Spark Quick Start
Scala:
more on RDD operations:
Self-Contained Applications:
SparkConf:
Python:
more on RDD operations:
Self-Contained Applications:
Spark Programming Guide
参考: http://spark.apache.org/docs/latest/programming-guide.html
Scala:
more on RDD operations:
Self-Contained Applications:
SparkConf:
Python:
more on RDD operations:
Self-Contained Applications:
参考: http://spark.apache.org/docs/latest/programming-guide.html
start Master:
start Slave:
Connecting an Application to the Cluster:
Launching Spark Applications:
Resource Scheduling:
参考: http://spark.apache.org/docs/latest/running-on-mesos.html
Installing Mesos:
hadoop fs -put spark-2.0.1.tar.gz /path/to/spark-2.0.1.tar.gzmesos://host:5050 for a single-master Mesos cluster, or mesos://zk://host1:2181,host2:2181,host3:2181/mesos for a multi-master Mesos cluster using ZooKeeper.
|
|
Cluster Mode:
Cluster mode:
Client mode:
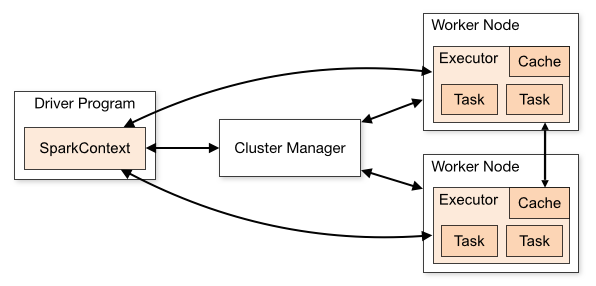
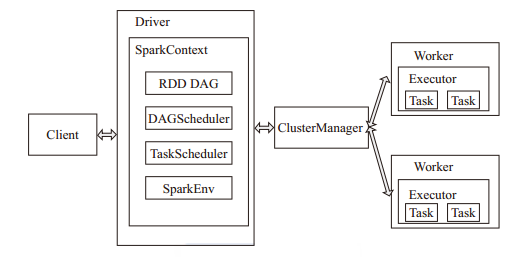
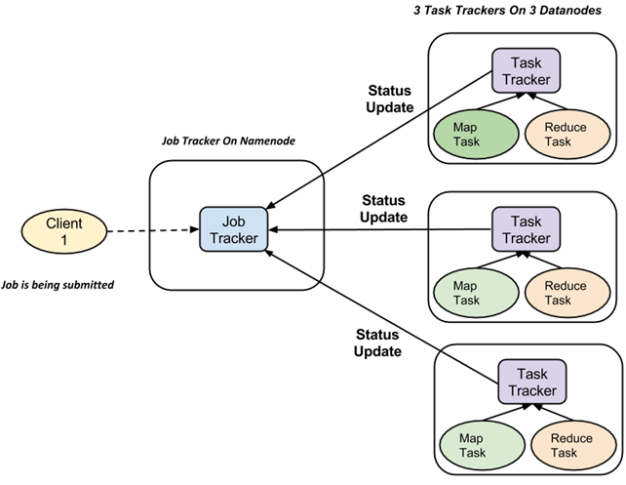
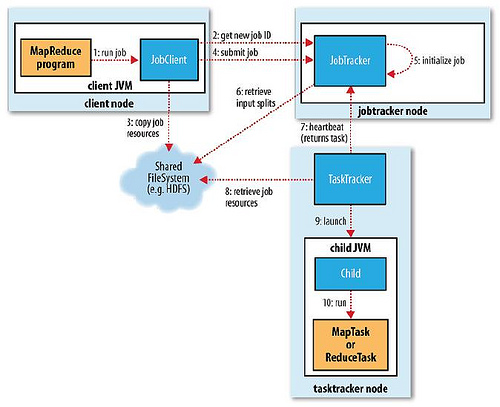
Spark架构采用了分布式计算中的Master-Slave模型。Master是对应集群中的含有Master进程的节点,Slave是集群中含有Worker进程的节点。Master作为整个集群的控制器,负责整个集群的正常运行;Worker相当于计算节点,接收主节点命令与进行状态汇报;Executor负责任务的执行;Client作为用户的客户端负责提交应用,Driver负责控制一个应用的执行。
Spark集群部署后,需要在主节点和从节点分别启动Master进程和Worker进程,对整个集群进行控制。在一个Spark应用的执行过程中,Driver和Worker是两个重要角色。Driver 程序是应用逻辑执行的起点,负责作业的调度,即Task任务的分发,而多个Worker用来管理计算节点和创建Executor并行处理任务。在执行阶段,Driver会将Task和Task所依赖的file和jar序列化后传递给对应的Worker机器,同时Executor对相应数据分区的任务进行处理。
参考: http://spark.apache.org/docs/latest/submitting-applications.html
可向 本地 或 集群 提交。
《Advanced Analytics with Spark. 2015.4》
Spark can integaration with Hadoop ecosystem.
Apache Cassandra是一套开源分布式NoSQL数据库系统。它最初由Facebook开发,用于储存收件箱等简单格式数据,集Google BigTable的数据模型与AmazonDynamo的完全分布式架构于一身。Facebook于2008将 Cassandra 开源,此后,由于Cassandra良好的可扩展性和性能,被Apple, Comcast,Instagram, Spotify, eBay, Rackspace, Netflix等知名网站所采用,成为了一种流行的分布式结构化数据存储方案。
在数据库排行榜“DB-Engines Ranking”中,Cassandra排在第七位,是非关系型数据库中排名第二高的(仅次于MongoDB)。
Cassandra使用了Google 设计的 BigTable的数据模型,Cassandra使用的是宽列存储模型(Wide Column Stores),每行数据由row key唯一标识之后,可以有最多20亿个列,每个列由一个column key标识,每个column key下对应若干value。这种模型可以理解为是一个二维的key-value存储,即整个数据模型被定义成一个类似 map< key1, map< key2,value>>的类型。
与BigTable和其模仿者HBase不同,Cassandra的数据并不存储在分布式文件系统如GFS或HDFS中,而是直接存于本地。与BigTable一样,Cassandra也是日志型数据库,即把新写入的数据存储在内存的Memtable中并通过磁盘中的CommitLog来做持久化,内存填满后将数据按照key的顺序写进一个只读文件SSTable中,每次读取数据时将所有SSTable和内存中的数据进行查找和合并。这种系统的特点是写入比读取更快,因为写入一条数据是顺序计入commit log中,不需要随机读取磁盘以及搜索。
HBase是Apache Hadoop项目的一个子项目,是Google BigTable的一个克隆,与Cassandra一样,它们都使用了BigTable的列族式的数据模型,但是:
1.启动服务
|
|
2.启动用户交互 实际启动cqlsh.py来进行交互
|
|
Cassandra Shell 命令: http://www.w3ii.com/cassandra/cassandra_shell_commands.html
|
|
创建使用Cqlsh一个密钥空间
http://www.w3ii.com/cassandra/cassandra_create_keyspace.html
使用Java创建API密钥空间一
http://www.w3ii.com/cassandra/cassandra_create_keyspace.html
改变使用Cqlsh KEYSPACE
http://www.w3ii.com/cassandra/cassandra_alter_keyspace.html
测试密钥空间的durable_writes属性
删除使用Cqlsh一个密钥空间
Cassandra创建表
Cassandra修改表
Cassandra删除表
Cassandra截断表
Cassandra创建索引
Cassandra DROP INDEX
Cassandra批量
Cassandra创建数据
Cassandra更新数据
Cassandra删除数据
Cassandra CQL集合
service 启动入口函数:
installation:
http://cassandra.apache.org/doc/latest/getting_started/installing.html
import源代码进Eclipse:
还有其它操作:
参考: http://storm.apache.org/releases/0.10.2/index.html
Storm是一个分布式计算框架,主要由Clojure编程语言编写。最初是由Nathan Marz[1]及其团队创建于BackType,[2]该项目在被Twitter取得后开源。[3]它使用用户创建的“管(spouts)”和“螺栓(bolts)”来定义信息源和操作来允许批量、分布式处理流式数据。
下载源代码并导入Eclipse: (可参考网页:http://ylzhj02.iteye.com/blog/2162197)

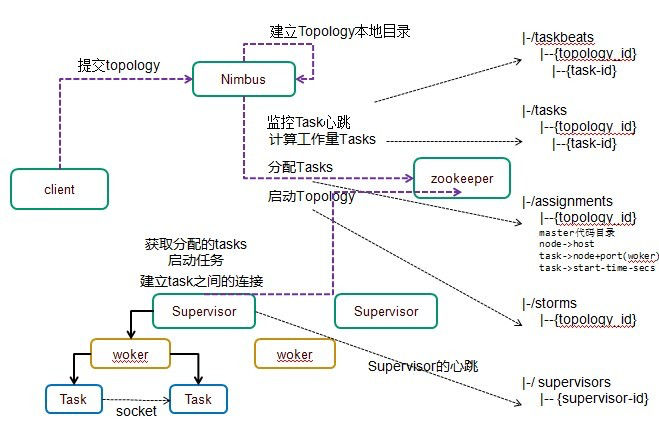
在Storm的集群里面有两种节点: 控制节点(master node)和工作节点(worker node)。控制节点上面运行一个叫Nimbus后台程序,它的作用类似Hadoop里面的JobTracker。Nimbus负责在集群里面分发代码,分配计算任务给机器,并且监控状态。
每一个工作节点上面运行一个叫做Supervisor的节点。Supervisor会监听分配给它那台机器的工作,根据需要启动/关闭工作进程。每一个工作进程执行一个topology的一个子集;一个运行的topology由运行在很多机器上的很多工作进程组成。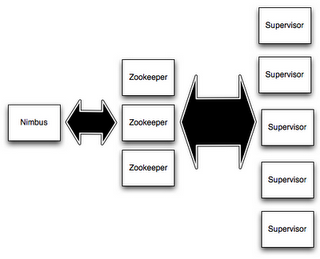

参考: https://cwiki.apache.org/confluence/display/Hive/Home
Apache Hive是一个建立在Hadoop架构之上的数据仓库。它能够提供数据的精炼,查询和分析。Apache Hive起初由Facebook开发。
hive是基于Hadoop的一个数据仓库工具,可以将结构化的数据文件映射为一张数据库表,并提供简单的SQL查询功能,可以将SQL语句转换为MapReduce任务进行运行。其优点是学习成本低,可以通过类SQL语句快速实现简单的MapReduce统计,不必开发专门的MapReduce应用,十分适合数据仓库的统计分析。
参考: http://doctuts.readthedocs.io/en/latest/hive.html
1.安装hadoop
|
|
2.启动hadoop hdfs文件系统
|
|
3.创建文件夹
|
|
4.第一次运行hive之前,需要设置schema
|
|
如果已经尝试运行hive出错之后,再去设置schema也会出错,需要做:
|
|
bin/hive —> hive script中会执行 bin/ext/*.sh, 以及 bin/ext/util/*.sh 命令
SERVICE_LIST 变量 在bin/ext/*.sh 中增加value;
SERVICE 变量在启动命令时 赋值; 默认 SERVICE=”cli”
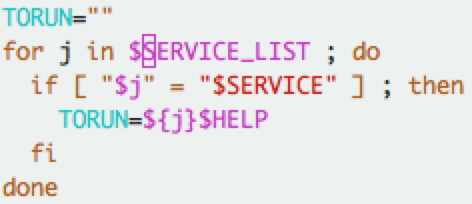
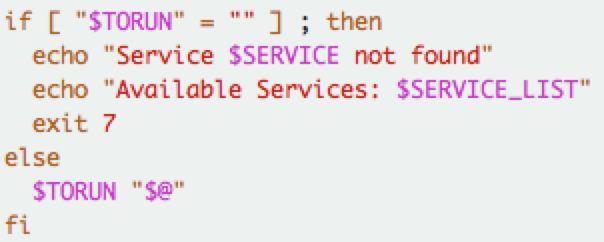
—> execHiveCmd 启动 java 源代码的入口 org.apache.hive.beeline.cli.HiveCli 或者 org.apache.hadoop.hive.cli.CliDriver
共同点:
区别:
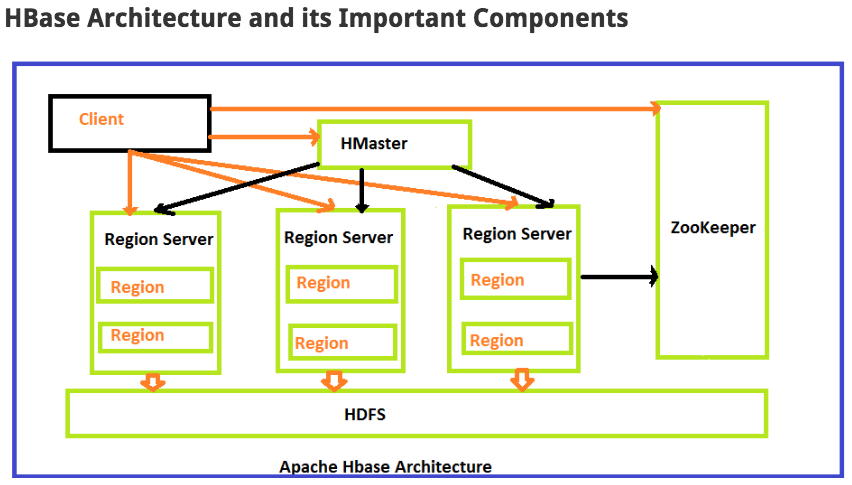
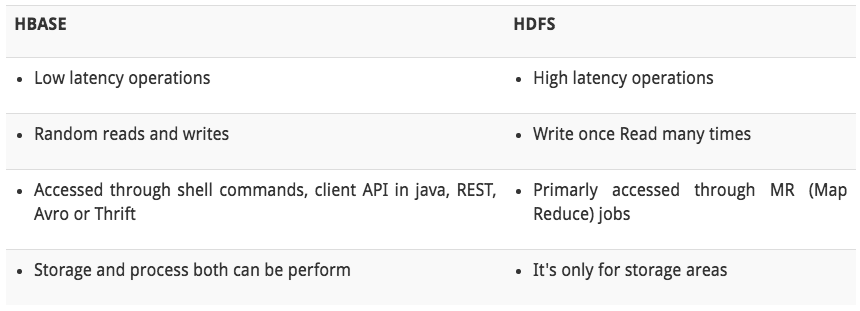
HBase 是一个开源的非关系型分布式数据库。 https://azure.microsoft.com/en-us/documentation/articles/hdinsight-hbase-tutorial-get-started-linux/
Hbase,Casandra,Bigtable都属于面向 列存储 的分布式存储系统。
HBase 基本单元:
列存储 vs 行存储: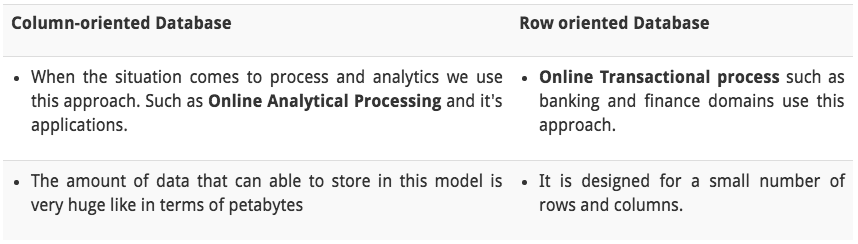
Hbase的优点:
1 列的可以动态增加,并且列为空就不存储数据,节省存储空间.
2 Hbase自动切分数据,使得数据存储自动具有水平scalability.
3 Hbase可以提供高并发读写操作的支持
Hbase的缺点:
1 不能支持条件查询,只支持按照Row key来查询.
2 暂时不能支持Master server的故障切换,当Master宕机后,整个存储系统就会挂掉.
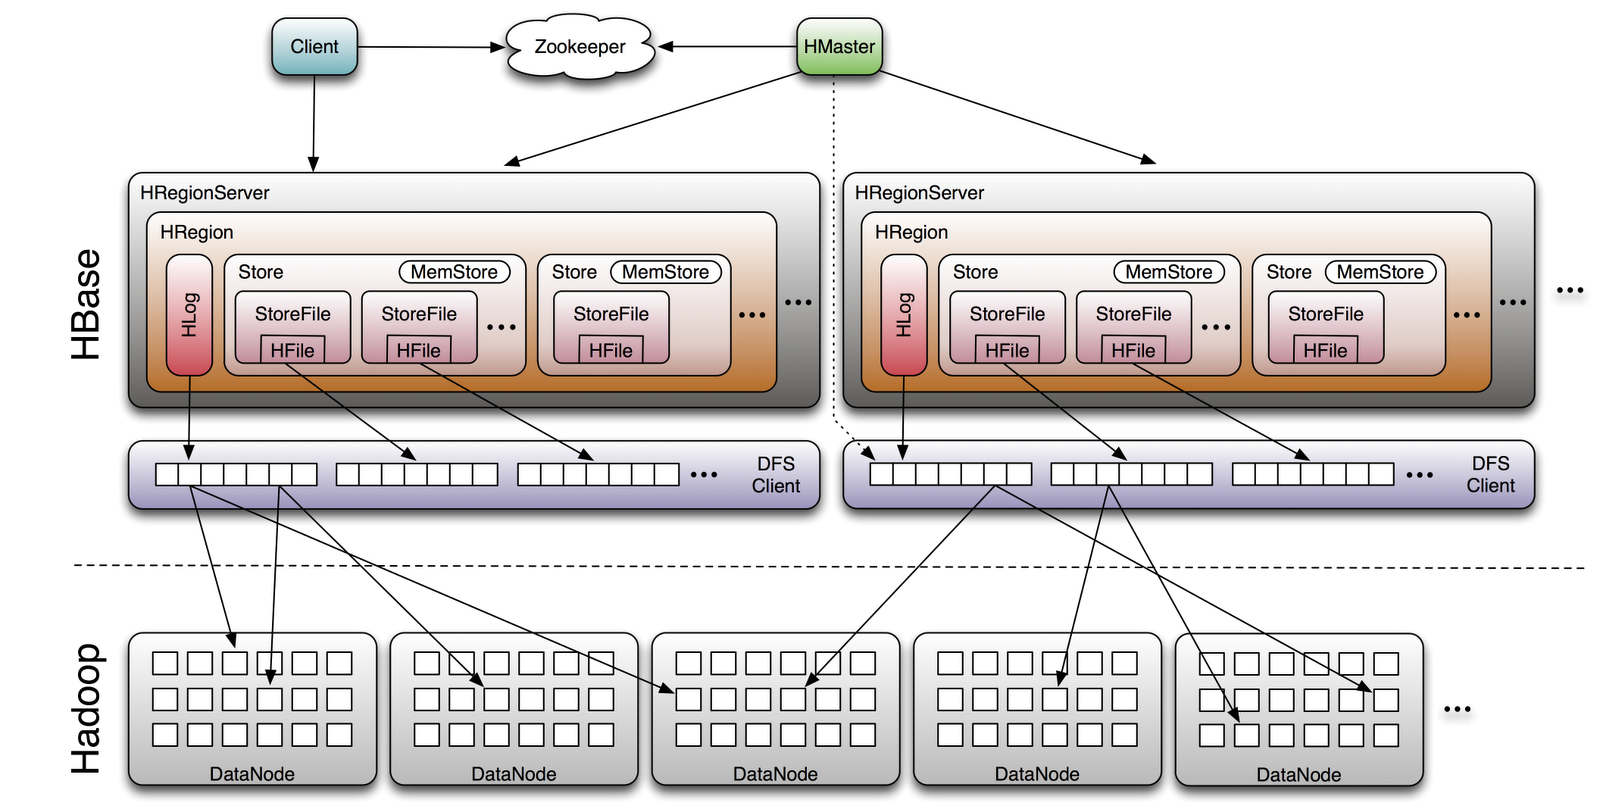

The Read and Write operations from Client into Hfile can be shown in below diagram.
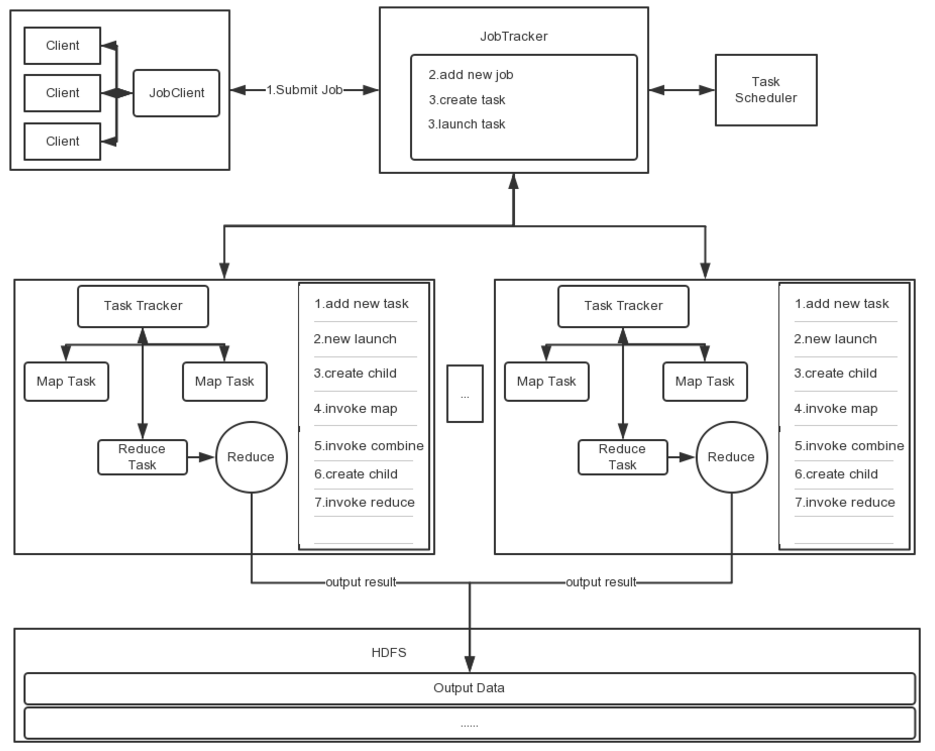
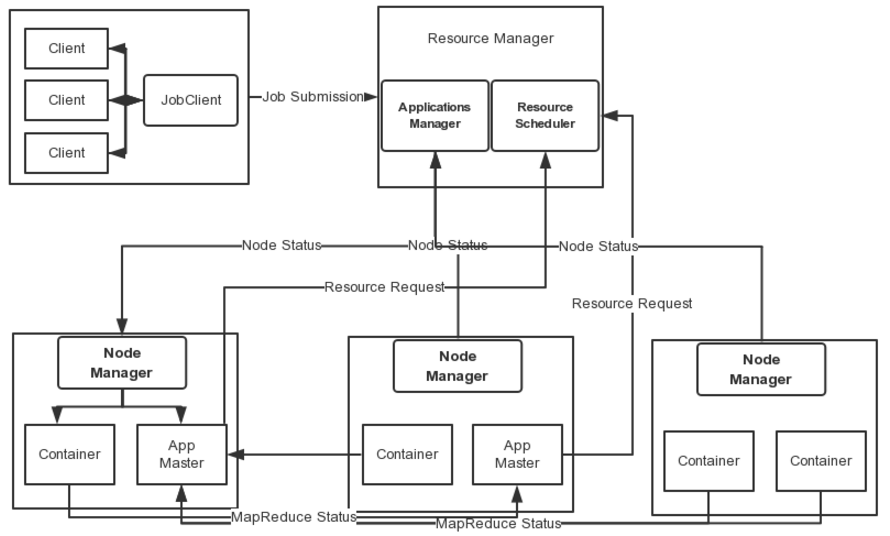
这些是Hadoop 源码阅读的入口位置,可以通过这些main函数看进源码实现。
|
|
|
|
|
|
|
|
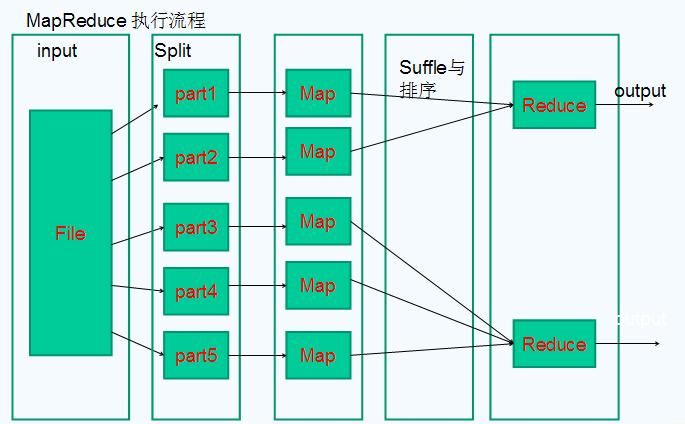
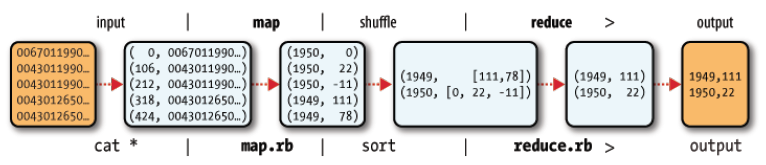
在hadoop中,map->combine->partition->shuffle->reduce,五个步骤的作用分别是什么?
摘自aboutyun社区,一些值得思考的问题
1.Shuffle的定义是什么?
2.map task与reduce task的执行是否在不同的节点上?
3.Shuffle产生的意义是什么?
4.每个map task都有一个内存缓冲区,存储着map的输出结果,当缓冲区快满的时候需要将缓冲区的数据该如何处理?
5.在map task执行时,它是如何读取HDFS的?
6.读取的Split与block的对应关系可能是什么?
7.MapReduce提供Partitioner接口,它的作用是什么?
8.溢写是在什么情况下发生?
9.溢写是为什么不影响往缓冲区写map结果的线程?
10.当溢写线程启动后,需要对这80MB空间内的key做排序(Sort)。排序是MapReduce模型默认的行为,这里的排序也是对谁的排序?
11.哪些场景才能使用Combiner呢?
12.Merge的作用是什么?
13.reduce中Copy过程采用是什么协议?
14.reduce中merge过程有几种方式,与map有什么相似之处?
15.溢写过程中如果有很多个key/value对需要发送到某个reduce端去,那么如何处理这些key/value值
Shuffle产生的意义是什么?
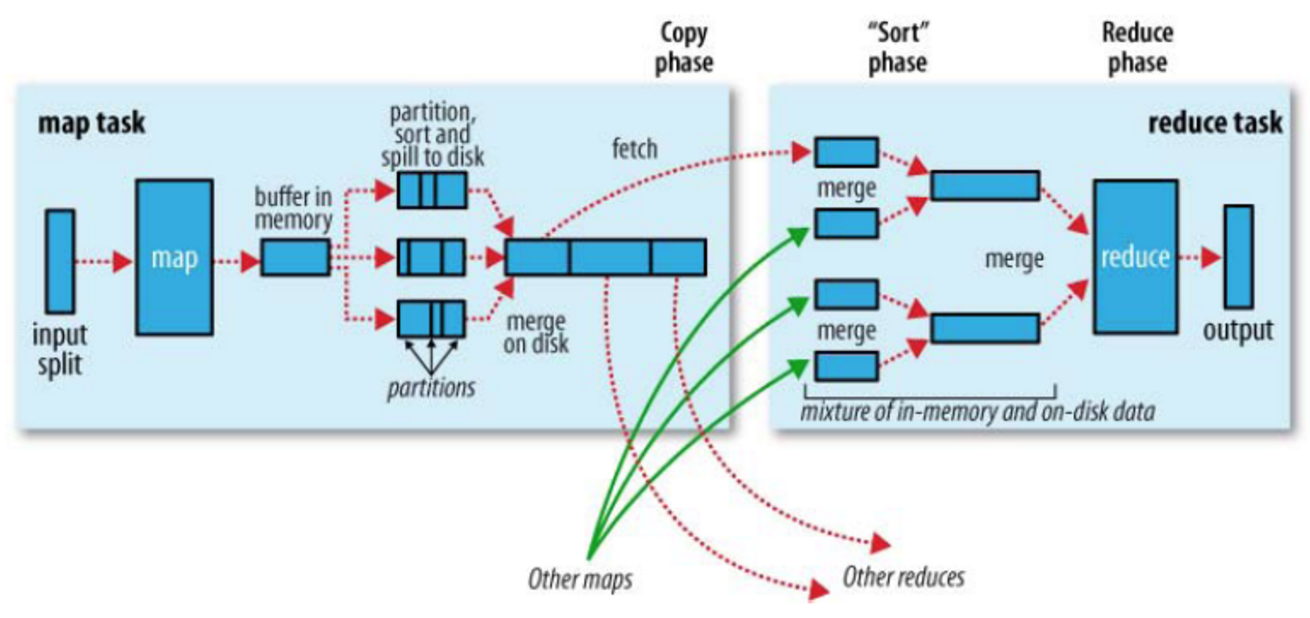
在Hadoop这样的集群环境中,大部分map task与reduce task的执行是在不同的节点上。当然很多情况下Reduce执行时需要跨节点去拉取其它节点上的map task结果。如果集群正在运行的job有很多,那么task的正常执行对集群内部的网络资源消耗会很严重。这种网络消耗是正常的,我们不能限制,能做的就是最大化地减少不必要的消耗。还有在节点内,相比于内存,磁盘IO对job完成时间的影响也是可观的。从最基本的要求来说,Shuffle过程的期望可以有:
完整地从map task端拉取数据到reduce 端。
在跨节点拉取数据时,尽可能地减少对带宽的不必要消耗。
减少磁盘IO对task执行的影响。
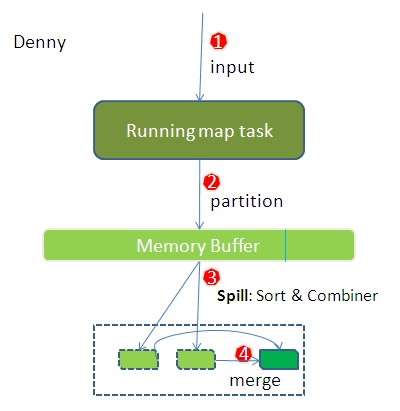
每个map task都有一个内存缓冲区,存储着map的输出结果,当缓冲区快满的时候需要将缓冲区的数据该如何处理?
每个map task都有一个内存缓冲区,存储着map的输出结果,当缓冲区快满的时候需要将缓冲区的数据以一个临时文件的方式存放到磁盘,当整个map task结束后再对磁盘中这个map task产生的所有临时文件做合并,生成最终的正式输出文件,然后等待reduce task来拉数据。
MapReduce提供Partitioner接口,它的作用是什么?
MapReduce提供Partitioner接口,它的作用就是根据key或value及reduce的数量来决定当前的这对输出数据最终应该交由哪个reduce task处理。默认对key hash后再以reduce task数量取模。默认的取模方式只是为了平均reduce的处理能力,如果用户自己对Partitioner有需求,可以订制并设置到job上。
什么是溢写?
在一定条件下将缓冲区中的数据临时写入磁盘,然后重新利用这块缓冲区。这个从内存往磁盘写数据的过程被称为Spill,中文可译为溢写。
溢写是为什么不影响往缓冲区写map结果的线程?
溢写线程启动时不应该阻止map的结果输出,所以整个缓冲区有个溢写的比例spill.percent。这个比例默认是0.8,也就是当缓冲区的数据已经达到阈值(buffer size spill percent = 100MB 0.8 = 80MB),溢写线程启动,锁定这80MB的内存,执行溢写过程。Map task的输出结果还可以往剩下的20MB内存中写,互不影响。
当溢写线程启动后,需要对这80MB空间内的key做排序(Sort)。排序是MapReduce模型默认的行为,这里的排序也是对谁的排序?
当溢写线程启动后,需要对这80MB空间内的key做排序(Sort)。排序是MapReduce模型默认的行为,这里的排序也是对序列化的字节做的排序。
溢写过程中如果有很多个key/value对需要发送到某个reduce端去,那么如何处理这些key/value值?
如果有很多个key/value对需要发送到某个reduce端去,那么需要将这些key/value值拼接到一块,减少与partition相关的索引记录。
哪些场景才能使用Combiner呢?
Combiner的输出是Reducer的输入,Combiner绝不能改变最终的计算结果。所以从我的想法来看,Combiner只应该用于那种Reduce的输入key/value与输出key/value类型完全一致,且不影响最终结果的场景。比如累加,最大值等。Combiner的使用一定得慎重,如果用好,它对job执行效率有帮助,反之会影响reduce的最终结果。
Merge的作用是什么?
最终磁盘中会至少有一个这样的溢写文件存在(如果map的输出结果很少,当map执行完成时,只会产生一个溢写文件),因为最终的文件只有一个,所以需要将这些溢写文件归并到一起,这个过程就叫做Merge
每个reduce task不断的通过什么协议从JobTracker那里获取map task是否完成的信息?
每个reduce task不断地通过RPC从JobTracker那里获取map task是否完成的信息
reduce中Copy过程采用是什么协议?
Copy过程,简单地拉取数据。Reduce进程启动一些数据copy线程(Fetcher),通过HTTP方式请求map task所在的TaskTracker获取map task的输出文件。
reduce中merge过程有几种方式?
merge有三种形式:1)内存到内存 2)内存到磁盘 3)磁盘到磁盘。默认情况下第一种形式不启用,让人比较困惑,是吧。当内存中的数据量到达一定阈值,就启动内存到磁盘的merge。与map 端类似,这也是溢写的过程,这个过程中如果你设置有Combiner,也是会启用的,然后在磁盘中生成了众多的溢写文件。第二种merge方式一直在运行,直到没有map端的数据时才结束,然后启动第三种磁盘到磁盘的merge方式生成最终的那个文件。
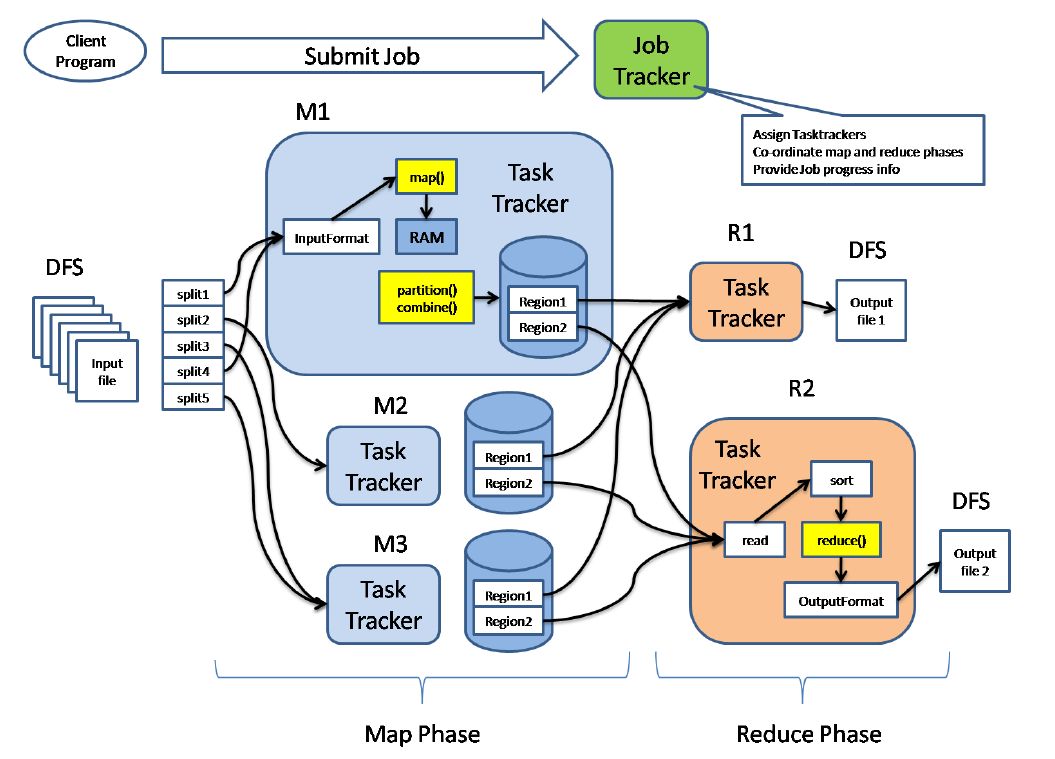
整个流程分了四步。简单些可以这样说,每个map task都有一个内存缓冲区,存储着map的输出结果,当缓冲区快满的时候需要将缓冲区的数据以一个临时文件的方式存放到磁盘,当整个map task结束后再对磁盘中这个map task产生的所有临时文件做合并,生成最终的正式输出文件,然后等待reduce task来拉数据。
当然这里的每一步都可能包含着多个步骤与细节,下面对细节来说明:
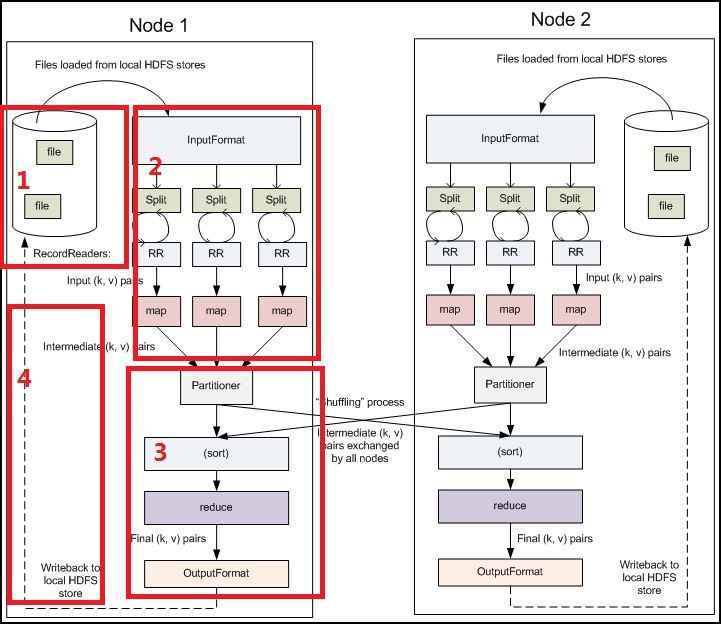
1.在map task执行时,它的输入数据来源于HDFS的block,当然在MapReduce概念中,map task只读取split。Split与block的对应关系可能是多对一,默认是一对一。在WordCount例子里,假设map的输入数据都是像“aaa”这样的字符串。
2.在经过mapper的运行后,我们得知mapper的输出是这样一个key/value对: key是“aaa”, value是数值1。因为当前map端只做加1的操作,在reduce task里才去合并结果集。这个job有多个reduce task,到底当前的“aaa”应该交由哪个reduce去做呢,是需要现在决定的。
MapReduce提供Partitioner接口,它的作用就是根据key或value及reduce的数量来决定当前的这对输出数据最终应该交由哪个reduce task处理。默认对key hash后再以reduce task数量取模。默认的取模方式只是为了平均reduce的处理能力,如果用户自己对Partitioner有需求,可以订制并设置到job上。
在WordCount例子中,“aaa”经过Partitioner后返回0,也就是这对值应当交由第一个reducer来处理。接下来,需要将数据写入内存缓冲区中,缓冲区的作用是批量收集map结果,减少磁盘IO的影响。我们的key/value对以及Partition的结果都会被写入缓冲区。当然写入之前,key与value值都会被序列化成字节数组。
当溢写线程启动后,需要对这80MB空间内的key做排序(Sort)。排序是MapReduce模型默认的行为,这里的排序也是对序列化的字节做的排序。
在这里我们可以想想,因为map task的输出是需要发送到不同的reduce端去,而内存缓冲区没有对将发送到相同reduce端的数据做合并,那么这种合并应该是体现是磁盘文件中的。从官方图上也可以看到写到磁盘中的溢写文件是对不同的reduce端的数值做过合并。所以溢写过程一个很重要的细节是,如果有很多个key/value对需要发送到某个reduce端去,那么需要将这些key/value值拼接到一块,减少与partition相关的索引记录。
在针对每个reduce端而合并数据时,有些数据可能像这样:“aaa”/1, “aaa”/1。对于WordCount例子,就是简单地统计单词出现的次数,如果在同一个map task的结果中有很多个像“aaa”一样出现多次的key,我们就应该把它们的值合并到一块,这个过程叫reduce也叫combine。但MapReduce的术语中,reduce只指reduce端执行从多个map task取数据做计算的过程。除reduce外,非正式地合并数据只能算做combine了。其实大家知道的,MapReduce中将Combiner等同于Reducer。
如果client设置过Combiner,那么现在就是使用Combiner的时候了。将有相同key的key/value对的value加起来,减少溢写到磁盘的数据量。Combiner会优化MapReduce的中间结果,所以它在整个模型中会多次使用。那哪些场景才能使用Combiner呢?从这里分析,Combiner的输出是Reducer的输入,Combiner绝不能改变最终的计算结果。所以从我的想法来看,Combiner只应该用于那种Reduce的输入key/value与输出key/value类型完全一致,且不影响最终结果的场景。比如累加,最大值等。Combiner的使用一定得慎重,如果用好,它对job执行效率有帮助,反之会影响reduce的最终结果。
至此,map端的所有工作都已结束,最终生成的这个文件也存放在TaskTracker够得着的某个本地目录内。每个reduce task不断地通过RPC从JobTracker那里获取map task是否完成的信息,如果reduce task得到通知,获知某台TaskTracker上的map task执行完成,Shuffle的后半段过程开始启动。
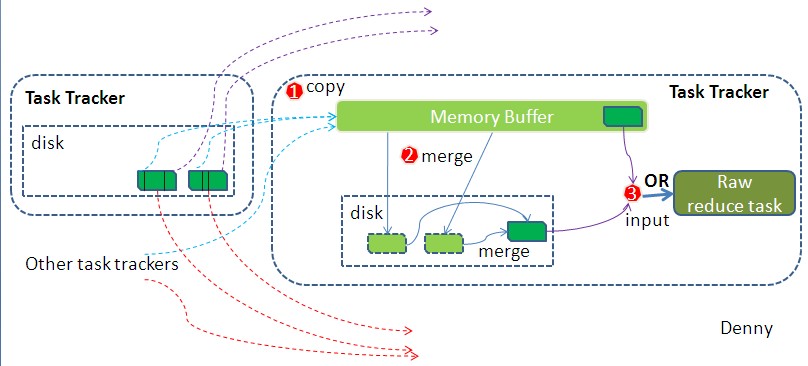
如map端的细节图,Shuffle在reduce端的过程也能用图上标明的三点来概括。当前reduce copy数据的前提是它要从JobTracker获得有哪些map task已执行结束。Reducer真正运行之前,所有的时间都是在拉取数据,做merge,且不断重复地在做。如前面的方式一样,下面也分段地描述reduce 端的Shuffle细节:
1.Copy过程,简单地拉取数据。Reduce进程启动一些数据copy线程(Fetcher),通过HTTP方式请求map task所在的TaskTracker获取map task的输出文件。因为map task早已结束,这些文件就归TaskTracker管理在本地磁盘中。
2.Merge阶段。这里的merge如map端的merge动作,只是数组中存放的是不同map端copy来的数值。Copy过来的数据会先放入内存缓冲区中,这里的缓冲区大小要比map端的更为灵活,它基于JVM的heap size设置,因为Shuffle阶段Reducer不运行,所以应该把绝大部分的内存都给Shuffle用。这里需要强调的是,merge有三种形式:1)内存到内存 2)内存到磁盘 3)磁盘到磁盘。默认情况下第一种形式不启用,让人比较困惑,是吧。当内存中的数据量到达一定阈值,就启动内存到磁盘的merge。与map 端类似,这也是溢写的过程,这个过程中如果你设置有Combiner,也是会启用的,然后在磁盘中生成了众多的溢写文件。第二种merge方式一直在运行,直到没有map端的数据时才结束,然后启动第三种磁盘到磁盘的merge方式生成最终的那个文件。
3.Reducer的输入文件。不断地merge后,最后会生成一个“最终文件”。为什么加引号?因为这个文件可能存在于磁盘上,也可能存在于内存中。对我们来说,当然希望它存放于内存中,直接作为Reducer的输入,但默认情况下,这个文件是存放于磁盘中的。当Reducer的输入文件已定,整个Shuffle才最终结束。然后就是Reducer执行,把结果放到HDFS上。
可以参考: http://hadoop.apache.org/docs/current/hadoop-project-dist/hadoop-common/FileSystemShell.html
The File System (FS) shell includes various shell-like commands that directly interact with the Hadoop Distributed File System (HDFS) as well as other file systems that Hadoop supports, such as Local FS, HFTP FS, S3 FS, and others. The FS shell is invoked by:
All FS shell commands take path URIs as arguments. The URI format is
For HDFS the scheme is hdfs , and for the Local FS the scheme is file. The scheme and authority are optional. If not specified, the default scheme specified in the configuration is used. An HDFS file or directory such as /parent/child can be specified as hdfs://namenodehost/parent/child or simply as /parent/child (given that your configuration is set to point to hdfs://namenodehost ).
args 可以为:
|
|
|
|
appendToFile
Usage: hadoop fs -appendToFile
Append single src, or multiple srcs from local file system to the destination file system. Also reads input from stdin and appends to destination file system.
Exit Code:
Returns 0 on success and 1 on error.
cat
Usage: hadoop fs -cat URI [URI …]
Copies source paths to stdout.
Example:
Exit Code:
Returns 0 on success and -1 on error.
checksum
Usage: hadoop fs -checksum URI
Returns the checksum information of a file.
Example:
chgrp
Usage: hadoop fs -chgrp [-R] GROUP URI [URI …]
Change group association of files. The user must be the owner of files, or else a super-user. Additional information is in the Permissions Guide.
Options
chmod
Usage: hadoop fs -chmod [-R]
Change the permissions of files. With -R, make the change recursively through the directory structure. The user must be the owner of the file, or else a super-user. Additional information is in the Permissions Guide.
Options
chown
Usage: hadoop fs -chown [-R] [OWNER][:[GROUP]] URI [URI ]
Change the owner of files. The user must be a super-user. Additional information is in the Permissions Guide.
Options
copyFromLocal
Usage: hadoop fs -copyFromLocal
Similar to put command, except that the source is restricted to a local file reference.
Options:
copyToLocal
Usage: hadoop fs -copyToLocal [-ignorecrc] [-crc] URI
Similar to get command, except that the destination is restricted to a local file reference.
count
Usage: hadoop fs -count [-q] [-h] [-v]
Count the number of directories, files and bytes under the paths that match the specified file pattern. The output columns with -count are: DIR_COUNT, FILE_COUNT, CONTENT_SIZE, PATHNAME
The output columns with -count -q are: QUOTA, REMAINING_QUATA, SPACE_QUOTA, REMAINING_SPACE_QUOTA, DIR_COUNT, FILE_COUNT, CONTENT_SIZE, PATHNAME
The -h option shows sizes in human readable format.
The -v option displays a header line.
Example:
Exit Code:
Returns 0 on success and -1 on error.
cp
Usage: hadoop fs -cp [-f] [-p | -p[topax]] URI [URI …]
Copy files from source to destination. This command allows multiple sources as well in which case the destination must be a directory.
‘raw.*’ namespace extended attributes are preserved if (1) the source and destination filesystems support them (HDFS only), and (2) all source and destination pathnames are in the /.reserved/raw hierarchy. Determination of whether raw.* namespace xattrs are preserved is independent of the -p (preserve) flag.
Options:
Example:
Exit Code:
Returns 0 on success and -1 on error.
createSnapshot
See HDFS Snapshots Guide.
deleteSnapshot
See HDFS Snapshots Guide.
df
Usage: hadoop fs -df [-h] URI [URI …]
Displays free space.
Options:
Example:
du
Usage: hadoop fs -du [-s] [-h] URI [URI …]
Displays sizes of files and directories contained in the given directory or the length of a file in case its just a file.
Options:
Example:
Exit Code: Returns 0 on success and -1 on error.
dus
Usage: hadoop fs -dus
Displays a summary of file lengths.
Note: This command is deprecated. Instead use hadoop fs -du -s.
expunge
Usage: hadoop fs -expunge
Empty the Trash. Refer to the HDFS Architecture Guide for more information on the Trash feature.
find
Usage: hadoop fs -find
Finds all files that match the specified expression and applies selected actions to them. If no path is specified then defaults to the current working directory. If no expression is specified then defaults to -print.
The following primary expressions are recognised:
-iname pattern
Evaluates as true if the basename of the file matches the pattern using standard file system globbing. If -iname is used then the match is case insensitive.
The following operators are recognised:
Example:
hadoop fs -find / -name test -print
Exit Code:
Returns 0 on success and -1 on error.
get
Usage: hadoop fs -get [-ignorecrc] [-crc]
Copy files to the local file system. Files that fail the CRC check may be copied with the -ignorecrc option. Files and CRCs may be copied using the -crc option.
Example:
Exit Code:
Returns 0 on success and -1 on error.
getfacl
Usage: hadoop fs -getfacl [-R]
Displays the Access Control Lists (ACLs) of files and directories. If a directory has a default ACL, then getfacl also displays the default ACL.
Options:
Examples:
Exit Code:
Returns 0 on success and non-zero on error.
getfattr
Usage: hadoop fs -getfattr [-R] -n name | -d [-e en]
Displays the extended attribute names and values (if any) for a file or directory.
Options:
Examples:
Exit Code:
Returns 0 on success and non-zero on error.
getmerge
Usage: hadoop fs -getmerge [-nl]
Takes a source directory and a destination file as input and concatenates files in src into the destination local file. Optionally -nl can be set to enable adding a newline character (LF) at the end of each file.
Examples:
Exit Code:
Returns 0 on success and non-zero on error.
help
Usage: hadoop fs -help
Return usage output.
ls
Usage: hadoop fs -ls [-d] [-h] [-R]
Options:
For a file ls returns stat on the file with the following format:
For a directory it returns list of its direct children as in Unix. A directory is listed as:
Files within a directory are order by filename by default.
Example:
Exit Code:
Returns 0 on success and -1 on error.
lsr
Usage: hadoop fs -lsr
Recursive version of ls.
Note: This command is deprecated. Instead use hadoop fs -ls -R
mkdir
Usage: hadoop fs -mkdir [-p]
Takes path uri’s as argument and creates directories.
Options:
Example:
Exit Code:
Returns 0 on success and -1 on error.
moveFromLocal
Usage: hadoop fs -moveFromLocal
Similar to put command, except that the source localsrc is deleted after it’s copied.
moveToLocal
Usage: hadoop fs -moveToLocal [-crc]
Displays a “Not implemented yet” message.
mv
Usage: hadoop fs -mv URI [URI …]
Moves files from source to destination. This command allows multiple sources as well in which case the destination needs to be a directory. Moving files across file systems is not permitted.
Example:
Exit Code:
Returns 0 on success and -1 on error.
put
Usage: hadoop fs -put
Copy single src, or multiple srcs from local file system to the destination file system. Also reads input from stdin and writes to destination file system.
Exit Code:
Returns 0 on success and -1 on error.
renameSnapshot
See HDFS Snapshots Guide.
rm
Usage: hadoop fs -rm [-f] [-r |-R] [-skipTrash] URI [URI …]
Delete files specified as args.
Options:
Example:
Exit Code:
Returns 0 on success and -1 on error.
rmdir
Usage: hadoop fs -rmdir [–ignore-fail-on-non-empty] URI [URI …]
Delete a directory.
Options:
Example:
rmr
Usage: hadoop fs -rmr [-skipTrash] URI [URI …]
Recursive version of delete.
Note: This command is deprecated. Instead use hadoop fs -rm -r
setfacl
Usage: hadoop fs -setfacl [-R] [-b |-k -m |-x
Sets Access Control Lists (ACLs) of files and directories.
Options:
Examples:
Exit Code:
Returns 0 on success and non-zero on error.
setfattr
Usage: hadoop fs -setfattr -n name [-v value] | -x name
Sets an extended attribute name and value for a file or directory.
Options:
Examples:
Exit Code:
Returns 0 on success and non-zero on error.
setrep
Usage: hadoop fs -setrep [-R] [-w]
Changes the replication factor of a file. If path is a directory then the command recursively changes the replication factor of all files under the directory tree rooted at path.
Options:
Example:
Exit Code:
Returns 0 on success and -1 on error.
stat
Usage: hadoop fs -stat [format]
Print statistics about the file/directory at
Example:
Exit Code: Returns 0 on success and -1 on error.
tail
Usage: hadoop fs -tail [-f] URI
Displays last kilobyte of the file to stdout.
Options:
Example:
Exit Code: Returns 0 on success and -1 on error.
test
Usage: hadoop fs -test -[defsz] URI
Options:
Example:
text
Usage: hadoop fs -text
Takes a source file and outputs the file in text format. The allowed formats are zip and TextRecordInputStream.
touchz
Usage: hadoop fs -touchz URI [URI …]
Create a file of zero length.
Example:
Exit Code: Returns 0 on success and -1 on error.
truncate
Usage: hadoop fs -truncate [-w]
Truncate all files that match the specified file pattern to the specified length.
Options:
Example:
usage
Usage: hadoop fs -usage command
Return the help for an individual command.
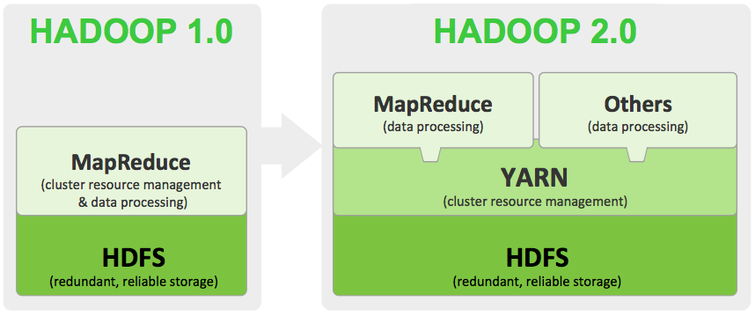
Hadoop HDFS有2个版本,1.x和2.x,两者之间还有比较大的差距:
网上资料中包含了10点差异,但是从技术/架构角度上来说,这3点变化是核心的。
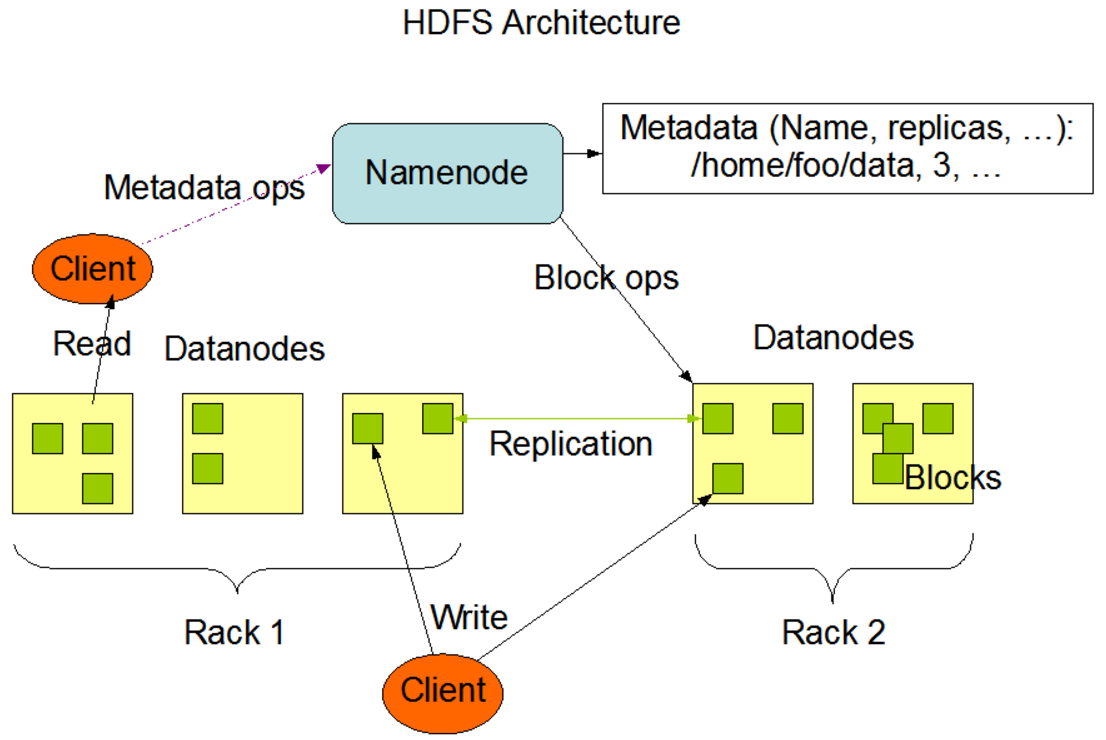
HDFS分布式文件系统中的管理者,负责管理文件系统的命名空间,集群配置信息,存储的复制。
并非NameNode的热备份,辅助NameNode,定期合并FSimage和EditLog。在NameNode失效的情况下,可以依据Secondary NameNode本地存储的FSimage和EditLog,恢复自身作为NameNode,但可能会有部分文件丢失,原因在于Secondary NameNode上的FSimage和EditLog并不是实时更新的。
DataNode是文件存储的节点,用于存放文件的Block,并且周期性的将Block信息发送给NameNode。值得提一句的是:HDFS中的Block大小设置很有讲究,通常为64M/128M,过小的Block会给NameNode带来巨大的管理压力,过大的Block可能会导致磁盘空间的浪费。
与NameNode交互,获取文件存放位置;再与DataNode交互,读取或写入数据;并且可以管理整个HDFS文件系统。
Hadoop HDFS 2.x 包含了3种安装模式:
欢迎浏览 SStar1314! 我的个人博客. 以及 SStar1314,我的github主页. 我的主页开通于2016年11月,一直想写点什么,两年多的时间,在Evernote上记录很多自己研究的东西,一直想开通一个博客,把Evernote上的东西搬上来,顺道梳理一下以前的知识点.
|
|
More info: 我的github主页
推荐一本书《云计算架构 技术与实践 第2版》,华为 顾炯炯 编著,一定要是第2版,这本书很全面,很赞!
列表: