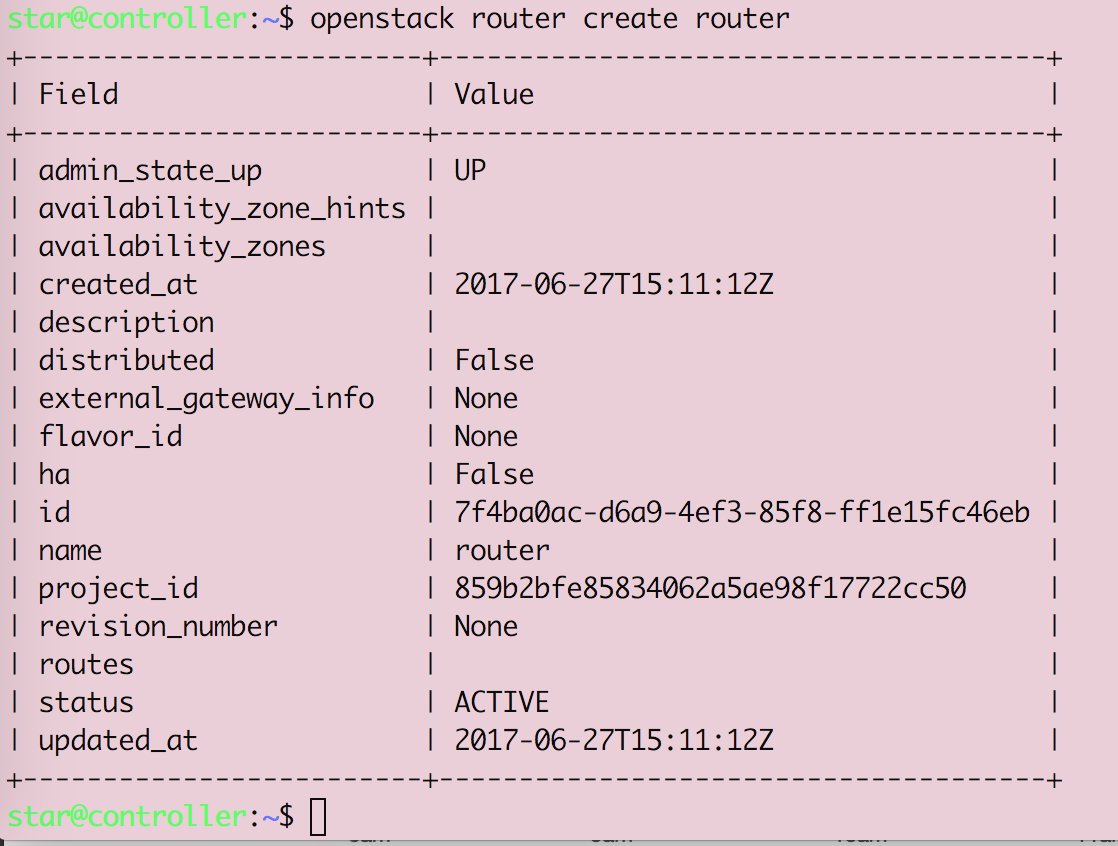
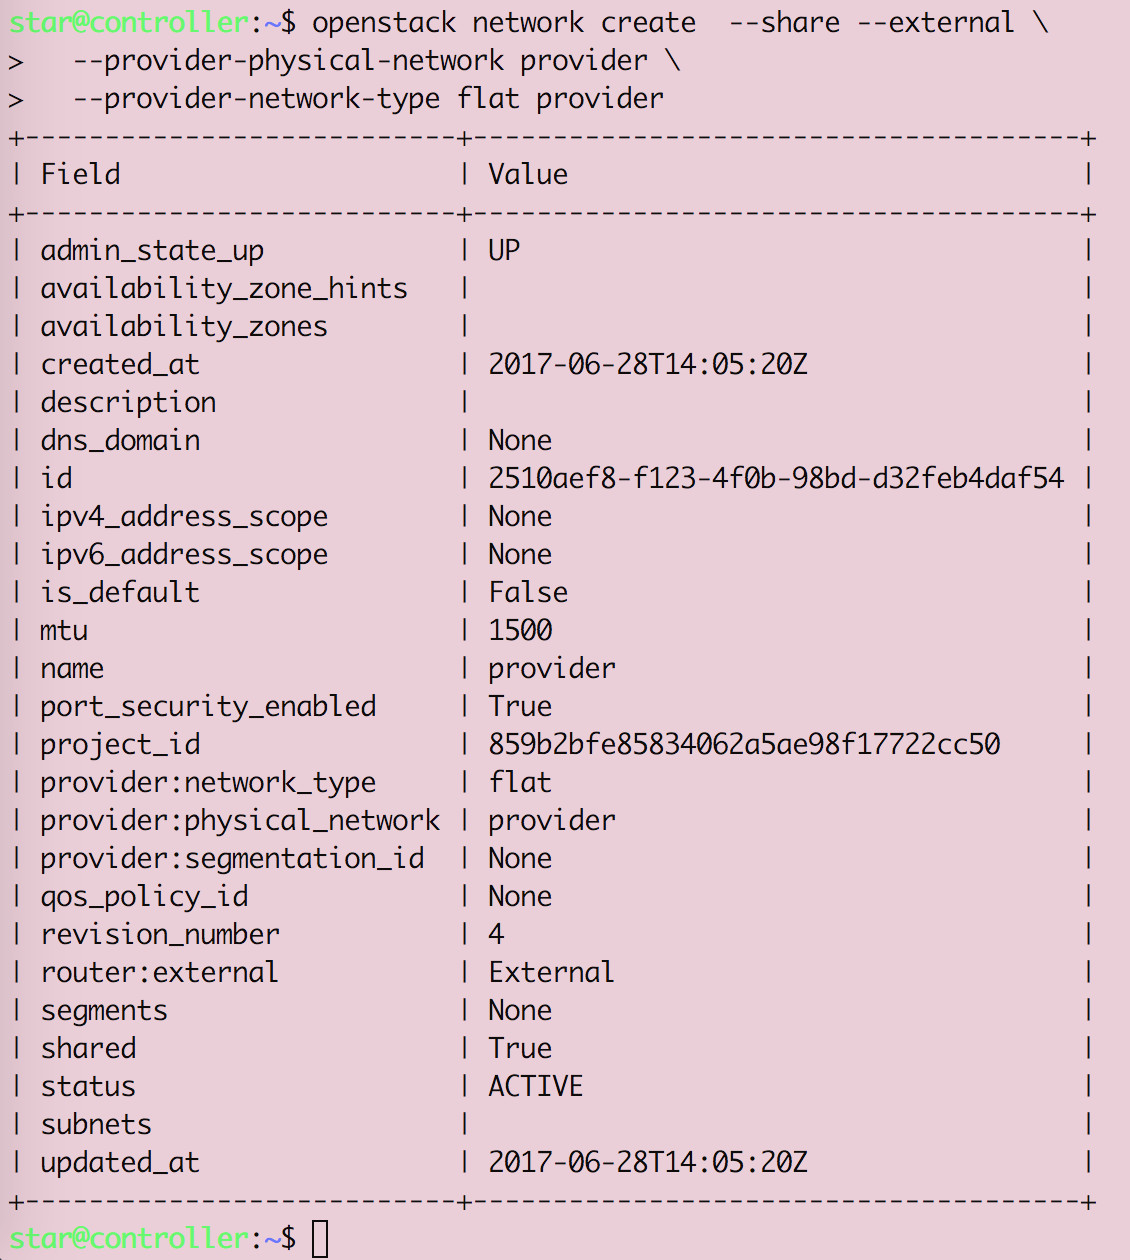
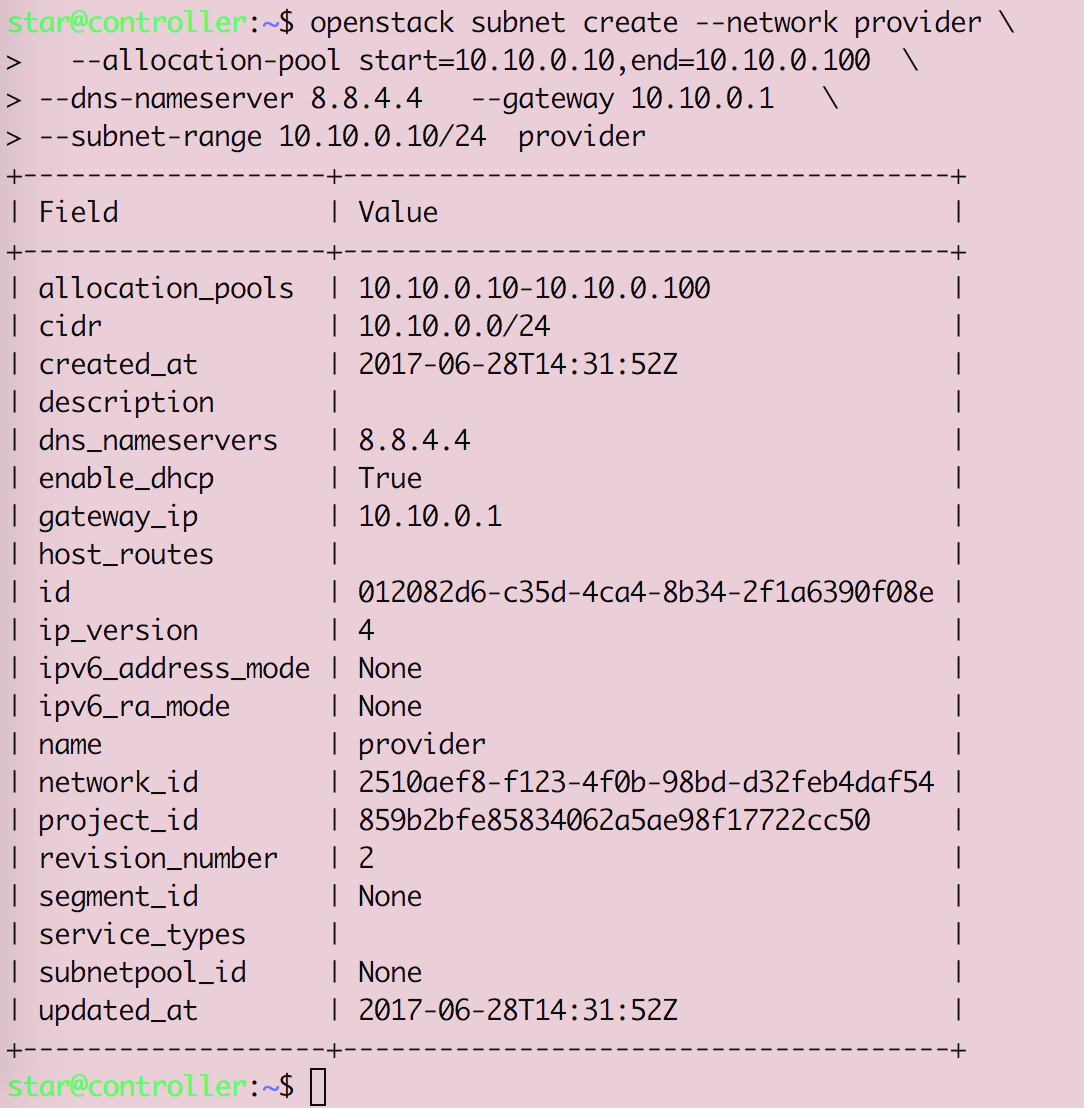
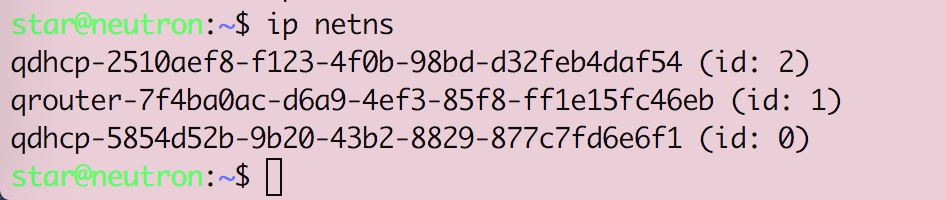
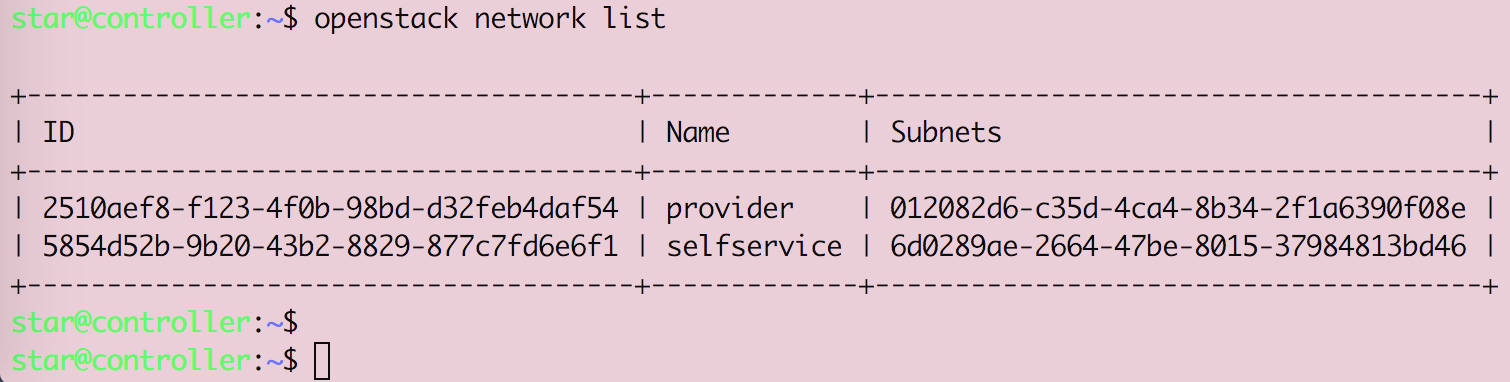
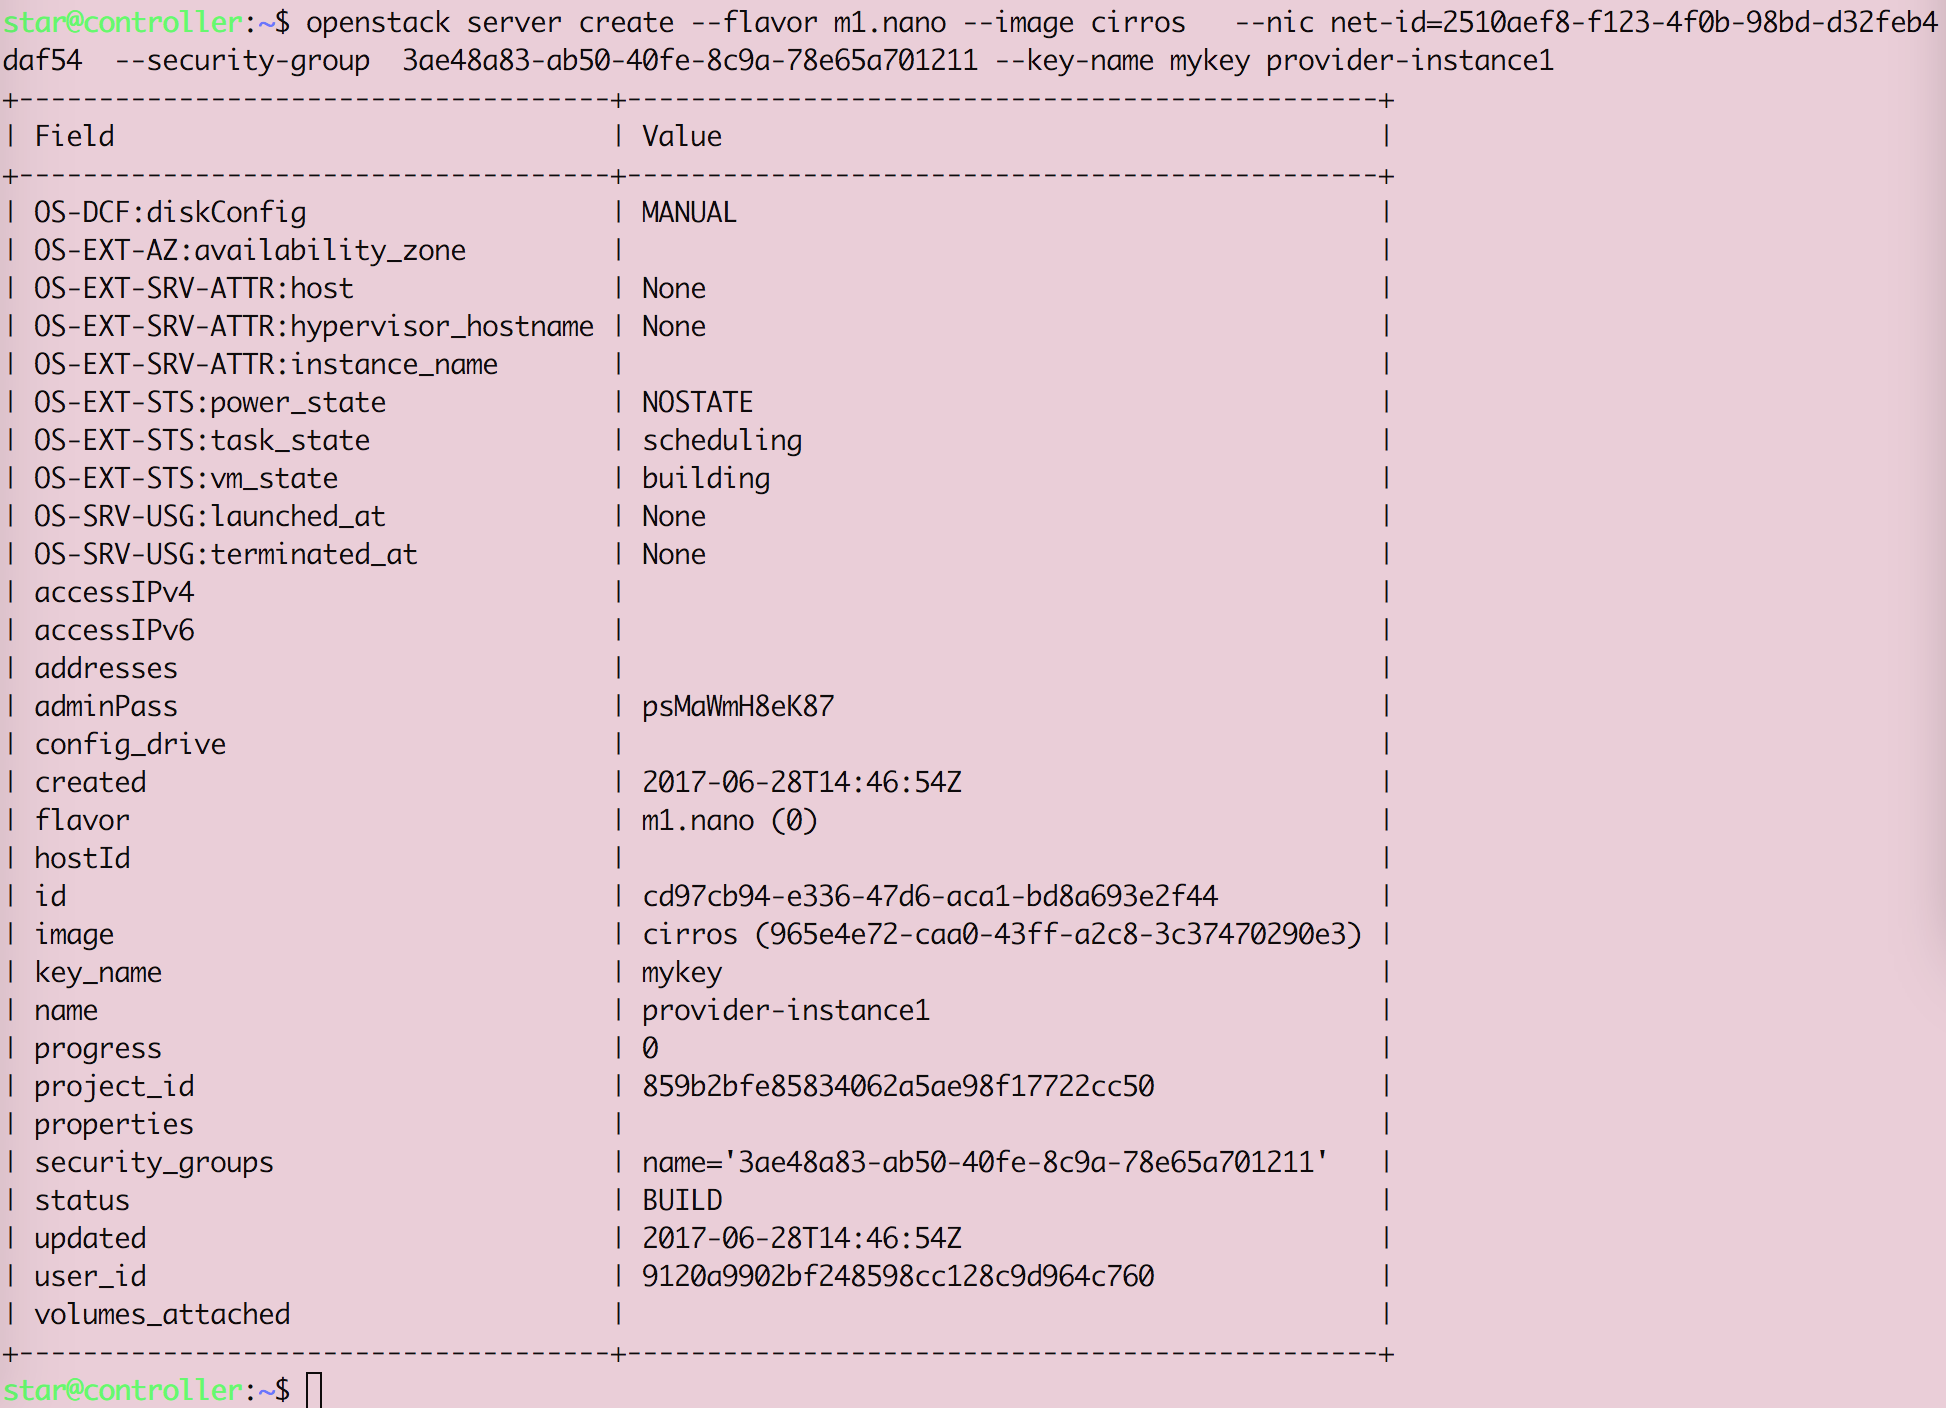
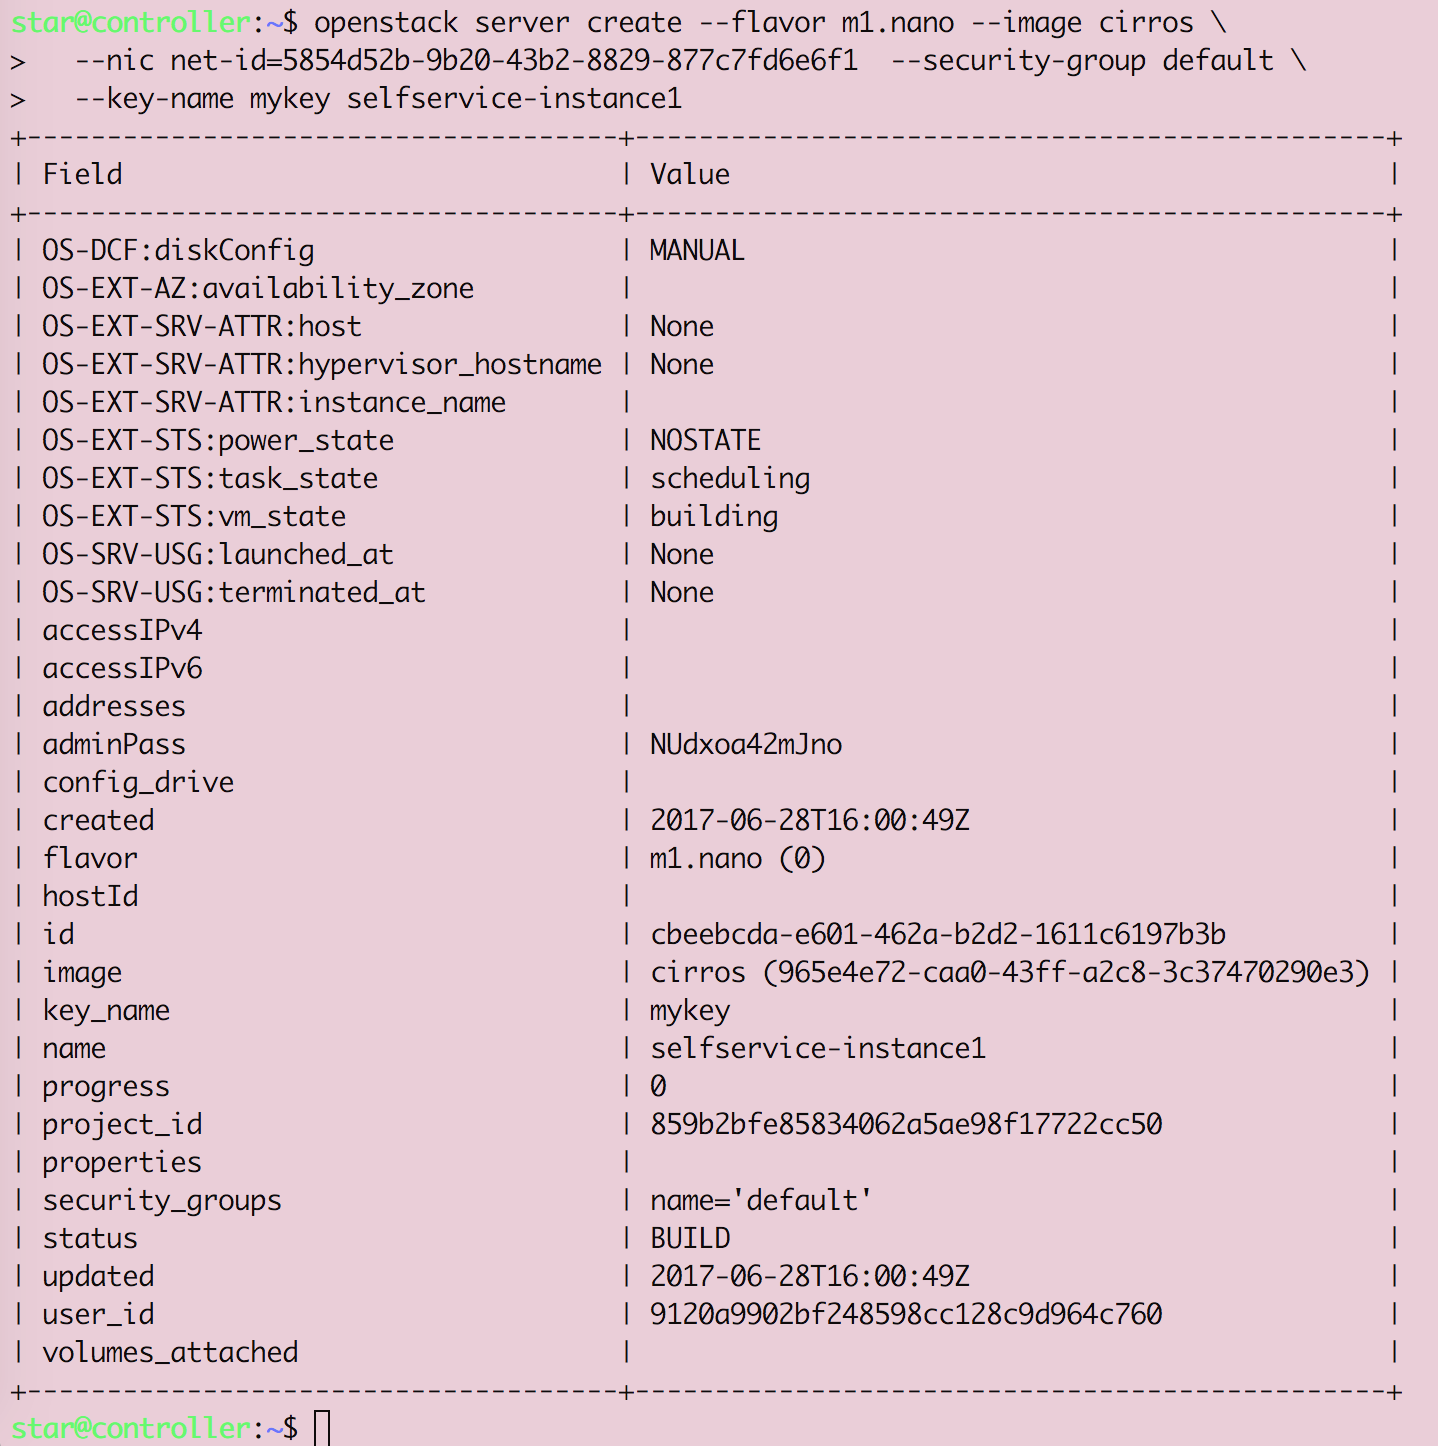
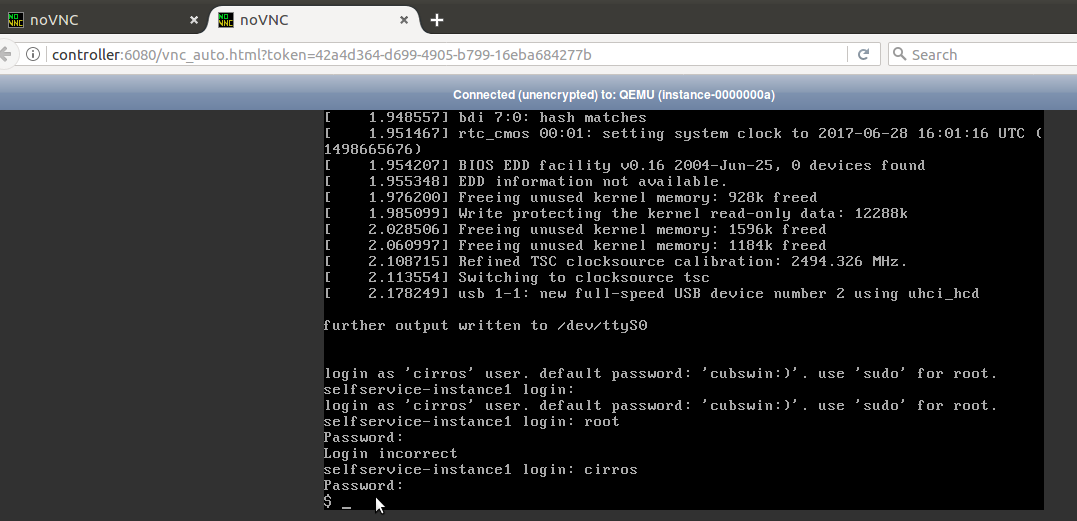
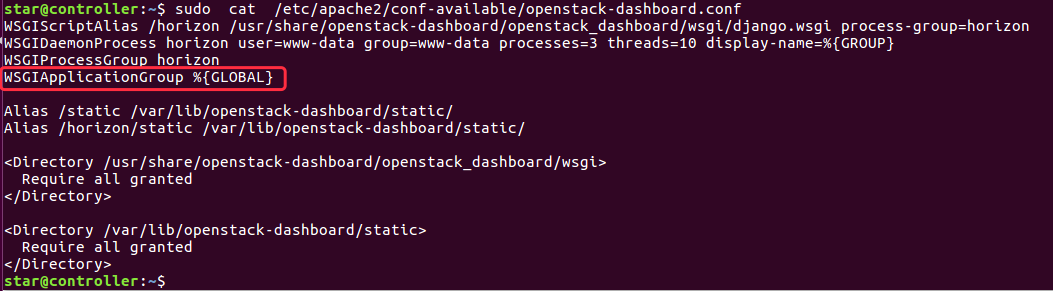
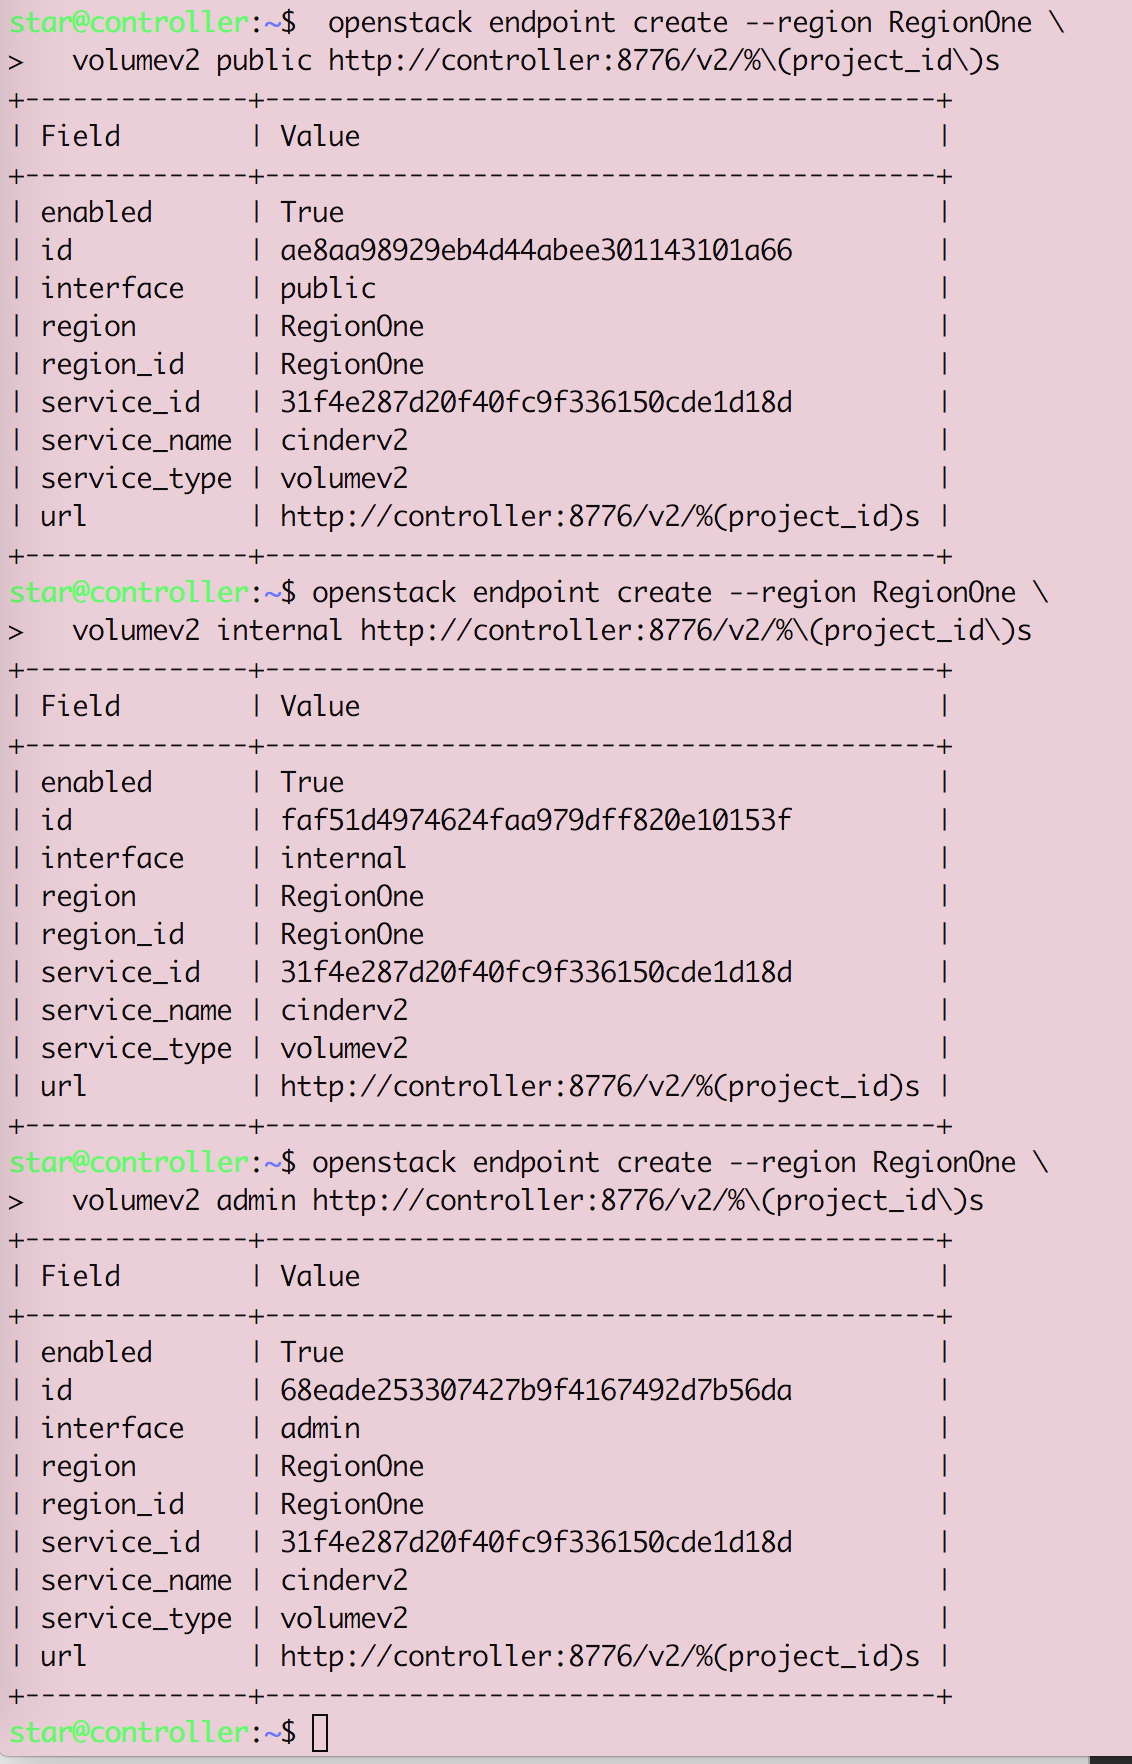
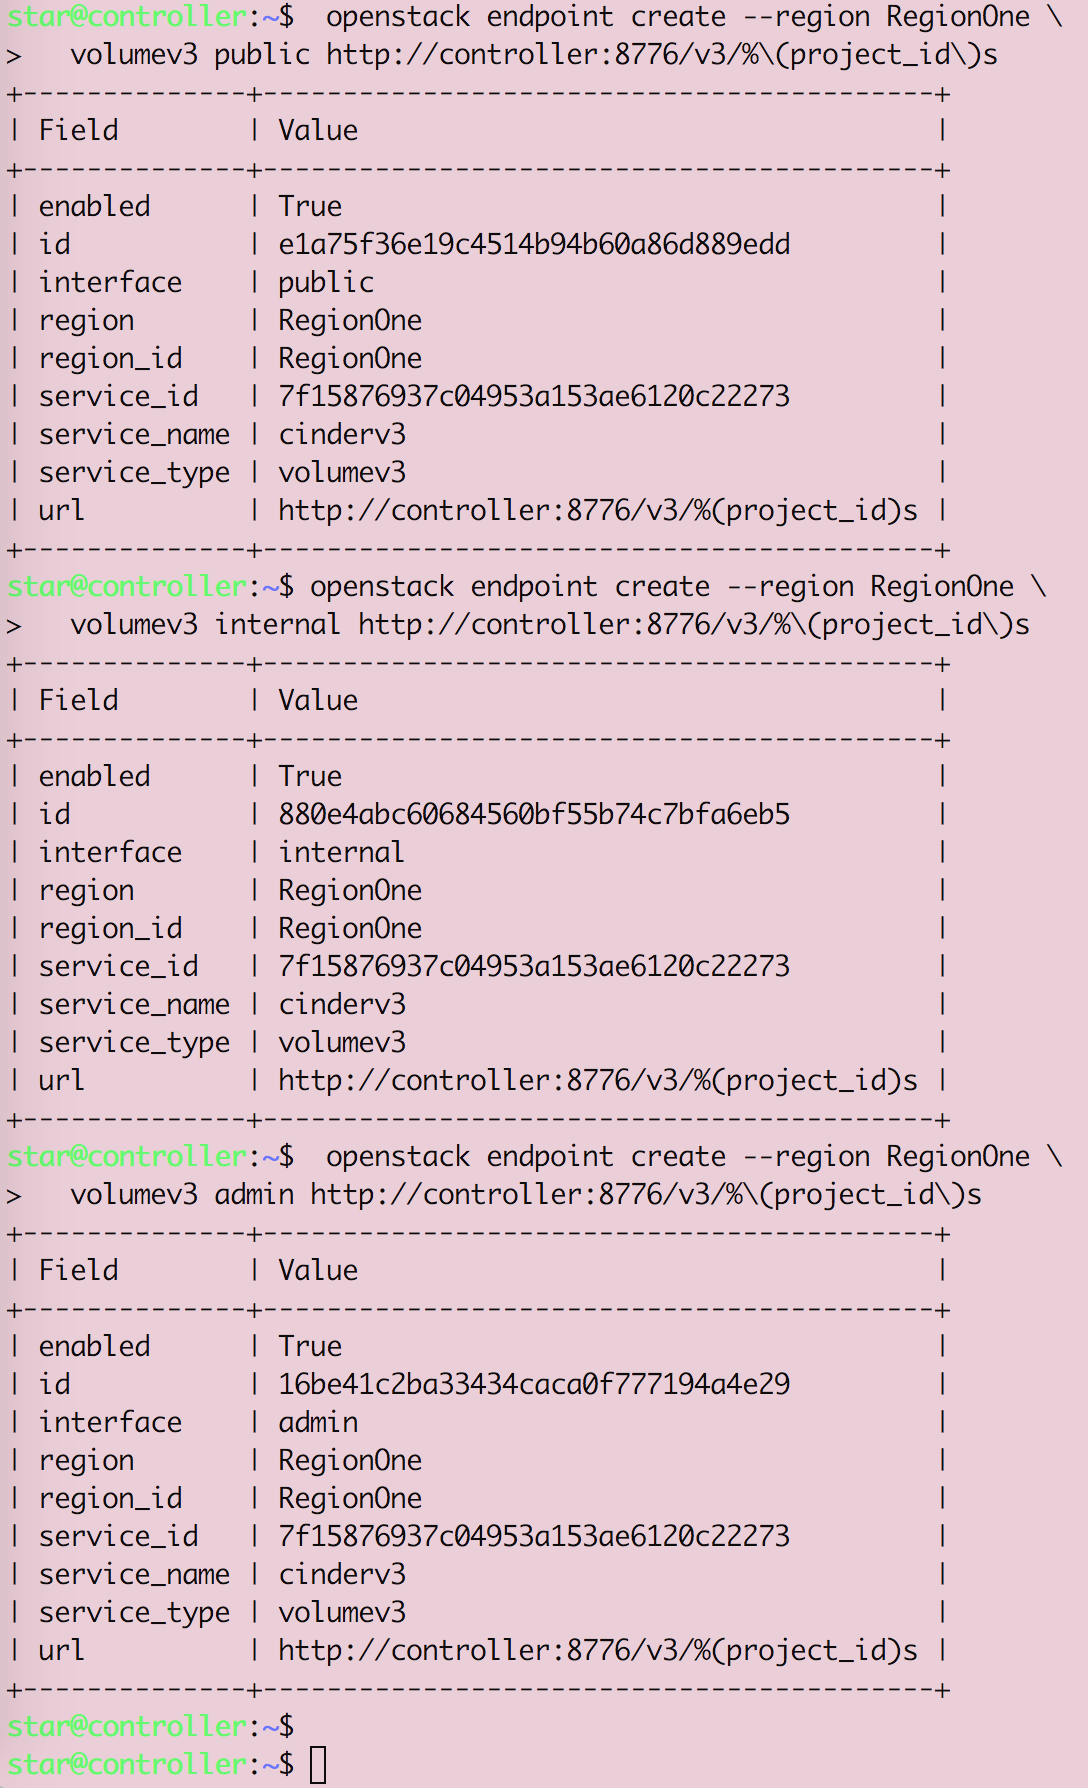
Openstack


Spring 框架的一个关键组件是面向方面的编程(AOP)框架。面向方面的编程需要把程序逻辑分解成不同的部分称为所谓的关注点。跨一个应用程序的多个点的功能被称为横切关注点,这些横切关注点在概念上独立于应用程序的业务逻辑。有各种各样的常见的很好的方面的例子,如日志记录、审计、声明式事务、安全性和缓存等。
Spring 方面可以使用下面提到的五种通知工作:
Database Driver:
|
|
1、execute方法:可以用于执行任何SQL语句,一般用于执行DDL语句;
2、update方法及batchUpdate方法:update方法用于执行新增、修改、删除等语句;batchUpdate方法用于执行批处理相关语句;
3、query方法及queryForXXX方法:用于执行查询相关语句;
4、call方法:用于执行存储过程、函数相关语句。
Spring 容器是 Spring 框架的核心。容器将创建对象,把它们连接在一起,配置它们,并管理他们的整个生命周期从创建到销毁。Spring 容器使用依赖注入(DI)来管理组成一个应用程序的组件。这些对象被称为 Spring Beans.
通过阅读配置元数据提供的指令,容器知道对哪些对象进行实例化,配置和组装。配置元数据可以通过 XML,Java 注释或 Java 代码来表示。下图是 Spring 如何工作的高级视图。 Spring IoC 容器利用 Java 的 POJO 类和配置元数据来生成完全配置和可执行的系统或应用程序。
它是最简单的容器,给 DI 提供了基本的支持,它用 org.springframework.beans.factory.BeanFactory 接口来定义。BeanFactory 或者相关的接口,如 BeanFactoryAware,InitializingBean,DisposableBean,在 Spring 中仍然存在具有大量的与 Spring 整合的第三方框架的反向兼容性的目的。
该容器添加了更多的企业特定的功能,例如从一个属性文件中解析文本信息的能力,发布应用程序事件给感兴趣的事件监听器的能力。该容器是由org.springframework.context.ApplicationContext 接口定义。
被称作 bean 的对象是构成应用程序的支柱也是由 Spring IoC 容器管理的。bean 是一个被实例化,组装,并通过 Spring IoC 容器所管理的对象。这些 bean 是由用容器提供的配置元数据创建的.
作用域 描述
singleton 该作用域将 bean 的定义的限制在每一个 Spring IoC 容器中的一个单一实例(默认)。
prototype 该作用域将单一 bean 的定义限制在任意数量的对象实例。
request 该作用域将 bean 的定义限制为 HTTP 请求。只在 web-aware Spring ApplicationContext 的上下文中有效。
session 该作用域将 bean 的定义限制为 HTTP 会话。 只在web-aware Spring ApplicationContext的上下文中有效。
global-session 该作用域将 bean 的定义限制为全局 HTTP 会话。只在 web-aware Spring ApplicationContext 的上下文中有效。
如果作用域设置为 singleton,那么 Spring IoC 容器刚好创建一个由该 bean 定义的对象的实例。该单一实例将存储在这种单例 bean 的高速缓存中,以及针对该 bean 的所有后续的请求和引用都返回缓存对象。
如果作用域设置为 prototype,那么每次特定的 bean 发出请求时 Spring IoC 容器就创建对象的新的 Bean 实例。一般说来,满状态的 bean 使用 prototype 作用域和没有状态的 bean 使用 singleton 作用域。
理解 Spring bean 的生命周期很容易。当一个 bean 被实例化时,它可能需要执行一些初始化使它转换成可用状态。同样,当 bean 不再需要,并且从容器中移除时,可能需要做一些清除工作。
org.springframework.beans.factory.InitializingBean 接口指定一个单一的方法:
void afterPropertiesSet() throws Exception;
org.springframework.beans.factory.DisposableBean 接口指定一个单一的方法:
void destroy() throws Exception;
如果你有太多具有相同名称的初始化或者销毁方法的 Bean,那么你不需要在每一个 bean 上声明初始化方法和销毁方法。框架使用 元素中的 default-init-method 和 default-destroy-method 属性提供了灵活地配置这种情况.
BeanPostProcessor 接口定义回调方法,你可以实现该方法来提供自己的实例化逻辑,依赖解析逻辑等。你也可以在 Spring 容器通过插入一个或多个 BeanPostProcessor 的实现来完成实例化,配置和初始化一个bean之后实现一些自定义逻辑回调方法。
ApplicationContext 会自动检测由 BeanPostProcessor 接口的实现定义的 bean,注册这些 bean 为后置处理器,然后通过在容器中创建 bean,在适当的时候调用它。12345678910111213package com.tutorialspoint;import org.springframework.beans.factory.config.BeanPostProcessor;import org.springframework.beans.BeansException;public class InitHelloWorld implements BeanPostProcessor { public Object postProcessBeforeInitialization(Object bean, String beanName) throws BeansException { System.out.println("BeforeInitialization : " + beanName); return bean; // you can return any other object as well } public Object postProcessAfterInitialization(Object bean, String beanName) throws BeansException { System.out.println("AfterInitialization : " + beanName); return bean; // you can return any other object as well }}
你需要注册一个在 AbstractApplicationContext 类中声明的关闭 hook 的 registerShutdownHook() 方法。它将确保正常关闭,并且调用相关的 destroy 方法。
为避免 Spring 注入的人为工作很麻烦, 可以设置 bean Autowiring, 搜寻 appContext 进行 自动注入。
可选值 功能说明
no 默认不使用autowiring。 必须显示的使用”“标签明确地指定bean。
byName 根据属性名自动装配。此选项将检查容器并根据名字查找与属性完全一致的bean,并将其与属性自动装配。
byType 如果容器中存在一个与指定属性类型相同的bean,那么将与该属性自动装配。如果存在多个该类型的bean,那么将会抛出异常,并指出不能使用byType方式进行自动装配。若没有找到相匹配的bean,则什么事都不发生,属性也不会被设置。如果你不希望这样,那么可以通过设置 dependency-check=”objects”让Spring抛出异常。
constructor 与byType的方式类似,不同之处在于它应用于构造器参数。如果在容器中没有找到与构造器参数类型一致的bean,那么将会抛出异常。
autodetect 通过bean类的自省机制(introspection)来决定是使用constructor还是byType方式进行自动装配。如果发现默认的构造器,那么将使用byType方式。
@Autowired注解注入
@Autowired往往用在类中注解注入,在配置xml需要配置才能使用@Autowired标识
@Autowired
@Qualifier(“teacher”)
private Teacher teacher;
public void setTeacher(Teacher teacher)
{this.teacher = teacher; }
beans标签设置default-autowire参数
在spring的配置文件中可以参照如下设置default-autowire参数
default-autowire="byName"
1    @Required
@Required 注解应用于 bean 属性的 setter 方法。

2    @Autowired
@Autowired 注解可以应用到 bean 属性的 setter 方法,非 setter 方法,构造函数和属性。

3    @Qualifier
通过指定确切的将被连线的 bean,@Autowired 和 @Qualifier 注解可以用来删除混乱。

4    JSR-250 Annotations
Spring 支持 JSR-250 的基础的注解,其中包括了 @Resource,@PostConstruct 和 @PreDestroy 注解。
Java 编写的 Web Application 为什么 能够监听一个port?
Web Application 都没有main函数, 那么该web从哪个入口函数启动的呢?
答案都是 依据 tomact 或 Websphere 这些server实现的, 以Tomcat为例,最重要的就是Tomcat的生命周期管理特性.

主要顺序: Bootstrap.java#main() —> init() —> load() —> start()
|
|
|
|

获取Mesos源码或者tar包:123$ wget http://www.apache.org/dist/mesos/0.28.2/mesos-0.28.2.tar.gz$ tar -zxf mesos-0.28.2.tar.gz$ git clone https://git-wip-us.apache.org/repos/asf/mesos.git
Mesos 安装(Ubuntu14.04):
$ sudo apt-get update
$ sudo apt-get install -y tar wget git
$ sudo apt-get install -y openjdk-7-jdk
$ sudo apt-get install -y autoconf libtool
$ sudo apt-get -y install build-essential python-dev libcurl4-nss-dev libsasl2-dev libsasl2-modules maven libapr1-dev libsvn-dev
Building Mesos(如果下载了tar.gz的Mesos包,此步可以被跳过):
$ cd mesos
$ ./bootstrap
$ mkdir build
$ cd build
$ ../configure
$ make
$ make check
$ make install
$ cd build
$ ./bin/mesos-master.sh —ip=$(ip) –work_dir=/var/lib/mesos
$ ./bin/mesos-agent.sh —master=$(master_ip):5050 –work_dir=/var/lib/mesos
$ ./src/test-framework –master=$(master_ip):5050
$ ./src/examples/java/test-framework $(master_ip):5050
$ ./src/examples/python/test-framework $(master_ip):5050
kube-controller-manager:负责执行各种控制器,目前有两类:
1.Kubernetes解压之后,进入kubernetes/server目录下,再次解压kubernetes-server-linux-amd64.tar.gz文件,再进入kubernetes/server/kubernetes/server/bin目录下,才能发现kubernetes对应的很多命令。
2.命令list:
Master:
./etcd > /var/log/etcd.log 2>&1 &
./kube-apiserver –insecure-bind-address=9.21.62.27 –insecure-port=8080 –service-cluster-ip-range=172.17.0.0/16 –etcd_servers=http://127.0.0.1:4001 –logtostderr=true –v=0 –log_dir=/home/kubernetes/logs/kube
./kube-controller-manager –v=0 –logtostderr=false –log_dir=/var/log/kube –master=9.21.62.27:8080
./kube-scheduler –master=’9.21.62.27:8080’ –v=0 –log_dir=/var/log/kube
Slave:
./kube-proxy –logtostderr=false –v=0 –master=http://9.21.62.27:8080
./kubelet –logtostderr=false –v=0 –allow-privileged=false –log_dir=/var/log/kube –address=0.0.0.0 –port=10250 –hostname_override=172.30.13.0 –api_servers=http://9.21.62.27:8080
Test: ./kubectl -s http://9.21.62.27:8080 get services
创建kubernetes Dashboard:./kubectl -s http://9.21.62.27:8080 create -f ../../../../cluster/addons/dashboard/dashboard-service.yaml –namespace=kube-system
访问地址为: http://9.21.62.27:8080/api/v1/proxy/namespaces/kube-system/services/kubernetes-dashboard/#/dashboard/
基于influxdb,grafana,heapster创建日志分析性能监控: ./kubectl -s http://9.21.62.27:8080 create -f ../../../../../kubernetes/cluster/addons/cluster-monitoring/influxdb/
显示cluster-info信息:
./kubectl -s http://9.21.62.27:8080 –namespace=”kube-system” cluster-info
Kubernetes master is running at http://9.21.62.27:8080
Heapster is running at http://9.21.62.27:8080/api/v1/proxy/namespaces/kube-system/services/heapster
Grafana is running at http://9.21.62.27:8080/api/v1/proxy/namespaces/kube-system/services/monitoring-grafana
InfluxDB is running at http://9.21.62.27:8080/api/v1/proxy/namespaces/kube-system/services/monitoring-influxdb
|
|
|
|
安装kubectl:12curl -sSL "http://storage.googleapis.com/kubernetes-release/release/v1.2.0/bin/linux/amd64/kubectl" > /usr/bin/kubectlchmod +x /usr/bin/kubectl
通过kubectl来配置本地kubernetes cluster:123kubectl config set-cluster test-doc --server=http://localhost:8080kubectl config set-context test-doc --cluster=test-dockubectl config use-context test-doc
Test本地Cluster:123kubectl get nodesRun an application:kubectl run nginx --image=nginx --port=80
|
|
2.需要安装VirtualBox环境:
ubuntu14.04: wget http://download.virtualbox.org/virtualbox/5.0.22/virtualbox-5.0_5.0.22-108108~Ubuntu~trusty_amd64.deb
Redhat 7.1: wget http://download.virtualbox.org/virtualbox/5.0.22/VirtualBox-5.0-5.0.22_108108_el7-1.x86_64.rpm
3.本地利用virtualbox搭建Kubernetes Cluster:123minikube startkubectl get pods --all-namespacesminikube dashboard
4.Test 搭建的环境:1kubectl get nodes
Requirements:
Docker 1.8.3+ : https://docs.docker.com/engine/installation/#installation
etcd : https://github.com/coreos/etcd/releases
go : https://golang.org/doc/install
etcd安装与Test:1234curl -L https://github.com/coreos/etcd/releases/download/v2.3.7/etcd-v2.3.7-linux-amd64.tar.gz -o etcd-v2.3.7-linux-amd64.tar.gztar xzvf etcd-v2.3.7-linux-amd64.tar.gzcd etcd-v2.3.7-linux-amd64./etcd
Open another terminal:1234567./etcdctl set mykey "this is awesome"./etcdctl get mykeydocker run --name etcd quay.io/coreos/etcd:v2.3.7docker exec etcd /etcdctl set foo barrkt run --volume data-dir,kind=host,source=/tmp --mds-register=false coreos.com/etcd:v2.3.7
容器 = Cgroup + Namespace + rootfs + 容器引擎
Docker 内核特性:
1.devices:设备权限控制。
2.cpuset:分配制定的CPU和内存节点。
3.cpu:控制CPU占用率。
4.cpuacct:统计CPU使用情况。
5.memory:限制内存的使用上限。
6.freezer:冻结(暂停)Cgroup中的进程。
7.net_cls:配合tc(traffic controller)限制网络带宽。
8.net_prio:设置进程的网络流量优先级。
9.huge_tlb:限制HugeTLB的使用。
10.perf_event:运行Perf工具基于Cgroup分组做性能检测。
1.IPC:隔离System V IPC和POSIX消息队列。
2.Network:隔离网络资源。
3.Mount:隔离文件系统挂载点。
4.PID:隔离进程ID。
5.UTS:隔离主机名和域名。
6.User:隔离用户ID和组ID。
Docker镜像:1234567891011docker imagesdocker images --help, docker images --filterdocker search image-namedockviz images -t 需要先调用:alias dockviz="docker run --rm -v /var/run/docker.sock:/var/run/docker.sock nate/dockviz"docker pull image-name 下载镜像docker save -o image-name.tar image-name 导出镜像docker load -i image-name.tar 导入镜像docker inspect image-name 查看容器和镜像详细信息docker commit 增量式的生产镜像docker history image-name 查看image layer纪录docker push 上传镜像 (docker push localhost:5000/official/ubuntu:14.04)
从image repositories中查看所有images信息: cat /var/lib/docker/image/aufs/repositories.json | python -m json.tool
启动Docker daemon,测试image layer之间的关系:docker daemon -D -s overlay -g /var/lib/docker/
|
|
|
|
|
|
refer: https://linuxcontainers.org/lxcfs/introduction/
refer : http://www.voidcn.com/blog/kc58236582/article/p-4505115.html

LXC is a userspace interface for the Linux kernel containment features.Through a powerful API and simple tools, it lets Linux users easily create and manage system or application containers.
online try: https://linuxcontainers.org/lxd/try-it/
|
|
|
|
|
|
神人 Fabrice Bellard最开始创立: https://bellard.org/
refer : https://wiki.archlinux.org/index.php/QEMU_(%E7%AE%80%E4%BD%93%E4%B8%AD%E6%96%87)
创建硬盘镜像1$ qemu-img create -f raw image_file 4G
执行 qemu-img 带 resize 选项调整硬盘驱动镜像的大小.它适用于 raw 和 qcow2. 例如, 增加镜像 10 GB 大小, 运行:1$ qemu-img resize disk_image +10G
qemu-system-* 程序 (例如 qemu-system-i386 或 qemu-system-x86_64, 取决于客户机架构)用来运行虚拟化的客户机. 用法是:1$ qemu-system-i386 options disk_image
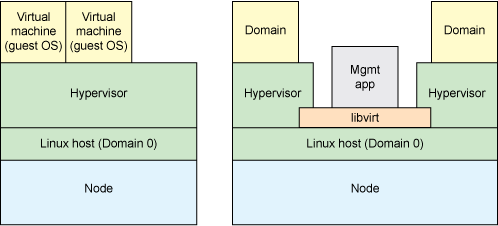
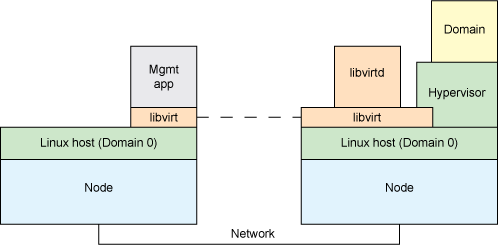
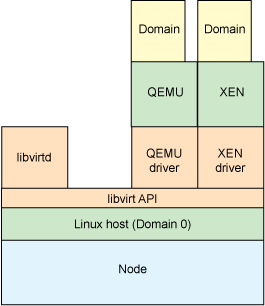
refer : https://wiki.archlinux.org/index.php/libvirt_(%E7%AE%80%E4%BD%93%E4%B8%AD%E6%96%87)
refer : https://www.ibm.com/developerworks/cn/linux/l-libvirt/index.html
mvn archetype:generate -DgroupId=com.mycompany.app -DartifactId=my-app -DarchetypeArtifactId=maven-archetype-quickstart -DinteractiveMode=false
groupId 指: project名称,及生成的war包名称。
artifactId 指: 不携带version的war包名称。
Build project:1mvn package
Maven Phases:
There are two other Maven lifecycles of note beyond the default list above
Detail usage: http://maven.apache.org/guides/getting-started/index.html
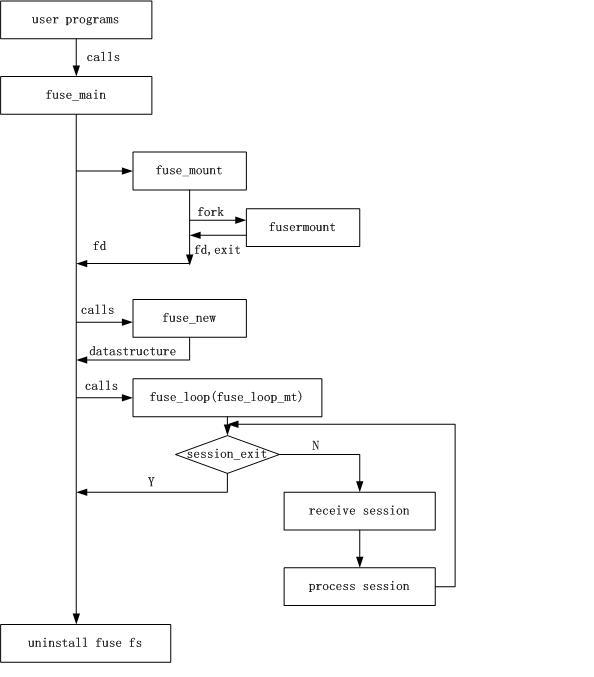
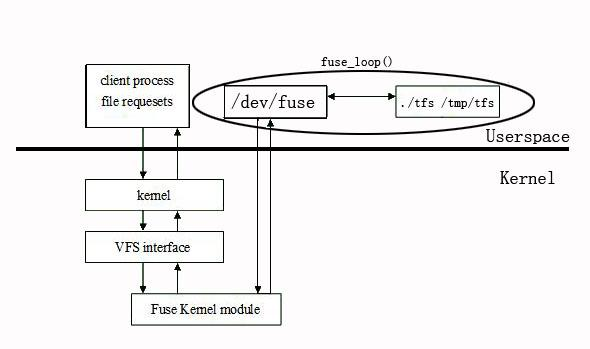
These are not really file systems; they allow access to file systems from an operating system standpoint.
main.c —> java.c(JLI_Launch函数) 文件:12345678910111213141516171819202122232425262728293031323334353637383940411. CreateExecutionEnvironment ==> GetJREPath + GetJVMPath GetJREPath : 获取 libjava.so 文件路径, 赋值给 jrepath . GetJVMPath : 获取 libjvm.dylib 文件路径, 赋值给 jvmpath.2. LoadJavaVM ==> libjvm = dlopen(jvmpath, RTLD_NOW + RTLD_GLOBAL); 加载链接文件 libjvm.dylib, 将以下3个函数指向链接文件中的函数 CreateJavaVM = (CreateJavaVM_t)dlsym(libjvm, "JNI_CreateJavaVM”); GetDefaultJavaVMInitArgs = (GetDefaultJavaVMInitArgs_t)dlsym(libjvm, "JNI_GetDefaultJavaVMInitArgs”); GetCreatedJavaVMs = (GetCreatedJavaVMs_t)dlsym(libjvm, "JNI_GetCreatedJavaVMs");3. SetJavaCommandLineProp ==> JLI_StrCCmp(str, "-Xss”) JLI_StrCCmp(str, "-Xmx”) JLI_StrCCmp(str, "-Xms”) jvm 堆栈大小4. JVMInit ==> ContinueInNewThread(InvocationFunctions* ifn) ==> ifn->GetDefaultJavaVMInitArgs(&args1_1); ==> ContinueInNewThread0(JavaMain, threadStackSize, (void*)&args); create new thread, and execute JavaMain function 主要函数: ==> JavaMain 函数 执行下列过程 JavaMain 函数 ==> RegisterThread() + InitializeJVM(&vm, &env, &ifn) { => (ifn->CreateJavaVM(pvm, (void **)penv, &args);) } + LoadMainClass(env, mode, what) + GetApplicationClass(env) + PostJVMInit(env, appClass, vm) (for GUI purpose) + mainID = (*env)->GetStaticMethodID(env, mainClass, "main”, "([Ljava/lang/String;)V”); + mainArgs = CreateApplicationArgs(env, argv, argc); build platform specific argument array + (*env)->CallStaticVoidMethod(env, mainClass, mainID, mainArgs); invoke main thread// InitializeJVM -> CreateJavaVM 函数ifn->CreateJavaVM(pvm, (void **)penv, &args); ==> 会调用 jni.cpp 的 JNI_CreateJavaVM 函数. JNI_CreateJavaVM ==> Threads::create_vm((JavaVMInitArgs*) args, &can_try_again);// java.c -> LoadMainClass(env, mode, what) 函数 , env 为load 进的 jni 函数环境. 通过class loader 取 load class 进来==> jclass cls = GetLauncherHelperClass(env); GetLuncherHelperClass 函数会: return helperClass = FindBootStrapClass(env, "sun/launcher/LauncherHelper”) load jni: JVM_FindClassFromBootLoader==> NULL_CHECK0(mid = (*env)->GetStaticMethodID(env, cls, "checkAndLoadMain", "(ZILjava/lang/String;)Ljava/lang/Class;")); ==> str = NewPlatformString(env, name); str 为组装后的java 启动 main函数类名==> result = (*env)->CallStaticObjectMethod(env, cls, mid, USE_STDERR, mode, str); 调用 LauncherHelper.java的checkAndLoadMain函数,返回 mainclass.// java.c -> GetApplicationClass(env) 函数 /* * In some cases when launching an application that needs a helper, e.g., a * JavaFX application with no main method, the mainClass will not be the * applications own main class but rather a helper class. To keep things * consistent in the UI we need to track and report the application main class. */==> jclass cls = GetLauncherHelperClass(env);==> NULL_CHECK0(mid = (*env)->GetStaticMethodID(env, cls, "getApplicationClass", "()Ljava/lang/Class;”));==> return (*env)->CallStaticObjectMethod(env, cls, mid); 调用 LauncherHelper.java的getApplicationClass函数,返回 appclass.
|
|
libjava.so
libjvm.so
See openjdk8/hotspot/src/share/vm/classfile/vmSymbols.hpp
|
|
publish -vs- subscribe
notifier_block 结构体123456struct notifier_block{ int (*notifier_call)(struct notifier_block *self, unsigned long, void *); struct notifier_block *next; int priority;};
注册函数: notifier_chain_register
网络相关的 chain: inetaddr_chain , inet6addr_chain , and netdev_chain.
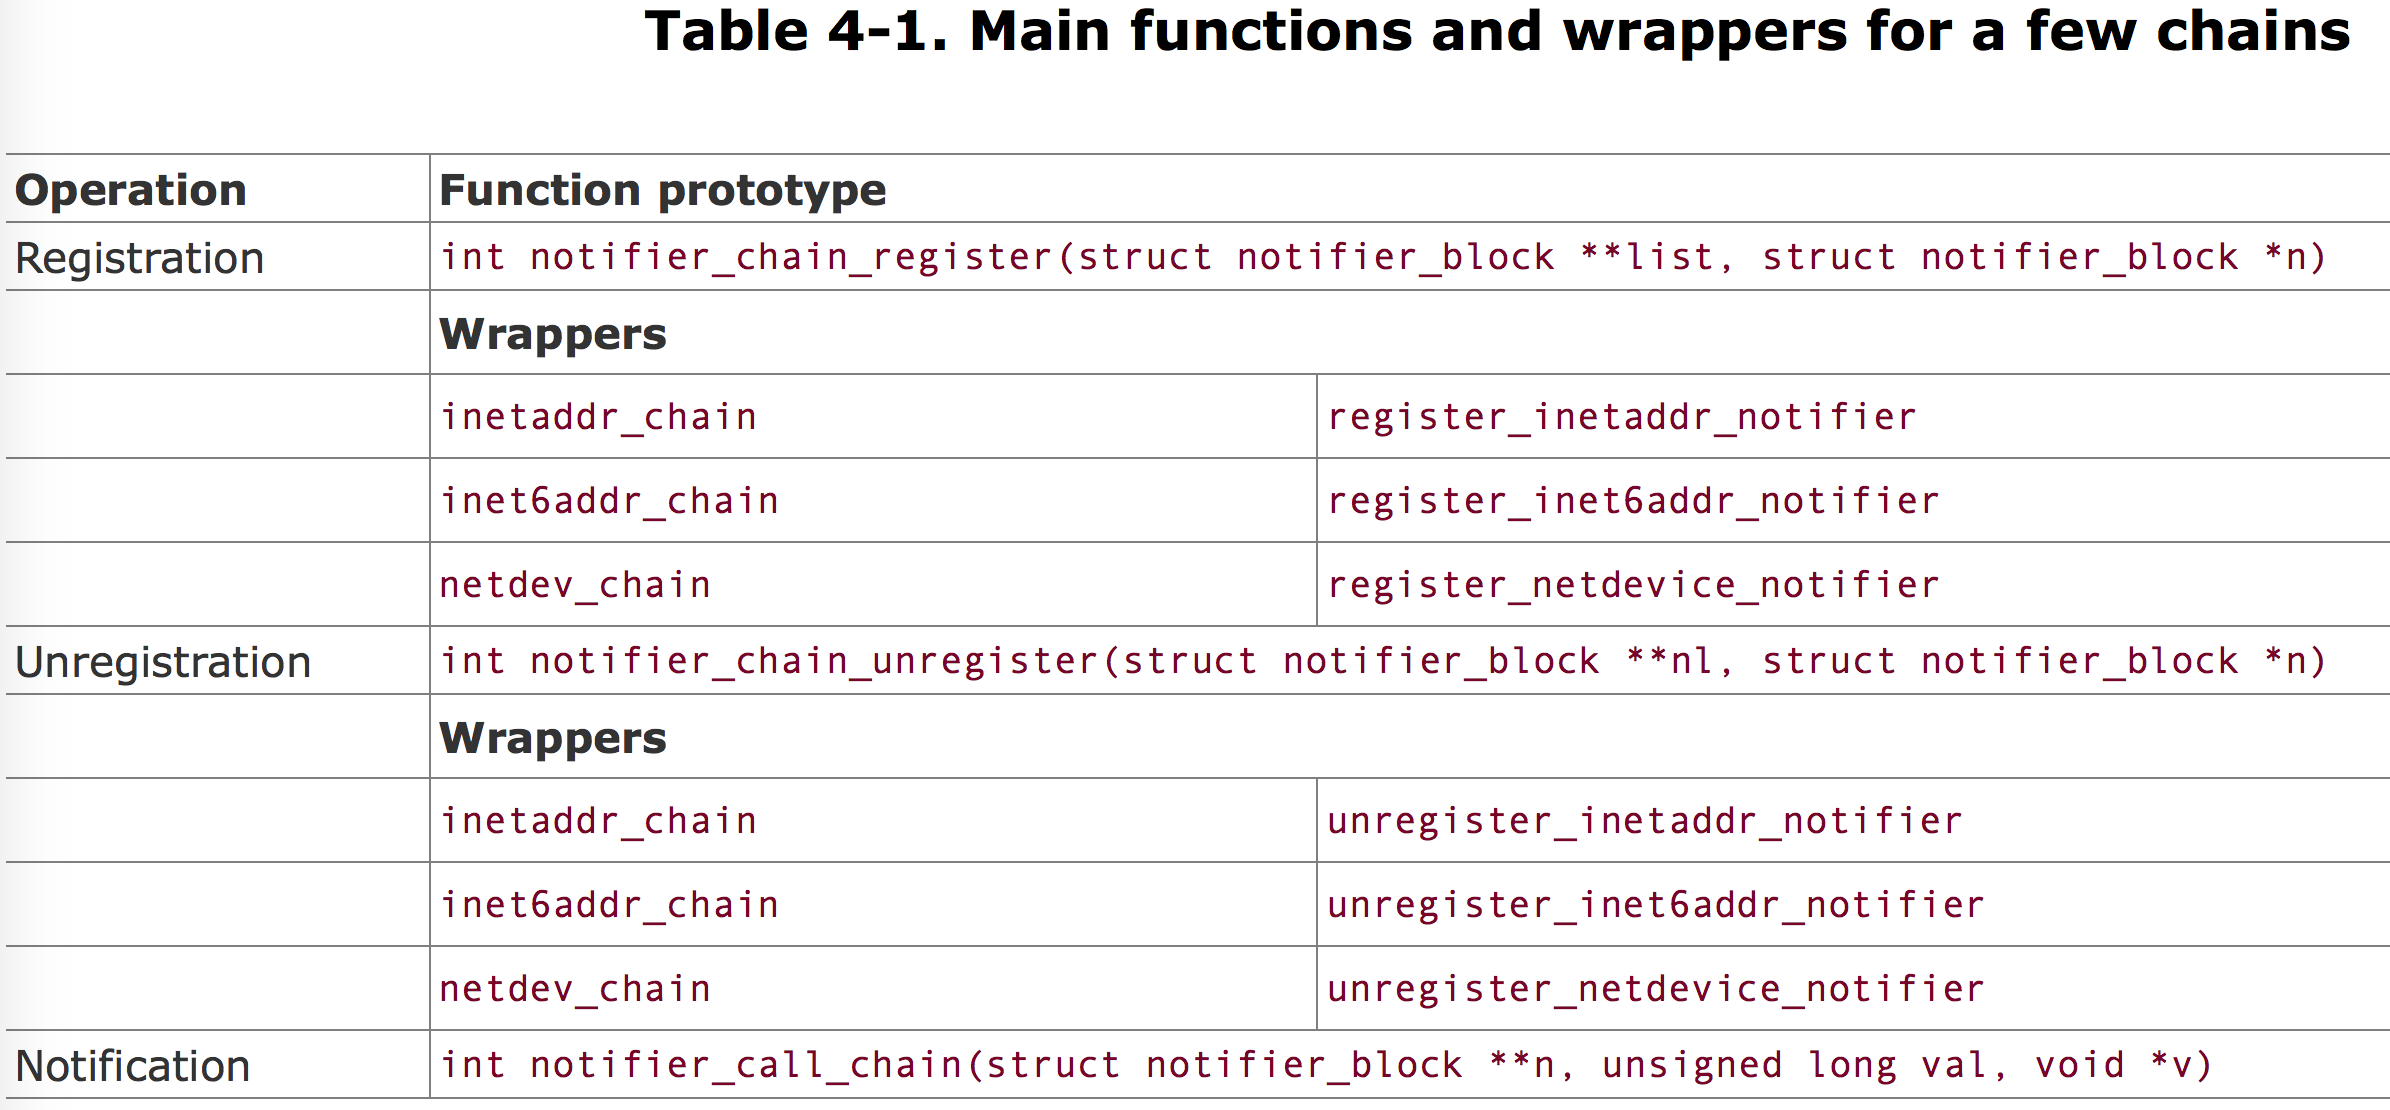
函数 notifier_call_chain 12345678910111213141516int notifier_call_chain(struct notifier_block **n, unsigned long val, void *v){ int ret = NOTIFY_DONE; struct notifier_block *nb = *n; while (nb) { ret = nb->notifier_call(nb, val, v); if (ret & NOTIFY_STOP_MASK) { return ret; } nb = nb->next; } return ret;}
该函数返回值 类型 位于 include/linux/notifier.h 文件中。
inetaddr_chain netdev_chain
inetaddr_chain: sends notifications about insertion/removal/change of an IPv4 address on a local interface.
netdev_chain: sends notifications about the registration status of network devices.
|
|
Common names for wrappers include [un]register_xxxnotifier, xxx[un]registernotifier, and xxx[un]register.
netdev_rx_stat, its elements are of type netif_rx_stats
|
|

包括2个阶段:
|
|
Both components built into the kernel and components loaded as modules can be passed input parameters so that users can fine-tune the functionality implemented by the components, override defaults compiled into them, or change them from one system boot to the next, kernel provides two kinds of macros to define options:
Module options.
module_param
The module parameters are listed in the module’s directory “/sys/modules”. The subdirectory /sys/modules/module/parameters holds a file for each parameter exported by module.12345678[root@localhost src]# ls -la /sys/module/sis900/parameters/total 0drwxr-xr-x 2 root root 0 Apr 9 18:31 .drwxr-xr-x 4 root root 0 Apr 9 18:31 ..-r--r--r-- 1 root root 0 Apr 9 18:31 debug-r--r--r-- 1 root root 4096 Apr 9 18:31 max_interrupt_work-r--r--r-- 1 root root 4096 Apr 9 18:31 multicast_filter_limit[root@localhost src]#
|
|
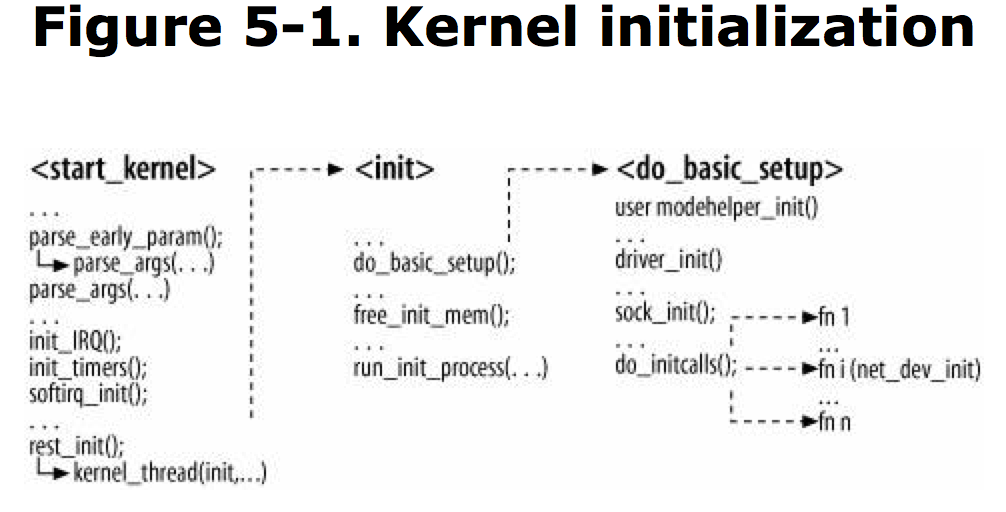
subsys_initcall(net_dev_init);
subsys_initcall macros ensure net_dev_init runs before any NIC device drivers register themselves.
main parts of net_dev_init:123456781. the per-CPU data structures used by two networking software interrupts(softirqs) are initialized.2. when kernel is compiled with support for /proc filesystem, a few files are added to /proc with dev_proc_init and dev_mcast_init.3. netdev_sysfs_init registers the net class with sysfs. This creates directory /sys/class/net, under this you can find a subdirectory for each registered network device.4. net_random_init initializes a per-CPU vector of seeds that will be used when generating random numbers with net_random routine.5. The protocol-independent destination cache(DST) is initialized with dst_init.6. The protocol handler vector ptype_base, used to demultiplex ingress traffic, is initialized.7. When OFFLINE_SAMPLE symbol is defined, the kernel sets up a function to run at regular intervals to collect statistics about the devices’ queue lengths.8. A callback handler is registered with the notification chain that issues notifications about CPU hotplug events. Callback used is dev_cpu_callback.
/proc/net is created by net_dev_init, via dev_proc_init and dev_mcast_init:12341. dev for each network device registered with kernel, a few statistics about reception and transmission.2. dev_mcast for each network device registered with kernel, the values of a few parameters used by IP multicast.3. wireless for each wireless device, prints the value of a few parameters from the wireless block.4. softnet_stat exports statistics about the software interrupts used by networking code.
/sbin/modprobe
Invoke when the kernel needs to load a module.
/sbin/hotplug
Invoke when the kernel detects that a new device has been plugged or unplugged from system.
The kernel provides a function named call_usermodehelper to execute such user-space helper.
Two kernel routines, request_module and kobject_hotplug , invoke call_usermodehelper to invoke /sbin/modprobe and /sbin/hotplug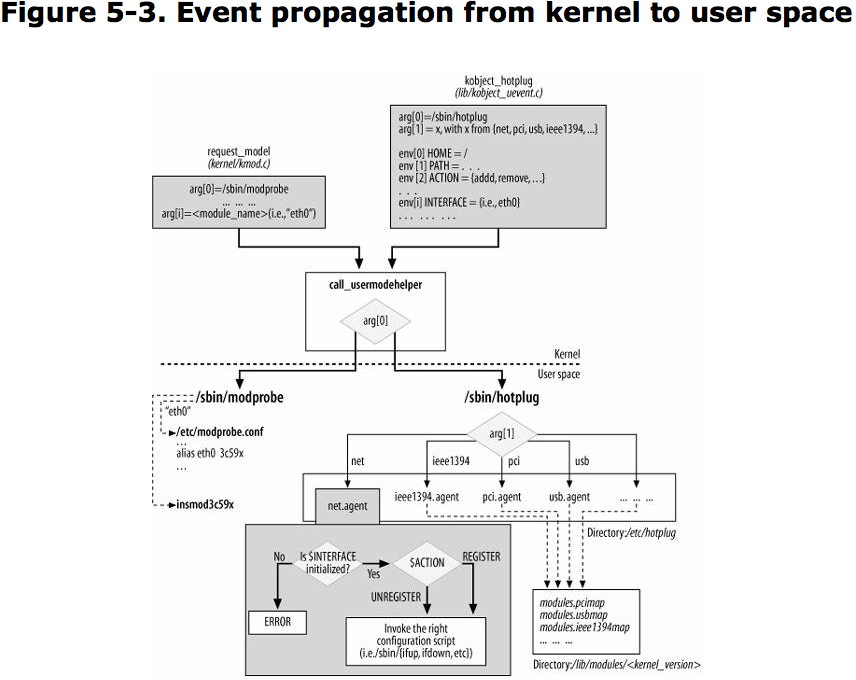
kmod is the kernel module loader that allows kernel components to request the loading of module. call request_module
Hotplug was introduced into the kernel to implement popular consuer feature known as Plug and Play (PnP). When compile the kernel modules, the object files are placed by default in directory: /lib/modules/kernel_version/. kobject_hotplug function is invoked by the kernel to respond to insertion and removal of a device.
modprobe and hotplug create file/directory in /proc/sys/kernel
The registration of a network device takes place in the following situations:
Two main conditions trigger the unregisteration of a device:
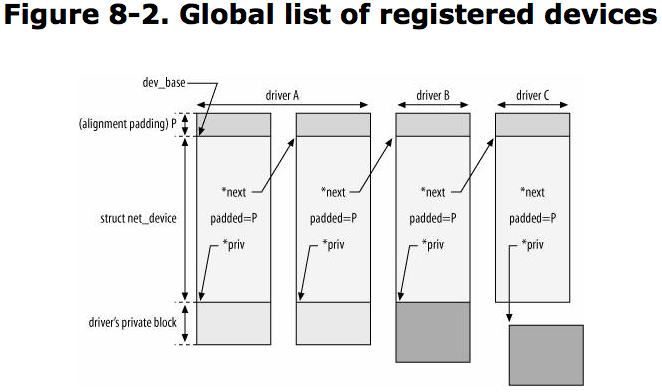
Network devices are defined with net_device structures.
include 3 input parameters:
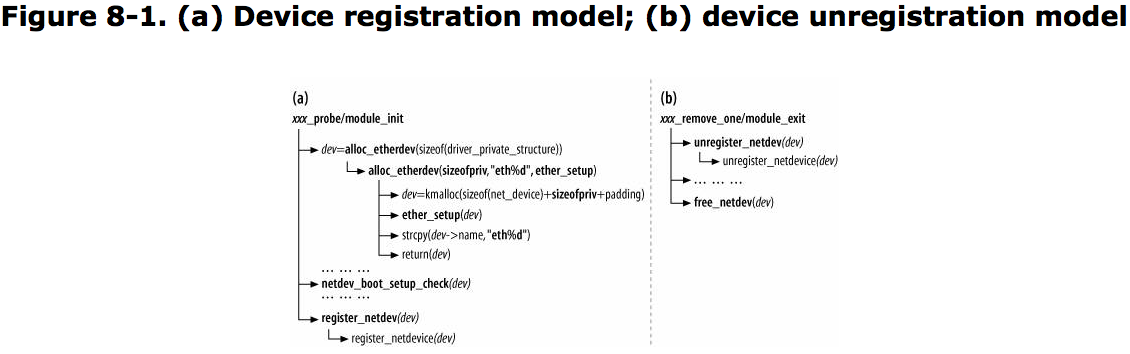
net_device structure is pretty bug, its fields are initialized in chunks by different routines.
alloc_ xxxdev function pass right xxx_setup routine to alloc_netdev .
void ether_setup(struct net_device *dev)
{
dev->change_mtu = eth_change_mtu;
dev->hard_header = eth_header;
dev->rebuild_header = eth_rebuild_header;
dev->set_mac_address = eth_mac_addr;
dev->hard_header_cache = eth_header_cache;
dev->header_cache_update = eth_header_cache_update;
dev->hard_header_parse = eth_header_parse;
dev->type                 = ARPHRD_ETHER;
dev->hard_header_len      = ETH_HLEN;
dev->mtu                  = 1500;
dev->addr_len             = ETH_ALEN;
dev->tx_queue_len         = 1000;
dev->flags                = IFF_BROADCAST|IFF_MULTICAST;

memset(dev->broadcast,0xFF, ETH_ALEN);
}
net_device include:
Each network device is assigned a queuing discipline, used by Traffic Control to implement its QoS mechanisms.
LINK_STATE_START
LINK_STATE_PRESENT
LINK_STATE_NOCARRIER
LINK_STATE_LINKWATCH_EVENT
LINK_STATE_XOFF
LINK_STATE_SHED
LINK_STATE_RX_SCHED
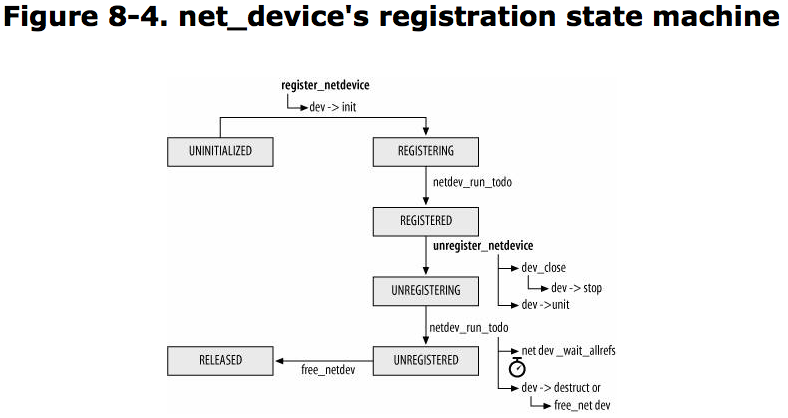
The state of a device with regard to its registration with the network stack is saved in reg_state field of the net_device structure.
NETREG_UNINITIALIZED
NETREG_REGISTERING
NETREG_REGISTERED
NETREG_UNREGISTERING
NETREG_UNREGISTERED
NETREG_RELEASED

Both kernel components and user-space applications are interested in knowing when a network device is registered, unregistered, goes down, or comes up.
netdev_chain: kernel components can register with this notification chain.
All the NETDEV_XXX events that are reported via neTDev_chain are listed in
Notification event list:
NETDEV_UP
NETDEV_GOING_DOWN
NETDEV_DOWN
NETDEV_REGISTER
NETDEV_UNREGISTER
NETDEV_REBOOT
NETDEV_CHANGEADDR
NETDEV_CHANGENAME
NETDEV_CHANGE
Quite a few kernel components register to netdev_chain List:
The virtual devices need to be registered and enabled just like real ones, to be used.
register_netdevice/unregister_netdevice
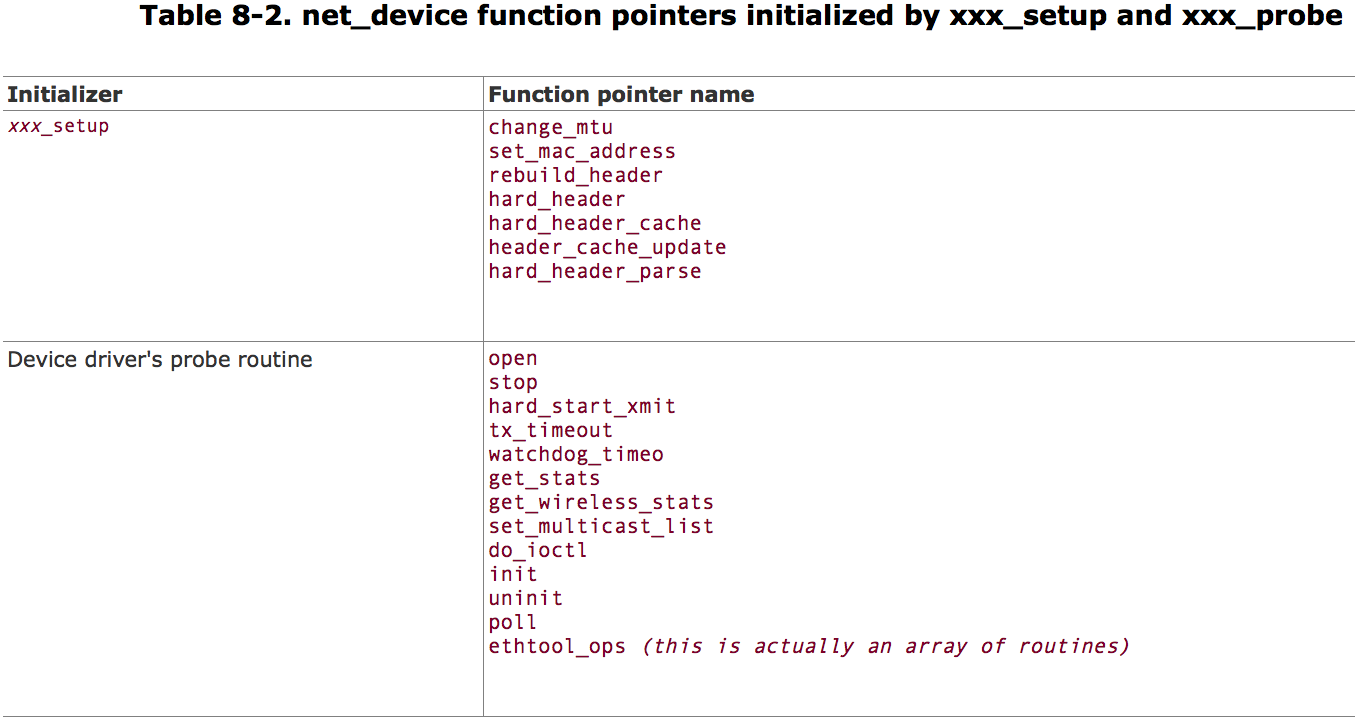
net_device data structure include a set of function pointers, that kernel uses to interact with the device driver and special kernel features
establish device/kernel communication. such as:
nearly all devices interact with kernel in two ways:
every interrupt runs a function called an interrupt handler. IRQ are defined in kernel/irq/manage.c and are overridden by arch/XXX/kernel/irq.c.12int request_irq(unsigned int irq, void (*handler)(int, void*, struct pt_regs*), unsigned long irqflags, const char * devname, void *dev_id)void free_irq(unsigned_int irq, void *dev_id)
|
|
|
|

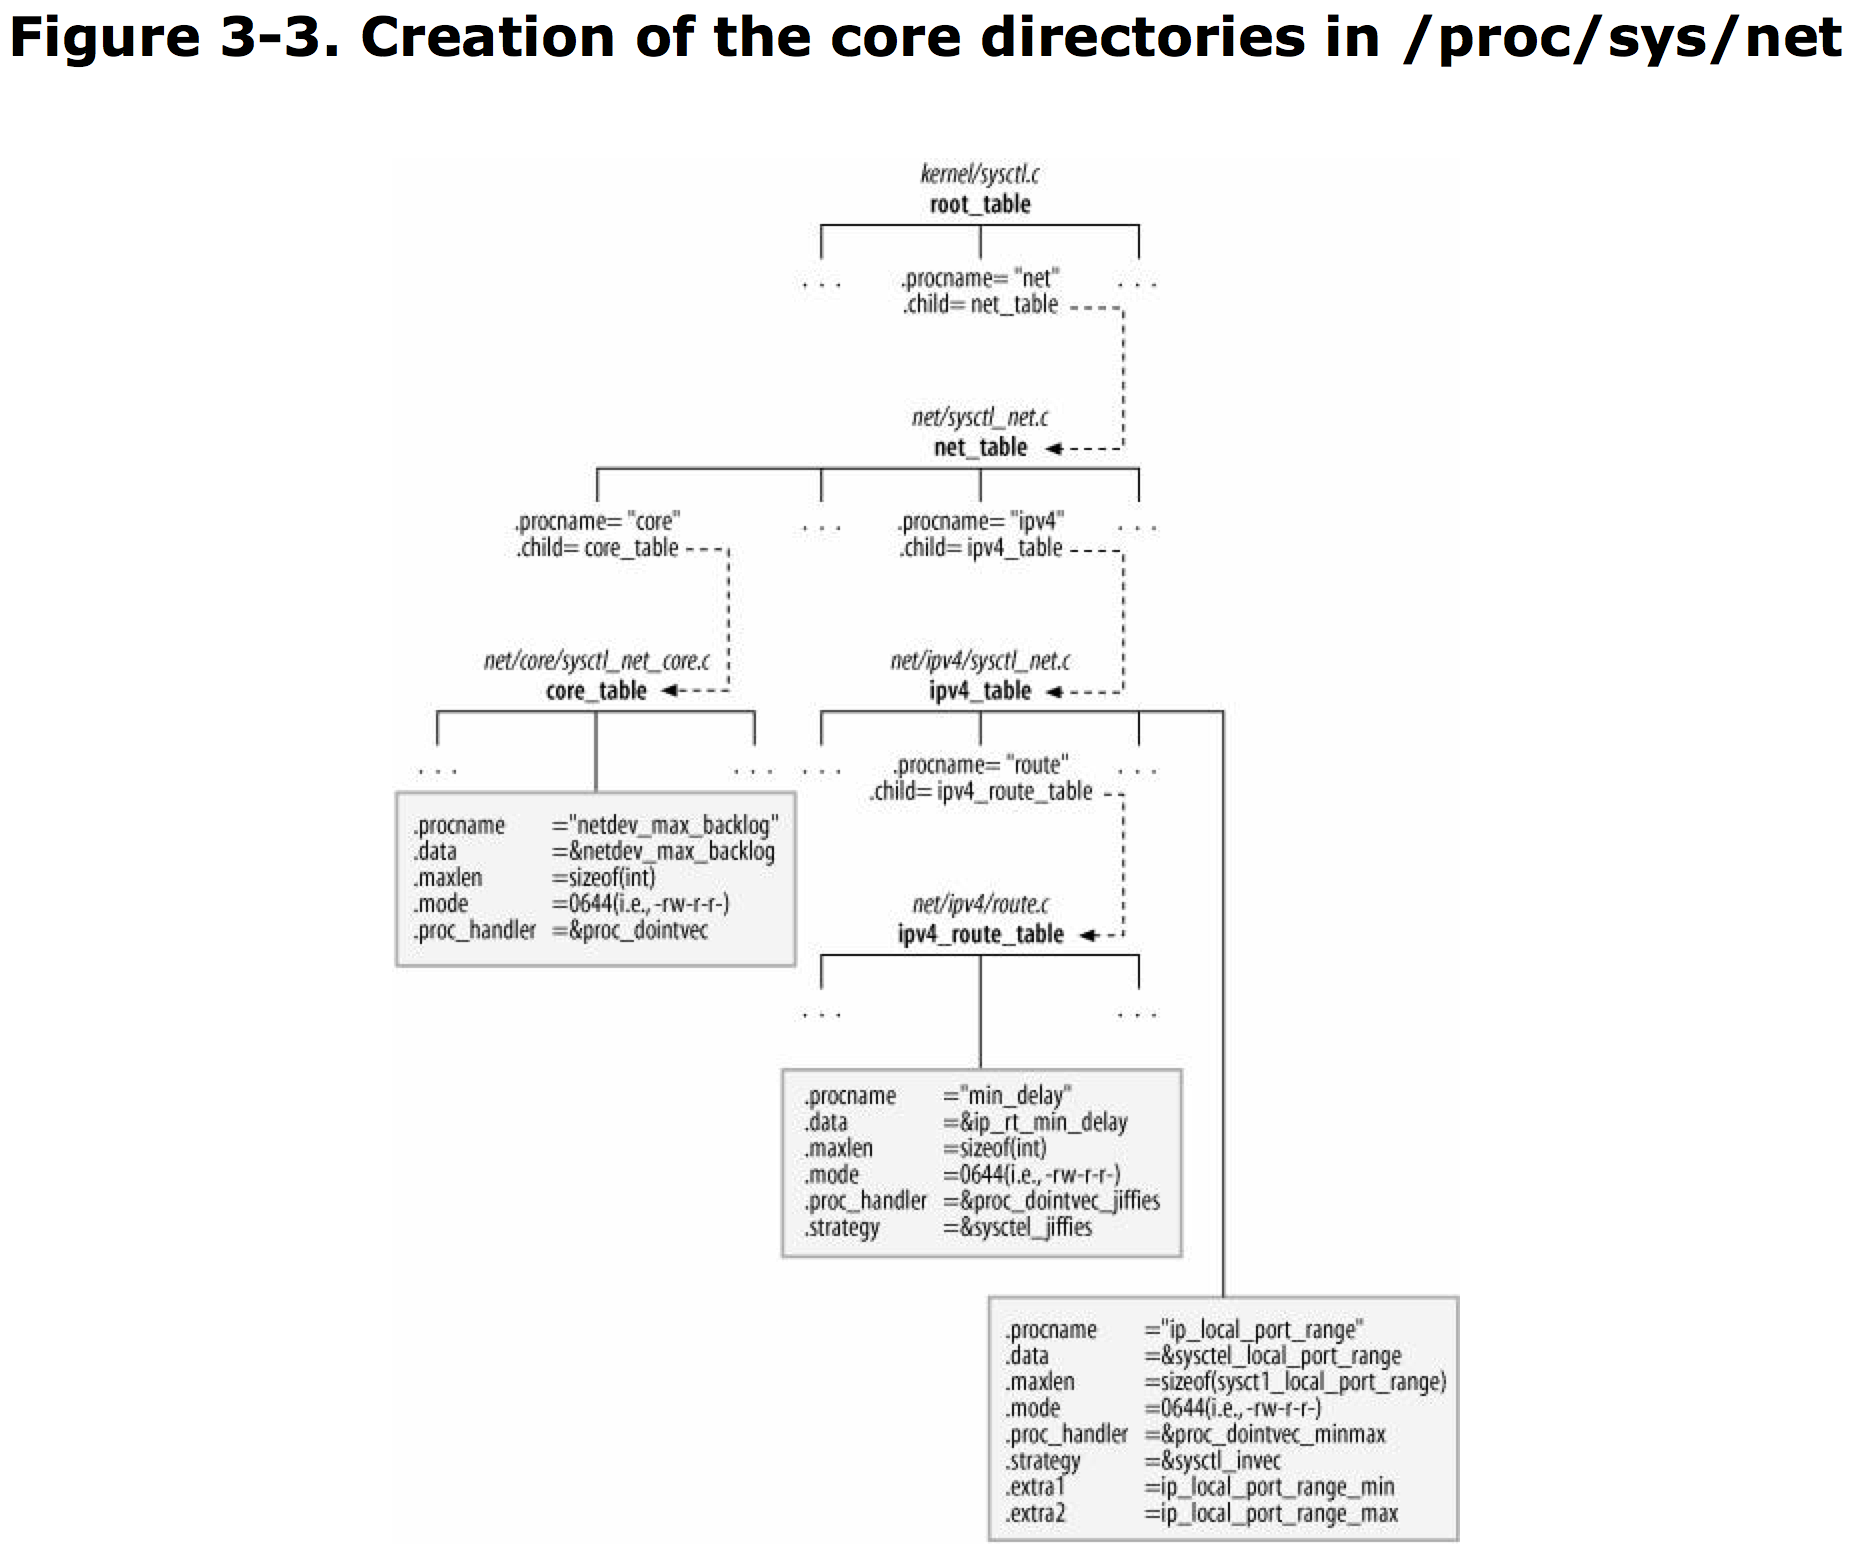
/proc 目录 被 proc_mkdir 函数创建。
/proc/net 目录 被 proc_net_fops_create/proc_net_remove (调用 create_proc_entry/remove_proc_entry) 创建及删除。
/proc/sys 实际上是内核变量,可以read/write。 /proc/sys 被定义在 ctl_table 结构体中, 通过 register_sysctl_table 和 unregister_sysctl_table 来注册和取消注册。
某些目录在系统启动的时候就被创建,某些在运行时刻才被添加。
ioctl 是主要管理net_device的调用函数.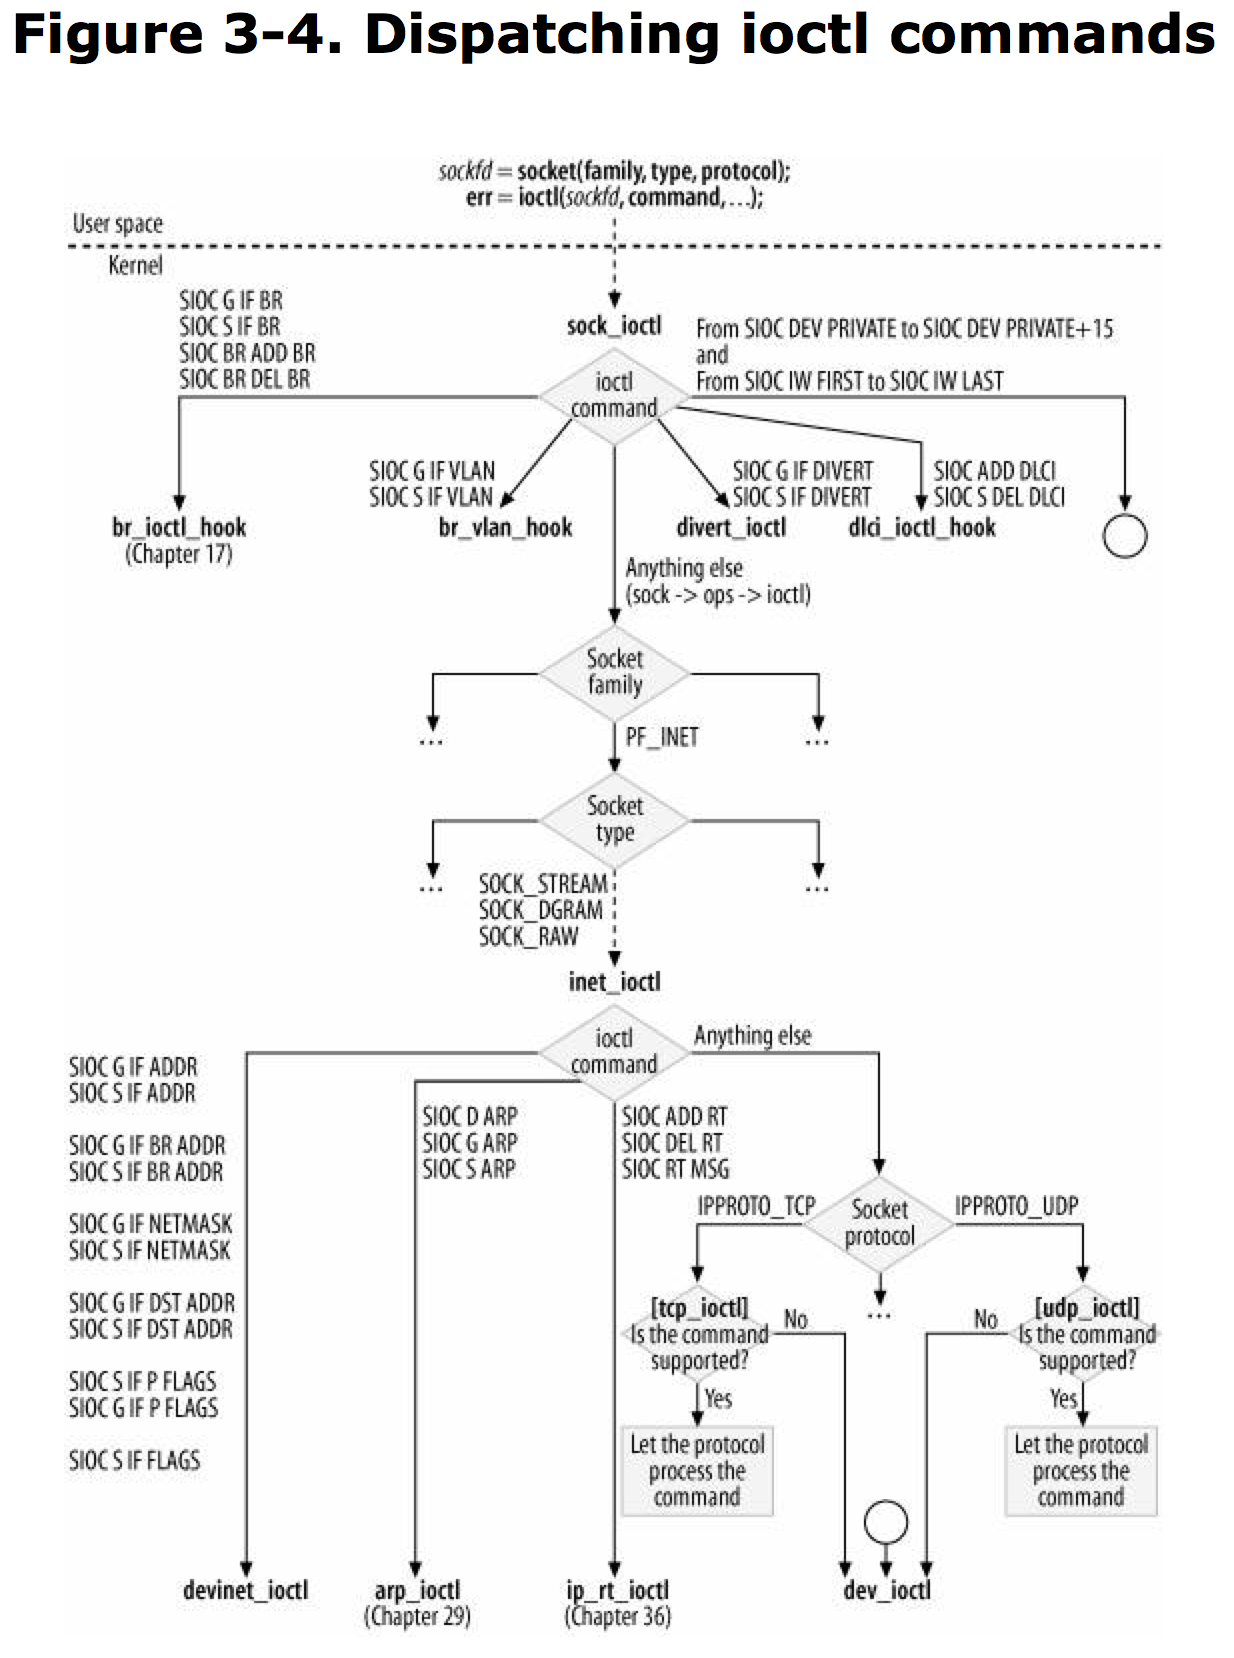
《Linux Networking Internals》 是基于Linux解释network的书籍, 文章内容还是不错的.
另推荐一本书《Understanding the Linux Kernel》, 阅读本系列之前更加推荐之前的文章, 关于该文章的记录也会放在博客上.
Sock Buffer: sk_buff
包括以下内容:
alloc_skb -> dev_alloc_skb
kfree_skb -> dev_kfree_skb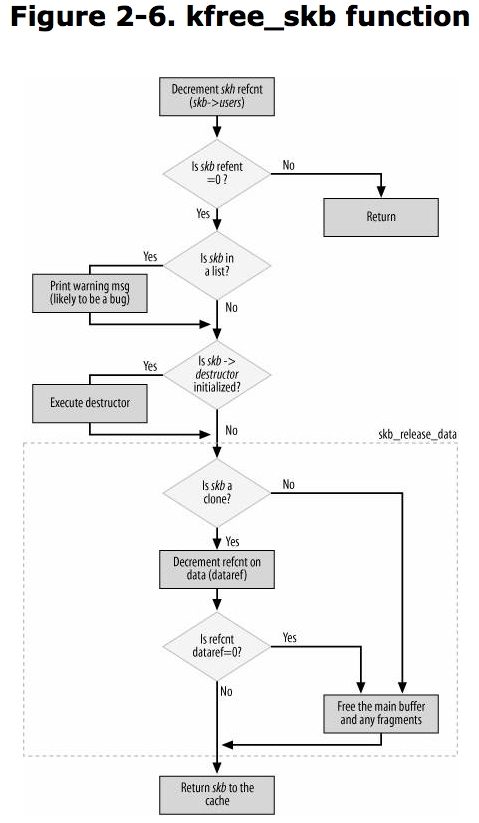
skb_reserve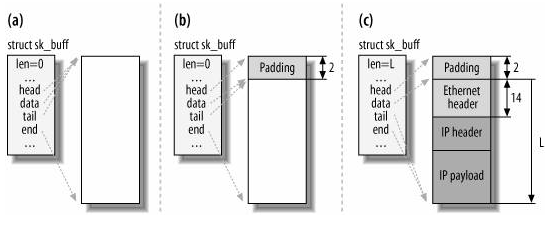
net_device structure include:
tips: ifconfig/route 通过 ioctl 系统调用来实现; ip/IPROUTE2 使用Netlink socket 来实现.
以x86_64 arch机器为例:
—————————————————— 内核load进内存阶段 (arch/*/boot/)—————————————————-
入口文件是: arch/x86/boot/compressed/head_64.S 注意: kernel 代码不是以 main 函数为入口的。
head_64.S 是 汇编 代码文件, 该文件会 call verify_cpu + make_boot_params(初始化boot_params) + efi_main(处理并返回boot_params),最终里面 call extract_kernel 会调用 入口函数 extract_kernel, 该 函数 位于 arch/x86/boot/compressed/misc.c 会:
1. 拿到 boot_params , 由汇编代码传入该参数      该 参数的结构体 位于 arch/x86/include/uapi/asm/bootparam.h .
2. 通过 sanitize_boot_params 函数  初始化 boot_params 参数部分内容, 代码位于 arch/x86/include/asm/bootparam_utils.h .
3. 通过 boot_params->screen_info 内容,  调用 arch/x86/boot/compressed/console.c  文件中的 console_init 函数, 初始化 tty 的console .
4. (arch/x86/boot/compressed/kaslr.c) choose_random_location 函数 会随机挑选一段内存地址, 用于解压内核 压缩文件。
5. 调用 (lib/decompress_bunzip2.c) __decompress 函数解压缩内核压缩文件, 根据不同的压缩文件类型,调用不同的解压缩函数, 压缩文件区分应该是发生在 编译内核时。
6. 内核文件解压之后会成为 elf 文件, 位于内存中, 通过调用 parse_elf 函数 load 进 内核内容,  parse_elf 位于 arch/x86/boot/compressed/misc.c 中。
7. 判断是否 需要重新 分配内存地址, 调用 handle_relocations 函数。
arch/x86/boot/compressed/head_64.S 在解压缩内核之后会执行解压缩之后的内核代码!!!
而 与arch 无关, 较为 common(legacy) 的 文件 arch/x86/boot/header.S 会 最终调用 (arch/x86/boot/main.c) main 函数 , 该函数会:
1. copy_boot_params   拷贝启动参数
2. console_init  初始化console
3. init_heap
4. validate_cpu
5. set_bios_mode
6. detect_memory
7. keyboard_init
8. query_ist
9. query_apm_bios (if  config_apm)
10. query_edd  (if config_edd)
11. set_video
12. go_to_protected_mode
—————————————————— 内核启动阶段 (init/main.c) —————————————————-
入口文件是 : init/main.c 启动函数是: start_kernel 该函数会:1234567891011121314151617181920212223242526272829303132333435363738394041424344454647484950515253545556575859606162636465666768697071727374757677787980818283848586878889909192939495969798991001011021031041. 调用 (kernel/fork.c) set_task_stack_end_magic(&init_task) 函数, 注册系统内核启动后的 idle(PID=0) 进程。 该 init_task 在 init_task.h 文件中定义,在 fork.c 文件中设置栈边界。2. smp_setup_processor_id 函数, 检查cpu是否为多处理器,获取当前处理器逻辑号。3. 调用(debugobjects.c)debug_objects_early_init 函数, 初始化debug对象的锁,并将debug对象链接成链表。4. 调用(stackprotector.h)boot_init_stack_canary函数, 尽可能早地进行stack protect,防止 栈越界 canary 攻击,关于canary attack 可以参照: https://hardenedlinux.github.io/2016/11/27/canary.html5. 调用(group.c)group_init_early 函数, 初始化 group_root 结构体, 并且将每一个 cgroup_subsys 加入到 group_root 对象中,并初始化每一个 cgroup_subsys 对象。 支持的 cgroup_subsys 位于 include/linux/cgroup_subsys.h 文件中。6. local_irq_disable() 函数 将本地中断暂时disabled。7. 调用(kernel/cpu.c)boot_cpu_init函数, 设置 获得 cpu 第一个处理器标志对象, 标志 该处理器对象为 online+active+present+possible.8. 调用 (mm/highmem.c)page_address_init 函数, 初始化 高端内存页表 page_address_htable 对象 .9. 调用 pr_notice 函数 打印 Linux 版本信息(linux_banner) .10. 调用 setup_arch(command_line) 函数, 设置与 硬件架构相关的 配置, command_line 为内核启动参数。 相关结构体有: hwrpb_struct, notifier_block(中断处理结构体,注册形成notifier_chain),alpha_using_srm/alpha_using_qemu(使用 srm或者qemu), callback_init(初始化 kernel_page + kernel_PCB + third_level_PTE) 11. 调用 mm_types.h(mm_init_cpumask)函数, 初始化 init_mm 对象,init_mm 是 mm_struct 结构体对象,位于 init-mm.c 文件中.12. 调用 setup_command_line 函数,保存 原始的 command_line 对象, 保存给以后分析。 13. cpu 相关的4个函数(不太明白): setup_nr_cpu_ids + setup_per_cpu_areas + boot_cpu_state_init + smp_prepare_boot_cpu14. 调用 (page_alloc.c)build_all_zonelists 函数 初始化 页表区, 建立系统内存页表链表 .15. 调用 (page_alloc.c)page_alloc_init 函数 初始化页表, 初始化内存页表。16. 调用 parse_early_param 函数, 解析 command_line 对象,拿到 早期 参数, 参数以 kernel_param 结构体保存 。17. 调用 pase_args 函数, 解析不能被 pase_early_param 函数解析的参数。18. 调用 (pid.c)pidhash_init 函数, call (page_alloc.c)alloc_large_system_hash 函数, allocate 一个大的系统 hash table,名字为 PID .19. 调用 (dcache.c)bfs_caches_init_early 函数, call 两次 alloc_large_system_hash 函数, allocate 两个大的系统 hash table,名字为 Dentry Cache + Inode-Cache .20. 调用 (eatable.c)sort_main_extable 函数, 对异常处理函数table进行排序。21. 调用 (arch/x86/kernel/traps.c)trap_init 函数, 初始化 硬件中断.22. 调用 (main.c)mm_init 函数, 建立内存分配器. 该函数会调用 page_ext_init_flatmem + mem_init + kmem_cache_init + percpu_init_late + pgtable_init + vmalloc_init + ioremap_huge_init .23. 调用 (core.c)sched_init 函数, 初始化 调度器 . 该调度器会处理各种中断. 很复杂.24. preempt_disable 函数, 禁止调度抢占.25. 调用 idr_init_cache 函数, call kmem_cache_create 函数 创建 kmem_cache , 该cache 名为 idr_layer_cache .26. 调用 (workqueue.c)workqueue_init_early 函数, 该函数 建立 各种数据结构/系统workqueue, 调用 多次 alloc_workqueque 函数 构建 各种事件队列.27. rcu_init 函数, 初始化互斥访问机制.28. (tiny.c/tree.c)trace_init 函数, trace printk 调用.29. (context_tracking.c)context_tracking_init 函数, tracking context 在哪个cpu上运行.30. (radix-tree.c)radix_tree_init函数, call kmem_cache_create 创建 kmem_cache, 该cache 名为 radix_tree_node . radix tree 为 基数树.31. (irq.c)early_irq_init 函数, 调用 arch_early_irq_init 函数, 构建 irq_domain 结构体.32. (irqinit.c)init_IRQ 函数, 调用 arch/x86/kernel/irqinit.c init_IRQ 函数, 初始化中断向量. 关键结构体 有 x86_init_ops .33. (tick-common.c)tick_init 函数, 初始化 时钟控制.34. rcu_init_nohz 函数.35. (timer.c)init_timers 函数, 初始化 定时器. 原理是: 通过 调用 open_softirq 软中断, 注册中断处理函数为 run_timer_softirq.36. hrtimers_init 函数, 初始化 高精度定时器.37. (softer_init.c)softirq_init 函数, 软中断 初始化. 调用 open_softirq 注册2个级别 TASKLET_SOFTIRQ + HI_SOFTIRQ 中断 向量, 关键对象 softirq_vec . 可以学习: soft_irq 与 tasklet 区别。38. timekeeping_init : 初始化资源和普通计时器, 初始化 clocksource 和 common timekeeping values.39. time_init : call (arch/x86/kernel/time.c) x86_late_time_init 函数, 注册 结构体 x86_init_ops 对象的 timer 属性. 以及 时钟中断, 在后面的 late_time_init 函数中调用. 40. sched_clock_postinit : 初始化 clock_data 结构体, 更新 调度 计时器. 41. printk_safe_init: 调用 init_irq_work 函数 初始化中断栈, 将 pending 的 所有 message 全都print 出去.42. (core.c)perf_event_init: 初始化 idr 结构体, call perf_pmu_function 注册 performance monitoring unit(pmu) 各类事件, pmu 事件类型有:perf_swevent + perf_tracepoint + perf_cpu_clock + perf_task_clock + perf_breakpoint .43. (profile.c)profile_init : kernel profiling 工具 初始化. 初始化 内核调优 的代码, 与内核启动的传入参数有关. CPU_PROFILING + SCHED_PROFILING + SLEEP_PROFILING + KVM_PROFILING .44. call_function_init: 不知道做啥.45. (slab.c)kmem_cache_init_late : 调.整 cpu cache大小, 并且 注册 一段 memory 用于 hotplug 回调.46. (tty_io.h)console_init : 初始化 console device. 可以显示 printk 的内容.47. (locked.c)lockdep_info : 打印 一些 依赖 信息.48. (locking-selftest.c)locking_selftest : self-test for hard/soft-irqs.49. (ifdef CONFIG_BLK_DEV_INITRD)initrd_start : kernel启动时是否传入 initrd 参数, 传入的话 会进入 raw disk.50. (page_ext.c)page_ext_init : 防止高位内存出界, 出界的内存可能没有被初始化,重新初始化, 并且 设置 回调 函数.51. (debugobjects.c) debug_objects_mem_init : debug 内存 是否 越界.52. (kmemleak.c)kmemleak_init : 内核内存 分配 泄漏 检测 逻辑 初始化.53. (page_alloc.c)setup_per_cpu_pageset : 为每一个 cpu 分配内存 页表 及 页表区. 在此函数调用之前, 可被使用的内存 仅为 boot memory. 54. (mempolicy.c)numa_policy_init : 设置内存 numa(Non-uniform memory access, 非统一内存访问架构) 规则. 关键结构体: mempolicy55. (arch/x86/kernel/time.c)later_time_init : 执行 time_init 函数初始化的内容.56. calibrate_delay : 校准 时延.57. (pid.c)pidmap_init : 初始化 pid_max 值, 以及 初始化 pid_namespace 结构体. 保留 pid 为0 的位置.58. (rmap.c)anon_vma_init : (Anonymous Virtual Memory Access) 匿名虚拟内存区域初始化. 59. (drivers/acpi/bus.c)acpi_early_init: ACPI ??? 不知道 干什么?60. (efi.c)efi_enter_virtual_mode : 也不清楚 EFI 做啥?61. (esprit_64.c)init_espfix_bsp : 调整 进程 esp 寄存器位置, 在 non-init 进程创建之前调用.62. (fork.c)thread_stack_cache_init : 调用 kmem_cache_create 在内核内存区 创建 thread_stack cache.63. (cred.c)cred_init : 调用 kmem_cache_create 在内核内存区 创建 cred_jar cache, 用于 存储 credentials.64. (fork.c)fork_init : 进程创建机制 初始化, 调用 kmem_cache_create 在内核内存区 创建 task_struct cache, set_max_threads, 关键结构体 task_struct65. (fork.c)proc_caches_init : 进程创建所需的其它结构体 初始化, 调用 kmem_cache_create 在内核内存区 创建 sighand_cache/signal_cache/files_cache/fs_cache/mm_struct cache .66. (fs/buffer.c)buffer_init : 调用 kmem_cache_create 在内核内存区 创建 buffer_head cache. 将一定数量的内存区 设置为 buffer.67. (security/keys/key.c)key_init : 内核密钥 管理, 调用 kmem_cache_create 在内核内存区 创建 key_jar cache . 68. (security.c)security_init : 内核安全框架. 比较复杂, 没看懂 ?69. (debug_core.c)dbg_late_init : kernel debug stuff.70. (fs/dcache.c)vfs_caches_init : 创建虚拟文件系统. 主要调用函数有: dcache_init, inode_init, files_init, files_maxfiles_init, mnt_init(该函数还会调用 kernfs_init/sysfs_init/kobject_create_and_add/init_rootfs/init_mount_tree), bdev_cache_init, chrdev_init. 调用 kmem_cache_create 在内核内存区 创建 names_cache + dentry + inode_cache + filp + mnt_cache + bdev_cache cache. 调用 alloc_large_system_hash 分配 Dentry cache + Inode-cache + Mount-cache + Mountpoint-cache HashMap. (mount.c)kernfs_init : 该函数 在内核内存区 创建 kernfs_node_cache cache. (kobject.c)kobject_create_and_add : 创建 kobject fs 对象. (mount.c)sysfs_init : 该函数 调用 register_filesystem 函数, 初始化 file_system_type 对象 sysfs . register_filesystem 当加载fs对应module时调用该函数. (do_mounts.c)init_rootfs : 该函数调用 register_filesystem 函数, 初始化 file_system_type 对象 rootfs + tmpfs/ramfs (namespace.c)init_mount_tree : 设置 rootfs mount tree. (block_dev.c)bdev_cache_init : 注册 block 设备, 注册对象为 file_system_type bdev . bd_mount 扫描磁盘, 获得 磁盘 文件系统. (char_dev.c)chrdev_init : 注册 字符设备.71. (mm/filemap.c)pagecache_init : 该函数 主要是初始化 页写回 机制, 主要函数为 (page_writeback.c)page_writeback_init .72. (kernel/signal.c)signals_init : 调用 kmem_cache_create 在内核内存区 创建 sigqueue cache 对象. 73. (fs/proc/root.c)proc_root_init : proc 文件系统初始化, 主要调用 proc_init_inodecache + set_proc_pid_nlink + register_filesystem + proc_self_init + proc_thread_self_init + proc_symlink + proc_net_init + proc_mkdir + proc_create_mount_point + proc_tty_init + proc_sys_init . (fs/proc/inode.c)proc_init_inodecache : 调用 kmem_cache_create 在内核内存区 创建 proc_inode_cache 对象. (fs/proc/base.c)set_proc_pid_nlink : 主要 调用 pid_entry_nlink 函数, 关键结构体 为 pid_entry . 初始化 2个对象: tid_base_stuff + tgid_base_stuff . (filesystem.c)register_filesystem : 注册 proc filesystem . 关键 函数为 proc_mount, 该函数会注册 /proc/self 文件夹. (fs/proc/thread_self.c)proc_self_init + proc_thread_self_init : 初始化 /proc/self 文件夹. (fs/proc/thread_self.c)proc_symlink : 创建 链接 文件 /proc/mounts 链接 /proc/self/mounts . (fs/proc/proc_net.c)proc_net_init : 创建 链接 文件 /proc/net 链接 /proc/self/net . 初始化 /proc/self/net 文件夹. proc_mkdir : 创建 sysvipc, fs, driver, bus 文件夹 . proc_create_mount_point : 创建 /proc/fs/nfsd 文件夹 . proc_tty_init : 创建 /proc/tty 文件夹. (fs/proc/proc_sysctl.c)proc_sys_init : 注册和初始化 /proc/sys (sysctl) 文件系统. 关键函数 : __register_sysctl_paths74. nsfs_init : 不知道干啥 ???75. (kernel/cpuset.c)cpuset_init : 初始化 cpuset 系统, 并且 创建 /sys/fs/cgroup/cpuset 文件夹. 76. (kernel/cgroup.c)cgroup_init : control group 初始化. 77. (kernel/taskstats.c)taskstats_init_early : 早期初始化,初始化 taskstats 结构体.78. delayacct_init() + check_bugs() + acpi_subsystem_init() + arch_post_acpi_subsys_init() + sfi_init_late()79. (main.c)rest_init : 完成 剩下 non-init 的 任务. 包括 : —> https://danielmaker.github.io/blog/linux/images/start_kernel_call_graph.svg rcu_scheduler_starting : 启动 rcu_scheduler kernel_thread(kernel_init) : do_fork 启动一个 进程 执行 kernel_init 函数. PID 为 1 的进程. —> kernel_init_freeable函数 + run_init_process numa_default_policy : 内存分配 numa 策略. kernel_thread(kthreadd) : 执行 kthreadd 函数. PID 为 2 的 进程. 为spawn所有其它的 thread 进程 . find_task_by_pid_ns init_idle_bootup_task schedule_preempt_disabled cpu_startup_entry ——> do_idle cpu 调度 idle 为 PID 为 0 的进程.
rest_init函数所做内容示意图:
内核代码中 调用 alloc_large_system_hash 函数的位置有不少,会构建一些 大的系统 hash table, 名称分别有:
—————————————中断 宏: SAVE_ALL & RESTORE_ALL 用户态和内核态 上下文切换 ————————————
中断向量表: linux/arch/x86/entry/systemcalls/syscall_32.tbl
中断结构体: irq_desc
linux/arch/x86/entry/entry_32.S : 系统调用的代码段, 入口应该是:
http://lxr.linux.no/linux+v3.19/arch/x86/kernel/entry_32.S —> ENTRY(system_call)
Linux 进程 fork 关键代码:
http://lxr.linux.no/linux+v3.19/kernel/fork.c#L1185
|
|
用户空间的程序默认是通过栈来传递参数的,但对于系统调用来说,内核态和用户态使用的是不同的栈,这使得系统调用的参数只能通过寄存器的方式进行传递。11. objdump -S thread_safe 可以对运行代码进行反汇编
ELF = Executable and Linkable Format1readelf 命令 可以读 Linux 可执行文件.
一般Linux程序编写都会使用到glibc库, 而最终glibc也只是帮助用户进行系统调用而已, 至于glibc如何进行系统调用的?
通过阅读源码发现, 所有的函数都会最终调用glibc的源码中的 sysdep.h , 里面有 INLINE_SYSCALL 定义
Linux中实际上 thread 也是被当成 process 来创建, process和thread 是一样的, 区别在于系统调用时的传参.
refer: http://duartes.org/gustavo/blog/post/kernel-boot-process/
boot: linux ks=nfs:192.168.0.254:/var/ftp/pub/ks.cfg
anaconda 是python写的系统安装工具。
Linux 中有 4个主分区 + 逻辑分区(需要将其中一个主分区变为扩展分区)。
Installation过程中可以切换窗口,Ctrl + Alt + F1,2,3,4,5,6,每个窗口分别有不同的作用。
anaconda-ks.cfg kickstart安装配置文件
python —> anaconda —> install Linux12yum install pykickstartyum install system-config-kickstart 无人值守需要先安装rpm包
/tftpboot/n1.cfg配置文件:12345delay=0image=/tftpboot/osimage/rhels7.1-x86_64-install-gss1/vmlinuz label="Kickstart" initrd=/tftpboot/osimage/rhels7.1-x86_64-install-gss1/initrd.img append="quiet inst.repo=http://%N:80/install/rhels7.1/x86_64 inst.ks=http://%N:80/install/autoinst/cn1 ip=eth0:dhcp net.ifnames=0 net.ifnames=0 BOOTIF=%B"
对于守护进程而言,一般情况下守护进程都是detach from shell,所以接受不到sighup信号,这个信号经常被用作 reload configuration左右。1kill -s SIGHUP $pid
Linux 系统中的主要log都在/var/log目录下:
|
|
redhat 中使用了 rsyslog 替代 syslog1/etc/rsyslog.d/*
w: 显示当前所有的登录用户
多登陆端口通信: (pts/1向pts/0发送消息)12__pts/1:__ echo aaaaaaaaa > /dev/pts/0__pts/0:__ aaaaaaaaa
vim /etc/inittab 可以减少默认启动的tty个数!!!!
compress/uncompress 最古老的Unix压缩工具
gzip/gunzip 最广泛的压缩工具,Linux系统中标准压缩工具,对于文本文件能够达到很高压缩率
bzip2/bunzip2 新版Linux压缩工具,比gzip拥有更高的压缩率
tar 打包(备份)作用,参数:
|
|
Linux 下文件类型共有7种:
“-“ 文件
d 文件夹
l 链接
b block
c char字符设备
s socket文件
p protocol网络文件
文件分为三个部分进行存储:(目录文件中存储文件名)
1.存储文件名(指向inode号) —> 2.inode(指向块存储单元) —> 3.block (4k为单位)
inode 存储文件的属性, 可以用 stat 命令查看文件inode的内容。
文本文件的操作命令:
wc: 统计文件的行,词,字数
which ls : 查找命令, 查找 $PATH 路径中的文件
locate ls : 查找所有匹配ls字母的文件, 注意!!! locate 命令从数据库中查找文件,而不是直接查找系统文件,数据库位置为/var/lib/slocate/slocate.db. 当数据库没有更新的时候,可能会查找不到。
|
|
find
|
|
系统服务启动顺序:
|-/etc/inittab 总的配置文件
|—–/etc/rc.d/rc.sysinit 系统初始化文件, 加载许多内容
————fsck.ext3 mount -o rw.remount /dev/sda2 /
————mount -a /etc/fstab
|—–/etc/rc.d/rcX.d/* X为系统运行级别
|———-/etc/rc.d/rcX.d/ServiceXXX1 start 用户定义自启动的service
|———-/etc/rc.d/rcX.d/ServiceXXX2 start
|—–/etc/rc.d/rc.local 最后访问的文件
|
|-minigetty 启动 /dev/tty1-6 启动tty
|———-login —> bash —> /etc/profile ~/.bash_profile
|-gdm 监控进程是否死掉,重启进程
shutdown -h now/init 0 / halt -p -f / poweroff: 关机
users: 显示当前系统登录的用户
who: 当前登录在本机的用户及来源
w: 当前登录本机的用户及运行的程序
write: 给当前联机的用户发消息
wall: 给所有登录在本机的用户广播消息
last: 查看用户的登录日志
lastlog: 查看每个用户最后登录的情况
finger: 查看用户信息
ping -s 1024 www.baidu.com -s 可以指定测试包的大小,用于测试不同包大小的带宽。
ab -n 1000 -c 1000 www.baidu.com ab为 linux压力测试的命令,模拟1000个端口,进行总共1000次请求 (Apache HTTP server benchmarking tool)
traceroute www.baidu.com 查询整个转发路径上的访问结点的掉包率
mtr www.baidu.com 查看通路的掉包率
arping 查询哪个机器网卡ip地址是多少
top
vmstat (Report virtual memory statistics)
netstat (Print network connections, routing tables, interface statistics, masquerade connections, and multicast memberships)
netstat 查看tcp连接时, 如果
ESTABLISHED特别多 CC(Challenge Collapsar) 攻击, 建立链接攻击
ESTABLISHED很少,LISTEN很多 DDOS 攻击 sync-flood(泛滥攻击)
抓包工具:
Linux 内核内核参数:
位于 /proc/sys 目录下, 修改内核参数:123echo 1 > /proc/sys/net/ipv4/icmp_echo_ignore_allsysctl -w net.ipv4.icmp_echo_ignore_all=1sysctl -p $file load config from file
输出内核参数:1sysctl -a > /tmp/sysctl.output
从文件中读入内核参数:1sysctl -f /tmp/sysctl.output -p
解压rpm包
|
|
查询rpm包里面内容
|
|
查询rpm包里面的install/uninstall script
|
|
参考: https://cwiki.apache.org/confluence/display/SPARK/Useful+Developer+Tools
到Spark源代码目录下,运行:12mvn -DskipTests clean packagemvn eclipse:eclipse
Spark 是由 Scala语言编写,而Scala语言的语法糖太多,对于Scala新手的我来说确实困难,花费时间会较多,先暂时放一放。
Summary of the steps for setting up a Storm cluster:
配置: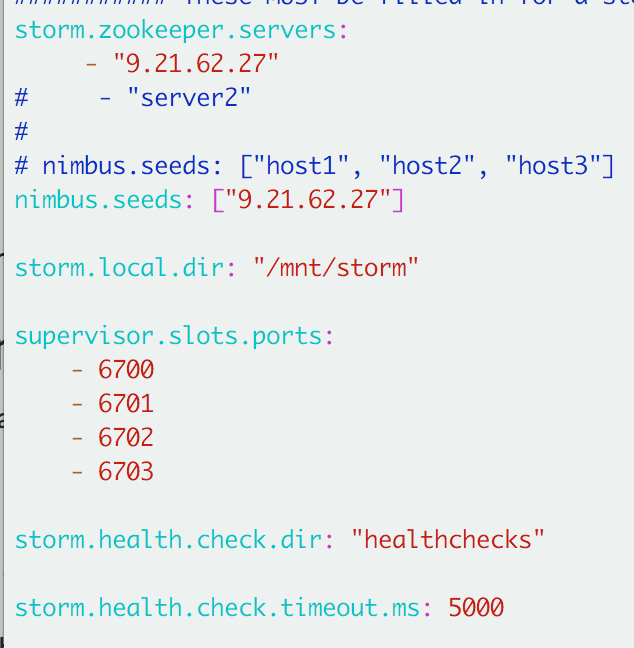
源代码入口:123bin/storm nimbus org.apache.storm.daemon.nimbusbin/storm supervisor org.apache.storm.daemon.supervisorbin/storm ui org.apache.storm.ui.core
运行测试案例:1bin/storm jar examples/storm-starter/storm-starter-topologies-1.0.2.jar org.apache.storm.starter.WordCountTopology
nimbus 与 supervisor之间通过zookeeper 进行通信12[zk: localhost:2181(CONNECTED) 9] ls /storm[backpressure, workerbeats, nimbuses, supervisors, errors, logconfigs, storms, assignments, leader-lock, blobstore]
The Offiline Image Viewer is a tool to dump the contents of hdfs fsimage files.
command :
|
|
Users can access the viewer and get information of the fsimage:1bin/hdfs dfs -ls webhdfs://127.0.0.1:5978/
|
|
hbase rest api 服务启动:1hbase-daemon.sh start rest
Follow these instructions for each HBase host fulfilling the REST server role.
To start the REST server as a foreground process, use the following command:
|
|
To start the REST server as a background process, use the following command:
|
|
To use a different port than the default of 8080, use the -p option.
|
|
Endpoint HTTP Verb Description Example
/version/cluster GET Version of HBase running on this cluster123456789101112131415curl -vi -X GET \ -H "Accept: text/xml" \ "http://example.com:8080/version/cluster"``` __/status/cluster__ GET Cluster status```bashcurl -vi -X GET \ -H "Accept: text/xml" \ "http://example.com:8080/status/cluster"``` __/__ GET List of all nonsystem tables```bashcurl -vi -X GET \ -H "Accept: text/xml" \ "http://example.com:8080/"
Endpoint HTTP Verb Description Example
/table/schema GET Describe the schema of the specified table.12345678910111213141516171819202122232425262728293031curl -vi -X GET \ -H "Accept: text/xml" \ "http://example.com:20550/users/schema"``` __/table/schema__ POST Create a new table, or replace an existing table's schema with the provided schema```bashcurl -vi -X POST \ -H "Accept: text/xml" \ -H "Content-Type: text/xml" \ -d '<?xml version="1.0" encoding="UTF-8"?><TableSchema name="users"><ColumnSchema name="cf" /></TableSchema>' \ "http://example.com:20550/users/schema"``` __/table/schema__ UPDATE Update an existing table with the provided schema fragment```bashcurl -vi -X PUT \ -H "Accept: text/xml" \ -H "Content-Type: text/xml" \ -d '<?xml version="1.0" encoding="UTF-8"?><TableSchema name="users"><ColumnSchema name="cf" KEEP_DELETED_CELLS="true" /></TableSchema>' \ "http://example.com:20550/users/schema"``` __/table/schema__ DELETE Delete the table. You must use thetable/schemaendpoint, not just table/.```bashcurl -vi -X DELETE \ -H "Accept: text/xml" \ "http://example.com:20550/users/schema"``` __/table/regions__ GET List the table regions.```bashcurl -vi -X GET \ -H "Accept: text/xml" \ "http://example.com:20550/users/regions"
Endpoint HTTP Verb Description Example
/table/row/column:qualifier/timestamp GET Get the value of a single row. Values are Base-64 encoded.123456789101112131415161718curl -vi -X GET \ -H "Accept: text/xml" \ "http://example.com:20550/users/row1"curl -vi -X GET \ -H "Accept: text/xml" \ "http://example.com:20550/users/row1/cf:a/1458586888395"curl -vi -X GET \ -H "Accept: text/xml" \ "http://example.com:20550/users/row1/cf:a"curl -vi -X GET \ -H "Accept: text/xml" \ "http://example.com:20550/users/row1/cf:a/"``` __/table/row/column:qualifier?v=number_of_versions__ Multi-Get a specified number of versions of a given cell. Values are Base-64 encoded.```bashcurl -vi -X GET \ -H "Accept: text/xml" \ "http://example.com:20550/users/row1/cf:a?v=2"
Endpoint HTTP Verb Description Example
/table/scanner/ PUT Get a Scanner object. Required by all other Scan operations. Adjust the batch parameter to the number of rows the scan should return in a batch. See the next example for adding filters to your Scanner. The scanner endpoint URL is returned as the Location in the HTTP response. The other examples in this table assume that the Scanner endpoint ishttp://example.com:20550/users/scanner/145869072824375522207.1234567curl -vi -X PUT \ -H "Accept: text/xml" \ -H "Content-Type: text/xml" \ -d '<Scanner batch="1"/>' \ "http://example.com:20550/users/scanner/"``` __/table/scanner/__ PUT To supply filters to the Scanner object or configure the Scanner in any other way, you can create a text file and add your filter to the file. For example, to return only rows for which keys start with u123and use a batch size of 100:
{
“type”: “PrefixFilter”,
“value”: “u123”
}
12345678910111213141516171819Pass the file to the -d argument of the curl request.```bashcurl -vi -X PUT \ -H "Accept: text/xml" \ -H "Content-Type:text/xml" \ -d @filter.txt \ "http://example.com:20550/users/scanner/"``` __/table/scanner/scanner_id__ GET Get the next batch from the scanner. Cell values are byte-encoded. If the scanner is exhausted, HTTP status 204 is returned.```bashcurl -vi -X GET \ -H "Accept: text/xml" \ "http://example.com:20550/users/scanner/145869072824375522207"``` __/table/scanner/scanner_id__ DELETE Deletes the scanner and frees the resources it was using.```bashcurl -vi -X DELETE \ -H "Accept: text/xml" \ "http://example.com:20550/users/scanner/145869072824375522207"
Endpoint HTTP Verb Description Example
/table/row_key/ PUT Write a row to a table. The row, column qualifier, and value must each be Base-64 encoded. To encode a string, you can use the base64command-line utility. To decode the string, usebase64 -d. The payload is in the –data argument, so the/users/fakerowvalue is a placeholder. Insert multiple rows by adding them to the12345678910curl -vi -X PUT \ -H "Accept: text/xml" \ -H "Content-Type: text/xml" \ -d '<?xml version="1.0" encoding="UTF-8" standalone="yes"?><CellSet><Row key="cm93NQo="><Cell column="Y2Y6ZQo=">dmFsdWU1Cg==</Cell></Row></CellSet>' \ "http://example.com:20550/users/fakerow"curl -vi -X PUT \ -H "Accept: text/json" \ -H "Content-Type: text/json" \ -d '{"Row":[{"key":"cm93NQo=", "Cell": [{"column":"Y2Y6ZQo=", "$":"dmFsdWU1Cg=="}]}]}' \ "example.com:20550/users/fakerow"
Endpoint HTTP Verb Description Example
/namespaces GET List all namespaces.123456789101112131415161718192021222324252627282930313233curl -vi -X GET \ -H "Accept: text/xml" \ "http://example.com:20550/namespaces/"``` __/namespaces/namespace__ GET Describe a specific namespace.```bashcurl -vi -X GET \ -H "Accept: text/xml" \ "http://example.com:20550/namespaces/special_ns"``` __/namespaces/namespace__ POST Create a new namespace.```bashcurl -vi -X POST \ -H "Accept: text/xml" \ "example.com:20550/namespaces/special_ns"``` __/namespaces/namespace/tables__ GET List all tables in a specific namespace.```bashcurl -vi -X GET \ -H "Accept: text/xml" \ "http://example.com:20550/namespaces/special_ns/tables"``` __/namespaces/namespace__ PUT Alter an existing namespace. Currently not used.```bashcurl -vi -X PUT \ -H "Accept: text/xml" \ "http://example.com:20550/namespaces/special_ns"``` __/namespaces/namespace__ DELETE Delete a namespace. The namespace must be empty.```bashcurl -vi -X DELETE \ -H "Accept: text/xml" \ "example.com:20550/namespaces/special_ns"
Hadoop Cluster High Availability (HA) enable QJM (Quorum Journal Manager): https://hadoop.apache.org/docs/r2.7.2/hadoop-project-dist/hadoop-hdfs/HDFSHighAvailabilityWithQJM.html
Hadoop Cluster High Availability (HA) enable using shared storage: https://hadoop.apache.org/docs/r2.7.2/hadoop-project-dist/hadoop-hdfs/HDFSHighAvailabilityWithNFS.html
Hadoop Cluster Service Level Authorization (ACL)
Hadoop Cluster enable HTTP/Web ACL
Integrate with Kerberos .
Rolling Upgrade url link: https://hadoop.apache.org/docs/r2.7.2/hadoop-project-dist/hadoop-hdfs/CentralizedCacheManagement.html
HDFS Rolling Upgrade url link: https://hadoop.apache.org/docs/r2.7.2/hadoop-project-dist/hadoop-hdfs/HdfsRollingUpgrade.html
Storage Policy url link: https://hadoop.apache.org/docs/r2.7.2/hadoop-project-dist/hadoop-hdfs/ArchivalStorage.html
Memory Storage Support url link: https://hadoop.apache.org/docs/r2.7.2/hadoop-project-dist/hadoop-hdfs/MemoryStorage.html
Hadoop KMS(Key Management Server) url link: https://hadoop.apache.org/docs/r2.7.2/hadoop-kms/index.html
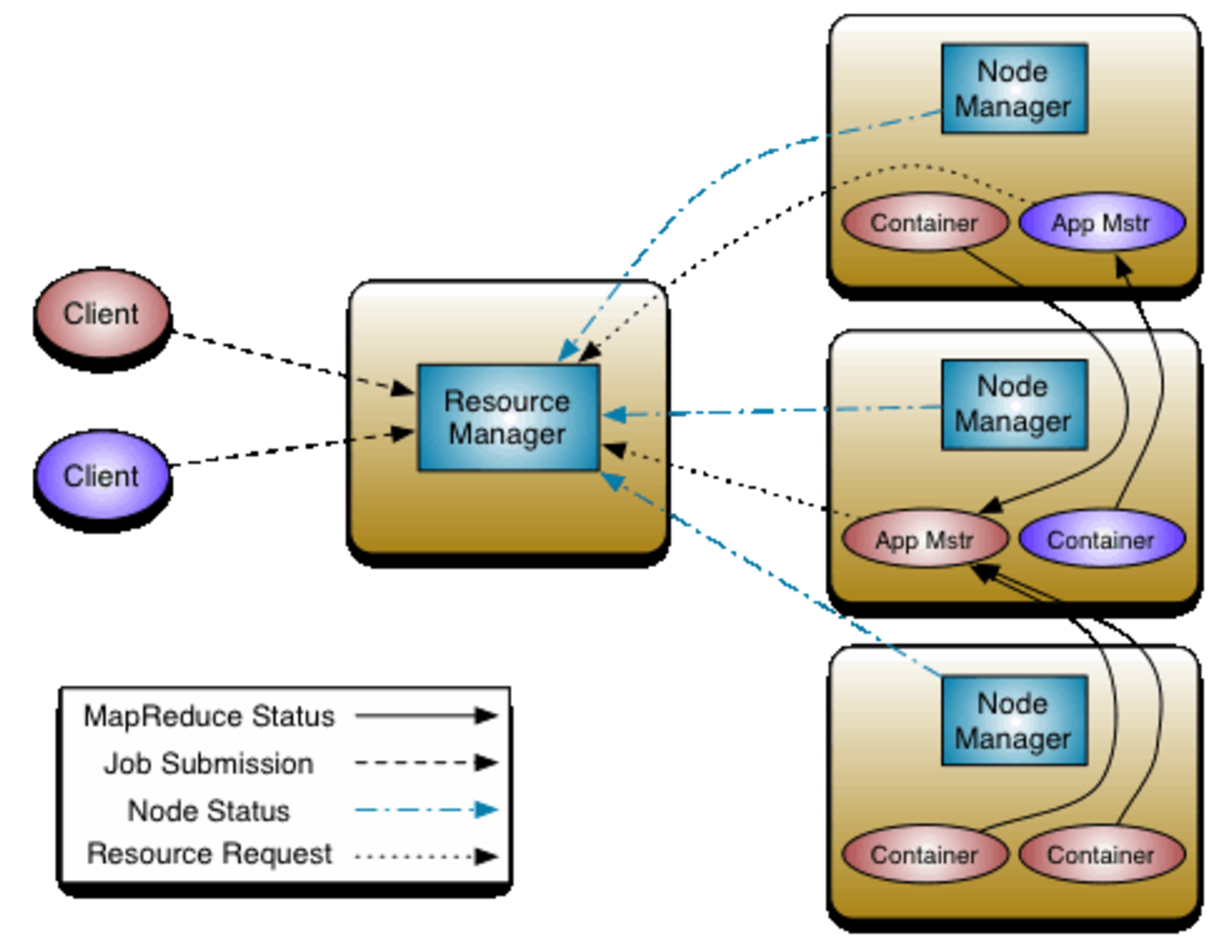
https://hadoop.apache.org/docs/r2.7.2/hadoop-yarn/hadoop-yarn-site/ResourceManagerRest.html
https://hadoop.apache.org/docs/r2.7.2/hadoop-yarn/hadoop-yarn-site/NodeManagerRest.html
https://hadoop.apache.org/docs/r2.7.2/hadoop-yarn/hadoop-yarn-site/MapredAppMasterRest.html
https://hadoop.apache.org/docs/r2.7.2/hadoop-yarn/hadoop-yarn-site/HistoryServerRest.html
The View File System (ViewFs) provides a way to manage multiple Hadoop file system namespaces or namespace volumes.
Suppose there are multiple cluster, each cluster has one or more namenodes. Each namenode has its own namespace, and a namenode belongs to one and only one cluster.
ViewFs implements the Hadoop file system interface just like HDFS and the local file system. 代码位于Hadoop HDFS src 工程的 ViewFS继承类。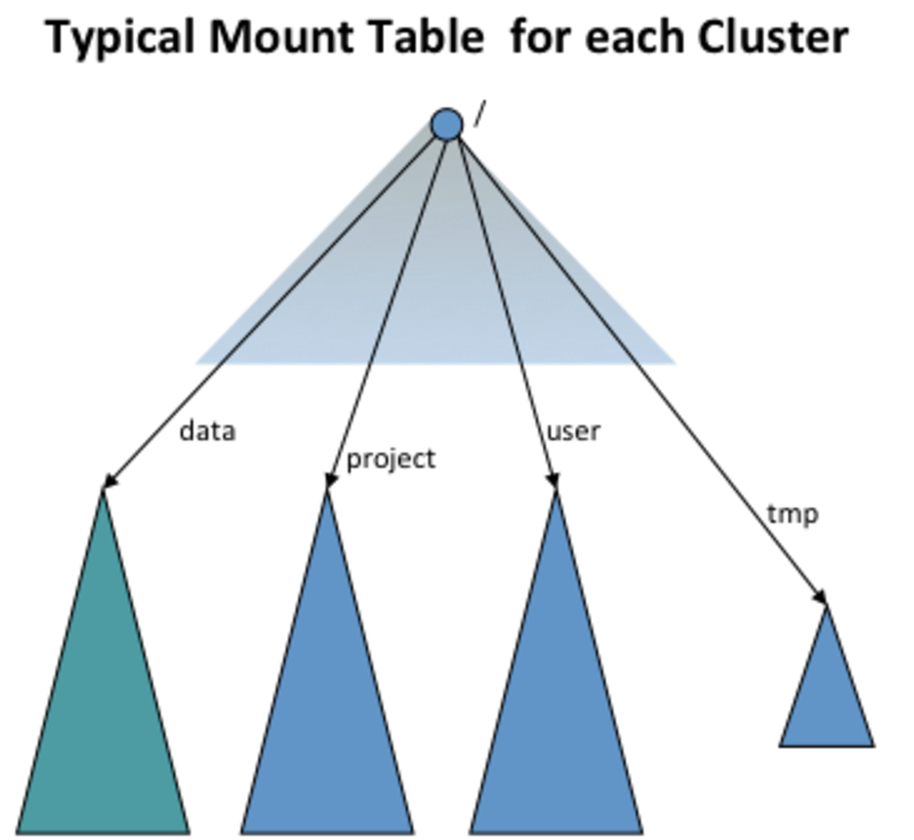
|
|
Port: 50070 也是 hdfs web portal的端口号.123webhdfs://<HOST>:<HTTP_PORT>/<PATH>hdfs://<HOST>:<RPC_PORT>/<PATH>http://<HOST>:<HTTP_PORT>/webhdfs/v1/<PATH>?op=...
Authentication when security is off:
|
|
Authentication using Kerberos SPNEGO when security is on:
|
|
Authentication using Hadoop delegation token when security is on:
|
|
List a Directory :1curl -i "http://<HOST>:<PORT>/webhdfs/v1/<PATH>?op=LISTSTATUS"
Status of a File/Directory :12345curl -i "http://<HOST>:<PORT>/webhdfs/v1/<PATH>?op=GETFILESTATUS"``` Make a Directory : ```bashcurl -i -X PUT "http://<HOST>:<PORT>/webhdfs/v1/<PATH>?op=MKDIRS[&permission=<OCTAL>]"
Delete a File/Directory :1curl -i -X DELETE "http://<host>:<port>/webhdfs/v1/<path>?op=DELETE[&recursive=<true|false>]"
Rename a File/Directory :1curl -i -X PUT "<HOST>:<PORT>/webhdfs/v1/<PATH>?op=RENAME&destination=<PATH>"
Open and Read a File :1curl -i -L "http://<HOST>:<PORT>/webhdfs/v1/<PATH>?op=OPEN[&offset=<LONG>][&length=<LONG>][&buffersize=<INT>]"
Create and Write to a File :1234curl -i -X PUT "http://<HOST>:<PORT>/webhdfs/v1/<PATH>?op=CREATE [&overwrite=<true|false>][&blocksize=<LONG>][&replication=<SHORT>] [&permission=<OCTAL>][&buffersize=<INT>]"curl -i -X PUT -T <LOCAL_FILE> "http://<DATANODE>:<PORT>/webhdfs/v1/<PATH>?op=CREATE..."
Append to a File :12curl -i -X POST "http://<HOST>:<PORT>/webhdfs/v1/<PATH>?op=APPEND[&buffersize=<INT>]"curl -i -X POST -T <LOCAL_FILE> "http://<DATANODE>:<PORT>/webhdfs/v1/<PATH>?op=APPEND…"
Concatenate Files :1curl -i -X POST "http://<HOST>:<PORT>/webhdfs/v1/<PATH>?op=CONCAT&sources=<PATHS>"
Get Content Summary of a Directory :1curl -i "http://<HOST>:<PORT>/webhdfs/v1/<PATH>?op=GETCONTENTSUMMARY"
Get File Checksum :1curl -i "http://<HOST>:<PORT>/webhdfs/v1/<PATH>?op=GETFILECHECKSUM"
Get Home Directory :1curl -i "http://<HOST>:<PORT>/webhdfs/v1/?op=GETHOMEDIRECTORY"
Set Permission :1curl -i -X PUT "http://<HOST>:<PORT>/webhdfs/v1/<PATH>?op=SETPERMISSION[&permission=<OCTAL>]"
Set Owner :12curl -i -X PUT "http://<HOST>:<PORT>/webhdfs/v1/<PATH>?op=SETOWNER [&owner=<USER>][&group=<GROUP>]"
Set Replication Factor :12curl -i -X PUT "http://<HOST>:<PORT>/webhdfs/v1/<PATH>?op=SETREPLICATION [&replication=<SHORT>]"
Set Access or Modification Time :12curl -i -X PUT "http://<HOST>:<PORT>/webhdfs/v1/<PATH>?op=SETTIMES [&modificationtime=<TIME>][&accesstime=<TIME>]"
Get Delegation Token :1curl -i "http://<HOST>:<PORT>/webhdfs/v1/?op=GETDELEGATIONTOKEN&renewer=<USER>"
Renew Delegation Token :1curl -i -X PUT "http://<HOST>:<PORT>/webhdfs/v1/?op=RENEWDELEGATIONTOKEN&token=<TOKEN>"
Cancel Delegation Token :1curl -i -X PUT "http://<HOST>:<PORT>/webhdfs/v1/?op=CANCELDELEGATIONTOKEN&token=<TOKEN>"
在前面的文章介绍过,Hadoop的Federation是将整个文件系统划分为子集,每一个Federation中的NameNode负责管理其中一个子集,整个文件系统由这些子集通过挂载mount的方式构建。 Federation与HA结合使用。
官方doc: https://hadoop.apache.org/docs/r2.7.2/hadoop-project-dist/hadoop-hdfs/Federation.html
Namespace :
1. Consists of directories, files and blocks.
2. It supports all the namespace related file system operations such as create, delete, modify and list files and directories.
Block Storage Services , this has two parts :
1. Block Management (performed in the Namenode)
  Provides Datanode cluster membership by handling registrations, and periodic heart beats.
  Processes block reports and maintains location of blocks.
  Supports block related operations such as create, delete, modify and get block location.
  Manages replica placement, block replication for under replicated blocks, and deletes blocks that are over replicated.
2. Storage   -   is provided by Datanodes by storing blocks on the local file system and allowing read/write access.
Federation uses multiple independent Namenodes/namespaces to scale the name service horizontally. The Namenodes are federated; the Namenodes are independent and do not require coordination with each other. The Datanodes are used as common storage for blocks by all the Namespaces. Each Datanode registers with all the Namenodes in the cluster. Datanodes send periodic heartbeats and block reports.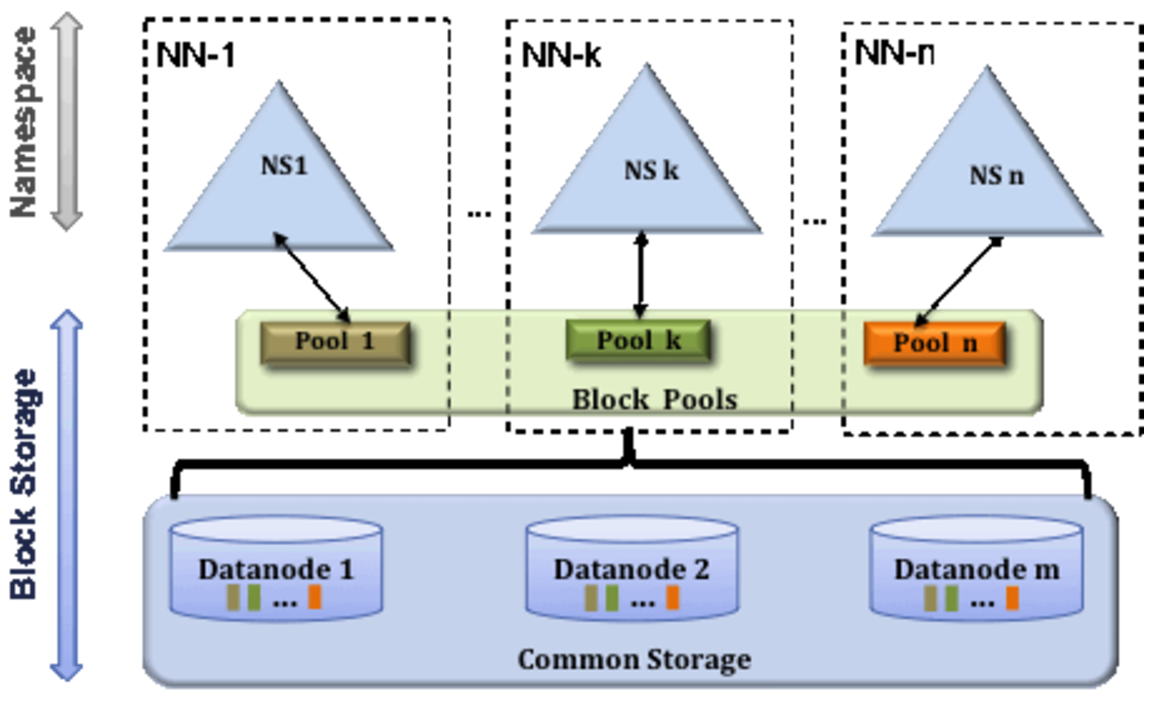
Federation configuration is backward compatible and allows existing single Namenode configuration to work without any change.
Step 1: Add the dfs.nameservices parameter to your configuration and configure it with a list of comma separated NameServiceIDs. This will be used by the Datanodes to determine the Namenodes in the cluster.
Step 2: For each Namenode and Secondary Namenode/BackupNode/Checkpointer add the following configuration parameters suffixed with the corresponding NameServiceID into the common configuration file:
Namenode
|
|
Step 1: Format a Namenode:1[hdfs]$ $HADOOP_PREFIX/bin/hdfs namenode -format [-clusterId <cluster_id>]
Step 2: Format additional Namenodes1[hdfs]$ $HADOOP_PREFIX/bin/hdfs namenode -format -clusterId <cluster_id>
Older releases only support a single Namenode, after Upgrade the cluster to newer release in order to enable federation.1[hdfs]$ $HADOOP_PREFIX/bin/hdfs start namenode --config $HADOOP_CONF_DIR -upgrade -clusterId <cluster_ID>
Perform the following steps:
|
|
Snapshots功能非常重要,可以保证HDFS在出现异常情况时可以进行恢复。 Snapshots可以使用在整个HDFS系统上,也可以只对其中的部分文件目录。
HDFS Snapshots are read-only point-in-time copies of file system. Snapshots can be taken on a subtree of the file system or the entire file system.
The HDFS path should be Snapshottable.12345678Snapshots Paths “.snapshot” is used for accessing its snapshots. hadoop fs -ls /foo/.snapshotAllow Snapshots command: hdfs dfsadmin -allowSnapshot <path>Disallow Snapshots command: hdfs dfsadmin -disallowSnapshot <path> Create Snapshots command: hdfs dfs -createSnapshot <path> [<snapshotName>]Delete Snapshots command: hdfs dfs -deleteSnapshot <path> [<snapshotName>]Rename Snapshots command: hdfs dfs -renameSnapshot <path> <oldName> <newName>Get Snapshottable Directory Listing command: hdfs lsSnapshottableDirGet Snapshots Difference Report command: hdfs snapshotDiff <path> <fromSnapshot> <toSnapshot>
Hadoop HDFS 2.x 包含了3种安装模式:
默认情况下,Hadoop被配置成以非分布式模式运行的一个独立Java进程。123456export JAVA_HOME=/usr/local/java/openjdk1.8/cd hadoop_home/mkdir inputcp etc/hadoop/*.xml inputbin/hadoop jar share/hadoop/mapreduce/hadoop-mapreduce-examples-2.7.2.jar grep input output 'dfs[a-z.]+'cat output/*
Hadoop可以在单节点上以所谓的伪分布式模式运行,此时每一个Hadoop守护进程都作为一个独立的Java进程运行。
不配置Yarn
etc/hadoop/core-site.xml:123456<configuration> <property> <name>fs.defaultFS</name> <value>hdfs://localhost:9000</value> </property></configuration>
etc/hadoop/hdfs-site.xml:123456<configuration> <property> <name>dfs.replication</name> <value>3</value> </property></configuration>
Setup passphraseless ssh login:1234ssh localhostssh-keygen -t dsa -P '' -f ~/.ssh/id_dsacat ~/.ssh/id_dsa.pub >> ~/.ssh/authorized_keyschmod 0600 ~/.ssh/authorized_keys
The following instructions are to run a MapReduce job locally.
Format the filesystem: 初始化!!!
|
|
Start NameNode daemon and DataNode daemon:
|
|
The hadoop daemon log output is written to the $(HADOOP_LOG_DIR) directory (defaults to $(HADOOP_HOME)/logs).
Make the HDFS directories required to execute MapReduce jobs:
|
|
Copy the input files into the distributed filesystem:
|
|
Run some of the examples provided:
|
|
Examine the output files: Copy the output files from the distributed filesystem to the local filesystem and examine them:
|
|
or
View the output files on the distributed filesystem:1bin/hdfs dfs -cat output/*
|
|
配置Yarn on a Single Node
etc/hadoop/mapred-site.xml123456<configuration> <property> <name>mapreduce.framework.name</name> <value>yarn</value> </property></configuration>
etc/hadoop/yarn-site.xml:123456<configuration> <property> <name>yarn.nodemanager.aux-services</name> <value>mapreduce_shuffle</value> </property></configuration>
Start ResourceManager daemon and NodeManager daemon:
|
|
Browse the web interface for the ResourceManager; by default it is available at:
ResourceManager - http://localhost:8088/
|
|
参考:http://hadoop.apache.org/docs/current/hadoop-project-dist/hadoop-common/ClusterSetup.html
下载 hadoop2.7.3 版本的压缩包,解压缩到master节点上, 解压路径为 ${Hadoop_Install} .
配置 hadoop cluster 中各个节点之间的passwordless 无密码访问。
到 ${Hadoop_Install}/etc/hadoop/ 目录下 编辑配置文件: core-site.xml hdfs-site.xml mapred-site.xml yarn-site.xml .
core-site.xml : configure important parameters12345678910<configuration> <property> <name>fs.defaultFS</name> <value>hdfs://hadoop-nn:9000</value> </property> <property> <name>dfs.permissions</name> <value>false</value> </property></configuration>
hdfs-site.xml : configure for NameNode + DataNode1234567891011121314151617181920<configuration> <property> <name>dfs.data.dir</name> <value>/opt/hadoop/dfs/name/data</value> <final>true</final> </property> <property> <name>dfs.name.dir</name> <value>/opt/hadoop/dfs/name</value> <final>true</final> </property> <property> <name>dfs.blocksize</name> <value>10240</value> </property> <property> <name>dfs.replication</name> <value>2</value> </property></configuration>
mapred-site.xml : Configure for MapReduce Applications + MapReduce JobHistory Server123456<configuration> <property> <name>mapred.framework.name</name> <value>yarn</value> </property></configuration>
yarn-site.xml : Configure for ResourceManager + NodeManager + History Server1234567891011121314<configuration> <property> <name>yarn.resourcemanager.resource-tracker.address</name> <value>hadoop-nn:8025</value> </property> <property> <name>yarn.resourcemanager.scheduler.address</name> <value>hadoop-nn:8035</value> </property> <property> <name>yarn.resourcemanager.address</name> <value>hadoop-nn:8050</value> </property></configuration>
Format a new distributed filesystem:1[hdfs]$ $HADOOP_PREFIX/bin/hdfs namenode -format <cluster_name>
会生成一个name文件夹,里面存储fsimage和editlog文件,记录整个cluster中的文件系统。
Start HDFS NameNode :1[hdfs]$ $HADOOP_PREFIX/sbin/hadoop-daemon.sh --config $HADOOP_CONF_DIR --script hdfs start namenode
Start HDFS DataNode :1[hdfs]$ $HADOOP_PREFIX/sbin/hadoop-daemons.sh --config $HADOOP_CONF_DIR --script hdfs start datanode
Start all Hadoop slaves * :1[hdfs]$ $HADOOP_PREFIX/sbin/start-dfs.sh
Start Yarn ResourceManager :1[yarn]$ $HADOOP_YARN_HOME/sbin/yarn-daemon.sh --config $HADOOP_CONF_DIR start resourcemanager
Start Yarn NodeManager :1[yarn]$ $HADOOP_YARN_HOME/sbin/yarn-daemons.sh --config $HADOOP_CONF_DIR start nodemanager
Start Yarn WebAppProxy server if necessary:1[yarn]$ $HADOOP_YARN_HOME/sbin/yarn-daemon.sh --config $HADOOP_CONF_DIR start proxyserver
Start all Yarn slaves *:1[yarn]$ $HADOOP_PREFIX/sbin/start-yarn.sh
Start MapReduce JobHistory server :1[mapred]$ $HADOOP_PREFIX/sbin/mr-jobhistory-daemon.sh --config $HADOOP_CONF_DIR start historyserver
|
|
configure hdfs-site.xml :12345<property> <name>dfs.hosts.exclude</name> <value>/home/hadoop/hdfs_exclude.txt</value> <description>DFS exclude</description></property>
Then write the decommission data node(slave2) to hdfs_exclude.txt file.
Last, force configure reload:12hadoop dfsadmin -refreshNodeshadoop dfsadmin -report
|
|
#get children of the root node1curl http://localhost:9998/znodes/v1/?view=children
#get “/cluster1/leader” as xml (default is json)1curl -H'Accept: application/xml' http://localhost:9998/znodes/v1/cluster1/leader
#get the data as text1curl -w "\n%{http_code}\n" "http://localhost:9998/znodes/v1/cluster1/leader?dataformat=utf8"
#set a node (data.txt contains the ascii text you want to set on the node)1curl -T data.txt -w "\n%{http_code}\n" "http://localhost:9998/znodes/v1/cluster1/leader?dataformat=utf8"
#create a node1curl -d "data1" -H'Content-Type: application/octet-stream' -w "\n%{http_code}\n" "http://localhost:9998/znodes/v1/?op=create&name=cluster2&dataformat=utf8"
|
|
#create a new session1curl -d "" -H'Content-Type: application/octet-stream' -w "\n%{http_code}\n" "http://localhost:9998/sessions/v1/?op=create&expire=10"
#session heartbeat1curl -X "PUT" -H'Content-Type: application/octet-stream' -w "\n%{http_code}\n" "http://localhost:9998/sessions/v1/02dfdcc8-8667-4e53-a6f8-ca5c2b495a72"
#delete a session1curl -X "DELETE" -H'Content-Type: application/octet-stream' -w "\n%{http_code}\n" "http://localhost:9998/sessions/v1/02dfdcc8-8667-4e53-a6f8-ca5c2b495a72"
RestAPI源码入门:
RestAPI 入口main函数所在文件: org.apache.zookeeper.server.jersey.RestMain
ZooKeeper Source Code 解析:
1.zkServer 脚本启动命令:12345ZOOMAIN="-Dcom.sun.management.jmxremote -Dcom.sun.management.jmxremote.local.only=$JMXLOCALONLY org.apache.zookeeper.server.quorum.QuorumPeerMain"nohup "$JAVA" "-Dzookeeper.log.dir=${ZOO_LOG_DIR}" "-Dzookeeper.root.logger=${ZOO_LOG4J_PROP}" \ -agentlib:jdwp=transport=dt_socket,server=y,suspend=y,address=7778 \ -cp "$CLASSPATH" $JVMFLAGS $ZOOMAIN "$ZOOCFG" > "$_ZOO_DAEMON_OUT" 2>&1 < /dev/null &
2.zkCli 脚本启动命令:123"$JAVA" "-Dzookeeper.log.dir=${ZOO_LOG_DIR}" "-Dzookeeper.root.logger=${ZOO_LOG4J_PROP}" \ -cp "$CLASSPATH" $CLIENT_JVMFLAGS $JVMFLAGS \ org.apache.zookeeper.ZooKeeperMain "$@"
由上可知, ZooKeeper的server启动入口函数为 QuorumPeerMain ,而client的启动入口函数为 ZooKeeperMain。
分布式协同技术诞生于分布式系统中,致力于解决各大分布式系统或分布式计算平台点到点的同步问题。 代表性的有 etcd, ZooKeeper, Consul, Doozerd。 其中:
推荐一个Raft算法动态描述的网站: https://raft.github.io/
至于 Raft 和 Paxos 算法的区别,网上文章有一些,可以阅读一下,但是本人至今没仔细钻研过两个算法的区别,以后如果有时间再补上。
1.logs.InitLogs()
k8s.io/kubernetes/pkg/util/logs 日志管理代码
每30秒刷新一次日志。 使用了github.com/golang/glog
type Factory struct {
clients ClientCache
flags pflag.FlagSet
// Returns interfaces for dealing with arbitrary runtime.Objects.
Object func() (meta.RESTMapper, runtime.ObjectTyper)
// Returns interfaces for dealing with arbitrary
// runtime.Unstructured. This performs API calls to discover types.
UnstructuredObject func() (meta.RESTMapper, runtime.ObjectTyper, error)
// Returns interfaces for decoding objects - if toInternal is set, decoded objects will be converted
// into their internal form (if possible). Eventually the internal form will be removed as an option,
// and only versioned objects will be returned.
Decoder func(toInternal bool) runtime.Decoder
// Returns an encoder capable of encoding a provided object into JSON in the default desired version.
JSONEncoder func() runtime.Encoder
// ClientSet gives you back an internal, generated clientset
ClientSet func() (*internalclientset.Clientset, error)
// Returns a RESTClient for accessing Kubernetes resources or an error.
RESTClient func() (*restclient.RESTClient, error)
// Returns a client.Config for accessing the Kubernetes server.
ClientConfig func() (*restclient.Config, error)
// Returns a RESTClient for working with the specified RESTMapping or an error. This is intended
// for working with arbitrary resources and is not guaranteed to point to a Kubernetes APIServer.
ClientForMapping func(mapping *meta.RESTMapping) (resource.RESTClient, error)
// Returns a RESTClient for working with Unstructured objects.
UnstructuredClientForMapping func(mapping *meta.RESTMapping) (resource.RESTClient, error)
// Returns a Describer for displaying the specified RESTMapping type or an error.
Describer func(mapping *meta.RESTMapping) (kubectl.Describer, error)
// Returns a Printer for formatting objects of the given type or an error.
Printer func(mapping *meta.RESTMapping, options kubectl.PrintOptions) (kubectl.ResourcePrinter, error)
// Returns a Scaler for changing the size of the specified RESTMapping type or an error
Scaler func(mapping *meta.RESTMapping) (kubectl.Scaler, error)
// Returns a Reaper for gracefully shutting down resources.
Reaper func(mapping *meta.RESTMapping) (kubectl.Reaper, error)
// Returns a HistoryViewer for viewing change history
HistoryViewer func(mapping *meta.RESTMapping) (kubectl.HistoryViewer, error)
// Returns a Rollbacker for changing the rollback version of the specified RESTMapping type or an error
Rollbacker func(mapping *meta.RESTMapping) (kubectl.Rollbacker, error)
// Returns a StatusViewer for printing rollout status.
StatusViewer func(mapping *meta.RESTMapping) (kubectl.StatusViewer, error)
// MapBasedSelectorForObject returns the map-based selector associated with the provided object. If a
// new set-based selector is provided, an error is returned if the selector cannot be converted to a
// map-based selector
MapBasedSelectorForObject func(object runtime.Object) (string, error)
// PortsForObject returns the ports associated with the provided object
PortsForObject func(object runtime.Object) ([]string, error)
// ProtocolsForObject returns the <port, protocol> mapping associated with the provided object
ProtocolsForObject func(object runtime.Object) (map[string]string, error)
// LabelsForObject returns the labels associated with the provided object
LabelsForObject func(object runtime.Object) (map[string]string, error)
// LogsForObject returns a request for the logs associated with the provided object
LogsForObject func(object, options runtime.Object) (*restclient.Request, error)
// PauseObject marks the provided object as paused ie. it will not be reconciled by its controller.
PauseObject func(object runtime.Object) (bool, error)
// ResumeObject resumes a paused object ie. it will be reconciled by its controller.
ResumeObject func(object runtime.Object) (bool, error)
// Returns a schema that can validate objects stored on disk.
Validator func(validate bool, cacheDir string) (validation.Schema, error)
// SwaggerSchema returns the schema declaration for the provided group version kind.
SwaggerSchema func(unversioned.GroupVersionKind) (*swagger.ApiDeclaration, error)
// Returns the default namespace to use in cases where no
// other namespace is specified and whether the namespace was
// overridden.
DefaultNamespace func() (string, bool, error)
// Generators returns the generators for the provided command
Generators func(cmdName string) map[string]kubectl.Generator
// Check whether the kind of resources could be exposed
CanBeExposed func(kind unversioned.GroupKind) error
// Check whether the kind of resources could be autoscaled
CanBeAutoscaled func(kind unversioned.GroupKind) error
// AttachablePodForObject returns the pod to which to attach given an object.
AttachablePodForObject func(object runtime.Object) (*api.Pod, error)
// UpdatePodSpecForObject will call the provided function on the pod spec this object supports,
// return false if no pod spec is supported, or return an error.
UpdatePodSpecForObject func(obj runtime.Object, fn func(*api.PodSpec) error) (bool, error)
// EditorEnvs returns a group of environment variables that the edit command
// can range over in order to determine if the user has specified an editor
// of their choice.
EditorEnvs func() []string
// PrintObjectSpecificMessage prints object-specific messages on the provided writer
PrintObjectSpecificMessage func(obj runtime.Object, out io.Writer)
}
const (
RunV1GeneratorName = “run/v1”
RunPodV1GeneratorName = “run-pod/v1”
ServiceV1GeneratorName = “service/v1”
ServiceV2GeneratorName = “service/v2”
ServiceNodePortGeneratorV1Name = “service-nodeport/v1”
ServiceClusterIPGeneratorV1Name = “service-clusterip/v1”
ServiceLoadBalancerGeneratorV1Name = “service-loadbalancer/v1”
ServiceAccountV1GeneratorName = “serviceaccount/v1”
HorizontalPodAutoscalerV1Beta1GeneratorName = “horizontalpodautoscaler/v1beta1”
HorizontalPodAutoscalerV1GeneratorName = “horizontalpodautoscaler/v1”
DeploymentV1Beta1GeneratorName = “deployment/v1beta1”
DeploymentBasicV1Beta1GeneratorName = “deployment-basic/v1beta1”
JobV1Beta1GeneratorName = “job/v1beta1”
JobV1GeneratorName = “job/v1”
ScheduledJobV2Alpha1GeneratorName = “scheduledjob/v2alpha1”
NamespaceV1GeneratorName = “namespace/v1”
ResourceQuotaV1GeneratorName = “resourcequotas/v1”
SecretV1GeneratorName = “secret/v1”
SecretForDockerRegistryV1GeneratorName = “secret-for-docker-registry/v1”
SecretForTLSV1GeneratorName = “secret-for-tls/v1”
ConfigMapV1GeneratorName = “configmap/v1”
)
Eclipse 安装 scala IDE 插件:
http://download.scala-ide.org/sdk/lithium/e44/scala211/stable/site
源代码 import进Eclipse
Step 1: Download the code
Download the 0.10.0.0 release and un-tar it.
tar -xzf kafka_2.11-0.10.0.0.tgz
cd kafka_2.11-0.10.0.0
Step 2: Start the server
Kafka uses ZooKeeper so you need to first start a ZooKeeper server if you don’t already have one. You can use the convenience script packaged with kafka to get a quick-and-dirty single-node ZooKeeper instance.
bin/zookeeper-server-start.sh config/zookeeper.properties
[2013-04-22 15:01:37,495] INFO Reading configuration from: config/zookeeper.properties (org.apache.zookeeper.server.quorum.QuorumPeerConfig)
…
Now start the Kafka server:
bin/kafka-server-start.sh config/server.properties
[2013-04-22 15:01:47,028] INFO Verifying properties (kafka.utils.VerifiableProperties)
[2013-04-22 15:01:47,051] INFO Property socket.send.buffer.bytes is overridden to 1048576 (kafka.utils.VerifiableProperties)
…
Step 3: Create a topic
Let’s create a topic named “test” with a single partition and only one replica:
bin/kafka-topics.sh –create –zookeeper localhost:2181 –replication-factor 1 –partitions 1 –topic test
We can now see that topic if we run the list topic command:
bin/kafka-topics.sh –list –zookeeper localhost:2181
test
Alternatively, instead of manually creating topics you can also configure your brokers to auto-create topics when a non-existent topic is published to.
Step 4: Send some messages
Kafka comes with a command line client that will take input from a file or from standard input and send it out as messages to the Kafka cluster. By default each line will be sent as a separate message.
Run the producer and then type a few messages into the console to send to the server.
bin/kafka-console-producer.sh –broker-list localhost:9092 –topic test
This is a message
This is another message
Step 5: Start a consumer
Kafka also has a command line consumer that will dump out messages to standard output.
bin/kafka-console-consumer.sh –zookeeper localhost:2181 –topic test –from-beginning
This is a message
This is another message
If you have each of the above commands running in a different terminal then you should now be able to type messages into the producer terminal and see them appear in the consumer terminal.
All of the command line tools have additional options; running the command with no arguments will display usage information documenting them in more detail.
Step 6: Setting up a multi-broker cluster
So far we have been running against a single broker, but that’s no fun. For Kafka, a single broker is just a cluster of size one, so nothing much changes other than starting a few more broker instances. But just to get feel for it, let’s expand our cluster to three nodes (still all on our local machine).
First we make a config file for each of the brokers:
cp config/server.properties config/server-1.properties
cp config/server.properties config/server-2.properties
Now edit these new files and set the following properties:
config/server-1.properties:
broker.id=1
listeners=PLAINTEXT://:9093
log.dir=/tmp/kafka-logs-1
config/server-2.properties:
broker.id=2
listeners=PLAINTEXT://:9094
log.dir=/tmp/kafka-logs-2
The broker.id property is the unique and permanent name of each node in the cluster. We have to override the port and log directory only because we are running these all on the same machine and we want to keep the brokers from all trying to register on the same port or overwrite each others data.
We already have Zookeeper and our single node started, so we just need to start the two new nodes:
bin/kafka-server-start.sh config/server-1.properties &
…
bin/kafka-server-start.sh config/server-2.properties &
…
Now create a new topic with a replication factor of three:
bin/kafka-topics.sh –create –zookeeper localhost:2181 –replication-factor 3 –partitions 1 –topic my-replicated-topic
Okay but now that we have a cluster how can we know which broker is doing what? To see that run the “describe topics” command:
bin/kafka-topics.sh –describe –zookeeper localhost:2181 –topic my-replicated-topic
Topic:my-replicated-topic PartitionCount:1 ReplicationFactor:3 Configs:
Topic: my-replicated-topic Partition: 0 Leader: 1 Replicas: 1,2,0 Isr: 1,2,0
Here is an explanation of output. The first line gives a summary of all the partitions, each additional line gives information about one partition. Since we have only one partition for this topic there is only one line.
Note that in my example node 1 is the leader for the only partition of the topic.
We can run the same command on the original topic we created to see where it is:
bin/kafka-topics.sh –describe –zookeeper localhost:2181 –topic test
Topic:test PartitionCount:1 ReplicationFactor:1 Configs:
Topic: test Partition: 0 Leader: 0 Replicas: 0 Isr: 0
So there is no surprise there—the original topic has no replicas and is on server 0, the only server in our cluster when we created it.
Let’s publish a few messages to our new topic:
bin/kafka-console-producer.sh –broker-list localhost:9092 –topic my-replicated-topic
…
my test message 1
my test message 2
^C
Now let’s consume these messages:
bin/kafka-console-consumer.sh –zookeeper localhost:2181 –from-beginning –topic my-replicated-topic
…
my test message 1
my test message 2
^C
Now let’s test out fault-tolerance. Broker 1 was acting as the leader so let’s kill it:
ps | grep server-1.properties
7564 ttys002 0:15.91 /System/Library/Frameworks/JavaVM.framework/Versions/1.8/Home/bin/java…
kill -9 7564
Leadership has switched to one of the slaves and node 1 is no longer in the in-sync replica set:
bin/kafka-topics.sh –describe –zookeeper localhost:2181 –topic my-replicated-topic
Topic:my-replicated-topic PartitionCount:1 ReplicationFactor:3 Configs:
Topic: my-replicated-topic Partition: 0 Leader: 2 Replicas: 1,2,0 Isr: 2,0
But the messages are still be available for consumption even though the leader that took the writes originally is down:
bin/kafka-console-consumer.sh –zookeeper localhost:2181 –from-beginning –topic my-replicated-topic
…
my test message 1
my test message 2
^C
Step 7: Use Kafka Connect to import/export data
Writing data from the console and writing it back to the console is a convenient place to start, but you’ll probably want to use data from other sources or export data from Kafka to other systems. For many systems, instead of writing custom integration code you can use Kafka Connect to import or export data. Kafka Connect is a tool included with Kafka that imports and exports data to Kafka. It is an extensible tool that runs connectors, which implement the custom logic for interacting with an external system. In this quickstart we’ll see how to run Kafka Connect with simple connectors that import data from a file to a Kafka topic and export data from a Kafka topic to a file. First, we’ll start by creating some seed data to test with:
echo -e “foo\nbar” > test.txt
Next, we’ll start two connectors running in standalone mode, which means they run in a single, local, dedicated process. We provide three configuration files as parameters. The first is always the configuration for the Kafka Connect process, containing common configuration such as the Kafka brokers to connect to and the serialization format for data. The remaining configuration files each specify a connector to create. These files include a unique connector name, the connector class to instantiate, and any other configuration required by the connector.
bin/connect-standalone.sh config/connect-standalone.properties config/connect-file-source.properties config/connect-file-sink.properties
These sample configuration files, included with Kafka, use the default local cluster configuration you started earlier and create two connectors: the first is a source connector that reads lines from an input file and produces each to a Kafka topic and the second is a sink connector that reads messages from a Kafka topic and produces each as a line in an output file. During startup you’ll see a number of log messages, including some indicating that the connectors are being instantiated. Once the Kafka Connect process has started, the source connector should start reading lines from
test.txt
and producing them to the topic
connect-test
, and the sink connector should start reading messages from the topic
connect-test
and write them to the file
test.sink.txt
. We can verify the data has been delivered through the entire pipeline by examining the contents of the output file:
cat test.sink.txt
foo
bar
Note that the data is being stored in the Kafka topic
connect-test
, so we can also run a console consumer to see the data in the topic (or use custom consumer code to process it):
bin/kafka-console-consumer.sh –zookeeper localhost:2181 –topic connect-test –from-beginning
{“schema”:{“type”:”string”,”optional”:false},”payload”:”foo”}
{“schema”:{“type”:”string”,”optional”:false},”payload”:”bar”}
…
The connectors continue to process data, so we can add data to the file and see it move through the pipeline:
echo “Another line” >> test.txt
You should see the line appear in the console consumer output and in the sink file.
Step 8: Use Kafka Streams to process data
Kafka Streams is a client library of Kafka for real-time stream processing and analyzing data stored in Kafka brokers. This quickstart example will demonstrate how to run a streaming application coded in this library. Here is the gist of the WordCountDemo example code (converted to use Java 8 lambda expressions for easy reading).
KTable wordCounts = textLines
// Split each text line, by whitespace, into words.
.flatMapValues(value -> Arrays.asList(value.toLowerCase().split(“\W+”)))
// Ensure the words are available as record keys for the next aggregate operation.
.map((key, value) -> new KeyValue<>(value, value))

// Count the occurrences of each word (record key) and store the results into a table named "Counts".
.countByKey("Counts")
It implements the WordCount algorithm, which computes a word occurrence histogram from the input text. However, unlike other WordCount examples you might have seen before that operate on bounded data, the WordCount demo application behaves slightly differently because it is designed to operate on aninfinite, unbounded stream of data. Similar to the bounded variant, it is a stateful algorithm that tracks and updates the counts of words. However, since it must assume potentially unbounded input data, it will periodically output its current state and results while continuing to process more data because it cannot know when it has processed “all” the input data.
We will now prepare input data to a Kafka topic, which will subsequently processed by a Kafka Streams application.
echo -e “all streams lead to kafka\nhello kafka streams\njoin kafka summit” > file-input.txt
Next, we send this input data to the input topic named streams-file-input using the console producer (in practice, stream data will likely be flowing continuously into Kafka where the application will be up and running):
bin/kafka-topics.sh –create \
–zookeeper localhost:2181 \
–replication-factor 1 \
–partitions 1 \
–topic streams-file-inputcat file-input.txt | bin/kafka-console-producer.sh –broker-list localhost:9092 –topic streams-file-input
We can now run the WordCount demo application to process the input data:
bin/kafka-run-class.sh org.apache.kafka.streams.examples.wordcount.WordCountDemo
There won’t be any STDOUT output except log entries as the results are continuously written back into another topic named streams-wordcount-output in Kafka. The demo will run for a few seconds and then, unlike typical stream processing applications, terminate automatically.
We can now inspect the output of the WordCount demo application by reading from its output topic:
bin/kafka-console-consumer.sh –zookeeper localhost:2181 \
–topic streams-wordcount-output \
–from-beginning \
–formatter kafka.tools.DefaultMessageFormatter \
–property print.key=true \
–property print.value=true \
–property key.deserializer=org.apache.kafka.common.serialization.StringDeserializer \
–property value.deserializer=org.apache.kafka.common.serialization.LongDeserializer
with the following output data being printed to the console:
all 1
streams 1
lead 1
to 1
kafka 1
hello 1
kafka 2
streams 2
join 1
kafka 3
summit 1
Since Kafka Connect is intended to be run as a service, it also provides a REST API for managing connectors. By default this service runs on port 8083. The following are the currently supported endpoints:
GET /connectors - return a list of active connectorsPOST /connectors - create a new connector; the request body should be a JSON object containing a string name field and a object config field with the connector configuration parametersGET /connectors/{name} - get information about a specific connectorGET /connectors/{name}/config - get the configuration parameters for a specific connectorPUT /connectors/{name}/config - update the configuration parameters for a specific connectorGET /connectors/{name}/status - get current status of the connector, including if it is running, failed, paused, etc., which worker it is assigned to, error information if it has failed, and the state of all its tasksGET /connectors/{name}/tasks - get a list of tasks currently running for a connectorGET /connectors/{name}/tasks/{taskid}/status - get current status of the task, including if it is running, failed, paused, etc., which worker it is assigned to, and error information if it has failedPUT /connectors/{name}/pause - pause the connector and its tasks, which stops message processing until the connector is resumedPUT /connectors/{name}/resume - resume a paused connector (or do nothing if the connector is not paused)POST /connectors/{name}/restart - restart a connector (typically because it has failed)POST /connectors/{name}/tasks/{taskId}/restart - restart an individual task (typically because it has failed)DELETE /connectors/{name} - delete a connector, halting all tasks and deleting its configurationKafka Connect also provides a REST API for getting information about connector plugins:
GET /connector-plugins- return a list of connector plugins installed in the Kafka Connect cluster. Note that the API only checks for connectors on the worker that handles the request, which means you may see inconsistent results, especially during a rolling upgrade if you add new connector jarsPUT /connector-plugins/{connector-type}/config/validate - validate the provided configuration values against the configuration definition. This API performs per config validation, returns suggested values and error messages during validation.
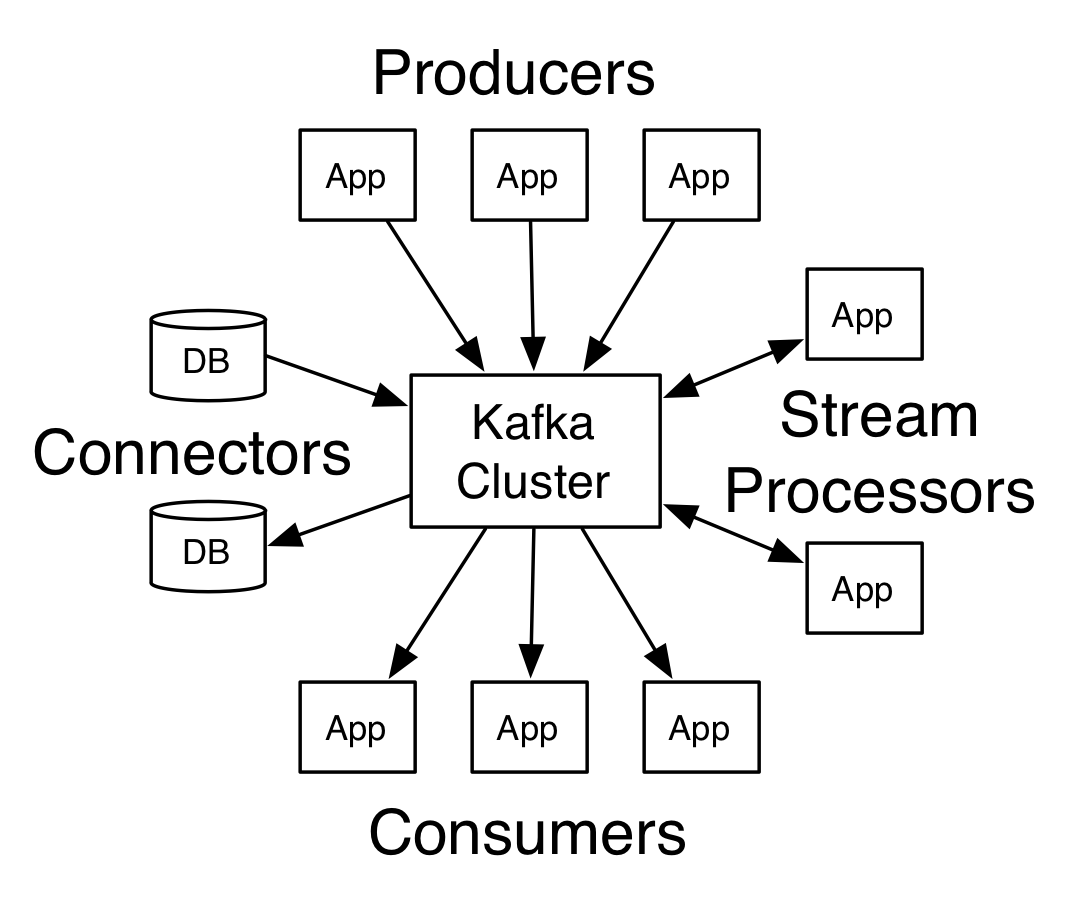
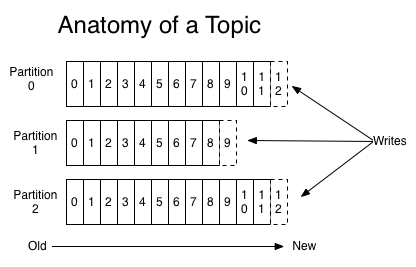
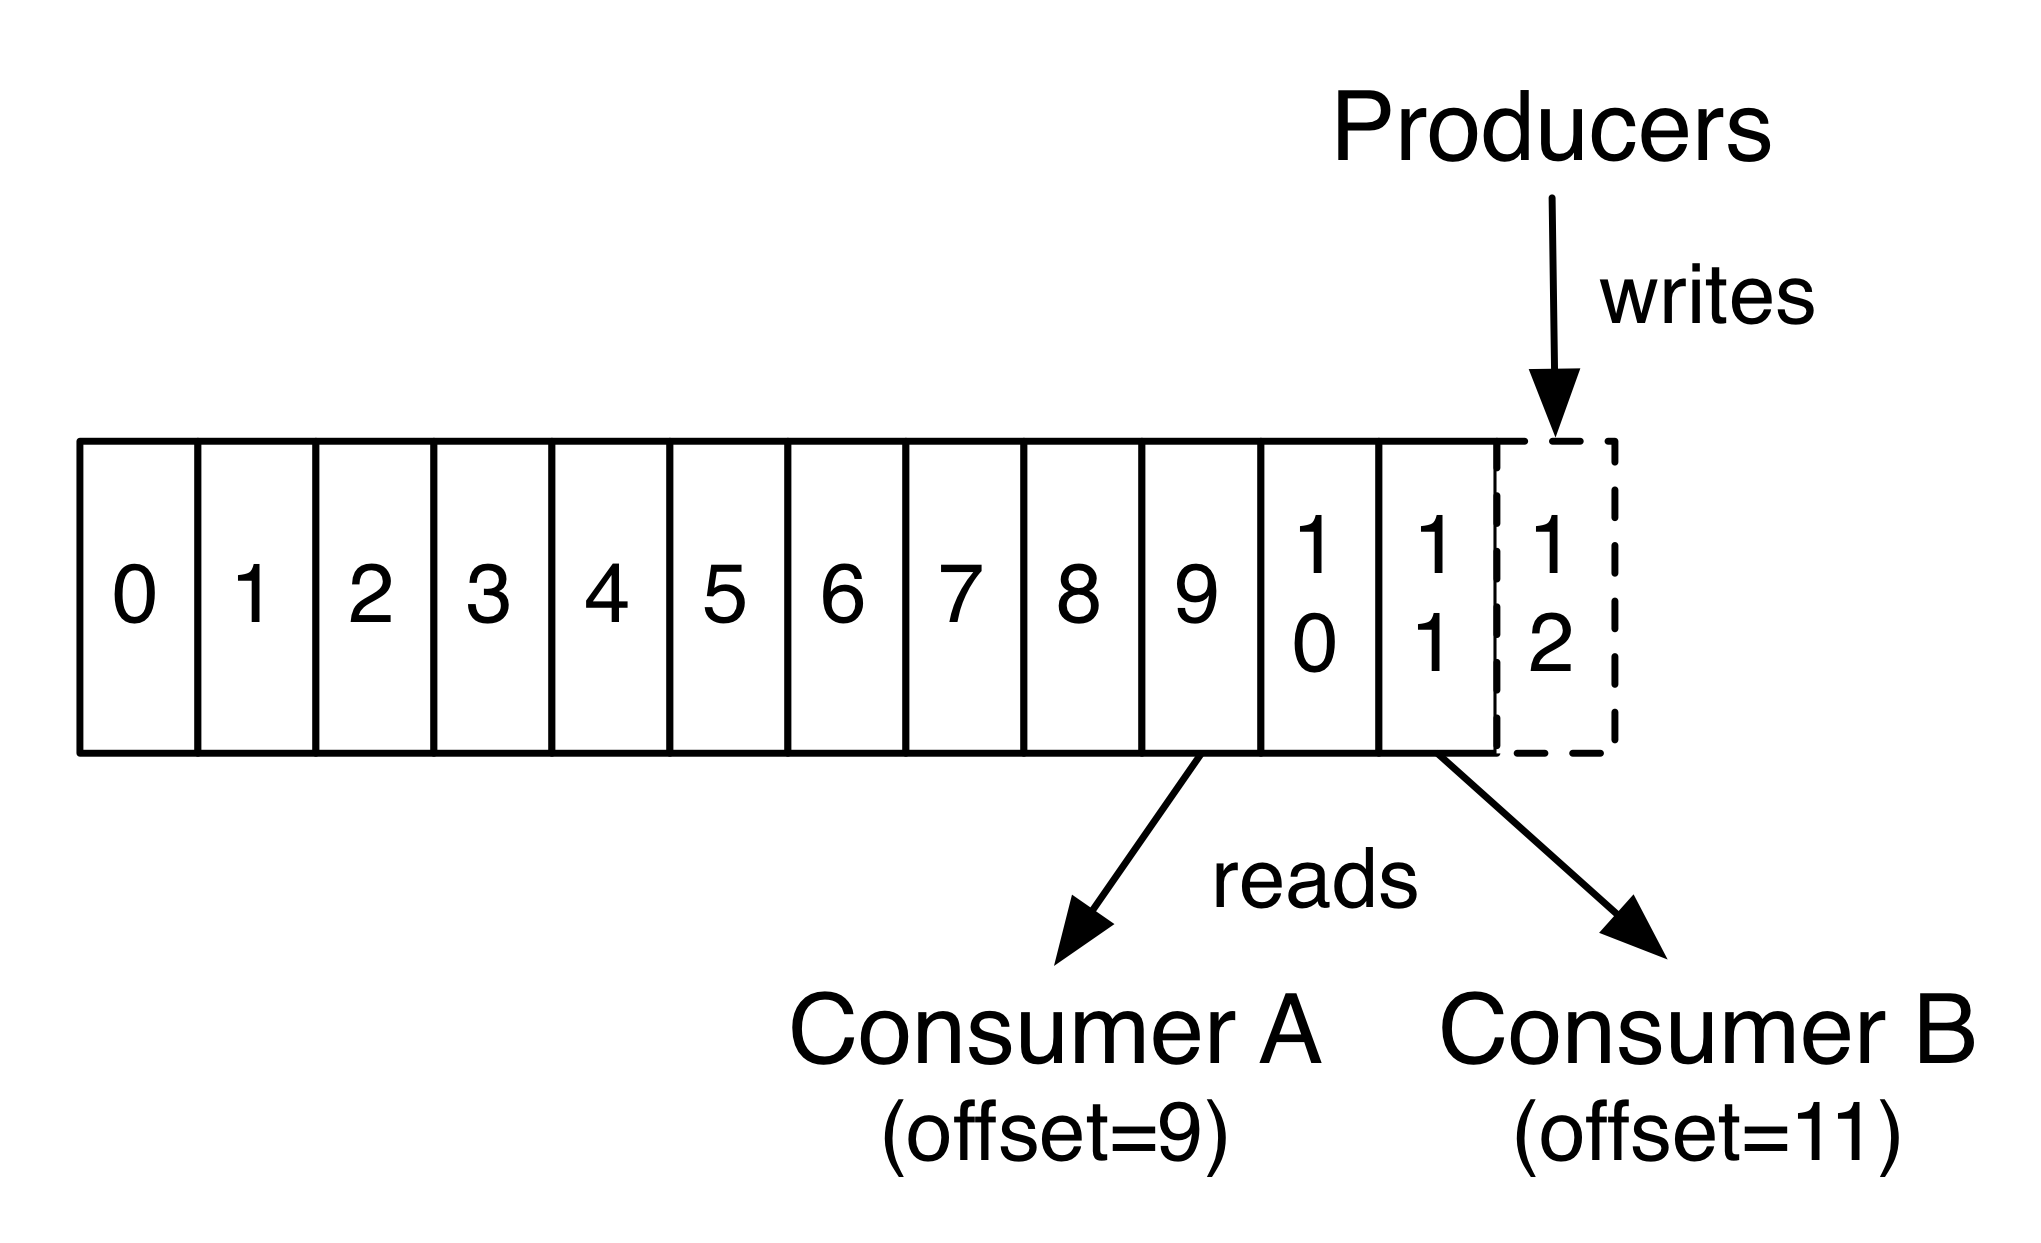
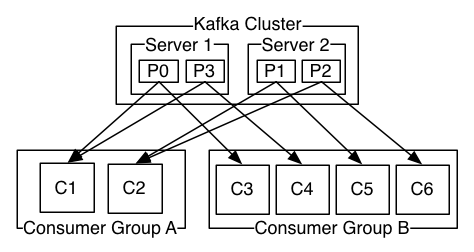
Kafka has four core APIs:
kafka.producer.SyncProducer and kafka.producer.async.AsyncProducer.1234567891011121314class Producer { /* Sends the data, partitioned by key to the topic using either the */ /* synchronous or the asynchronous producer */ public void send(kafka.javaapi.producer.ProducerData<K,V> producerData); /* Sends a list of data, partitioned by key to the topic using either */ /* the synchronous or the asynchronous producer */ public void send(java.util.List<kafka.javaapi.producer.ProducerData<K,V>> producerData); /* Closes the producer and cleans up */ public void close();}
can handle queueing/buffering of multiple producer requests and asynchronous dispatch of the batched datakafka.producer.Producer provides the ability to batch multiple produce requests (producer.type=async), before serializing and dispatching them to the appropriate kafka broker partition. The size of the batch can be controlled by a few config parameters. As events enter a queue, they are buffered in a queue, until either queue.time or batch.size is reached. A background thread (kafka.producer.async.ProducerSendThread) dequeues the batch of data and lets the kafka.producer.EventHandler serialize and send the data to the appropriate kafka broker partition. A custom event handler can be plugged in through the event.handler config parameter. At various stages of this producer queue pipeline, it is helpful to be able to inject callbacks, either for plugging in custom logging/tracing code or custom monitoring logic. This is possible by implementing the kafka.producer.async.CallbackHandler interface and setting callback.handlerconfig parameter to that class.
handles the serialization of data through a user-specified Encoder:
|
|
The default is the no-op kafka.serializer.DefaultEncoder
The routing decision is influenced by the kafka.producer.Partitioner.123interface Partitioner<T> { int partition(T key, int numPartitions);}
|
|
Broker Node Registry:1/brokers/ids/[0...N] --> {"jmx_port":...,"timestamp":...,"endpoints":[...],"host":...,"version":...,"port":...} (ephemeral node)
Broker Topic Registry:1/brokers/topics/[topic]/partitions/[0...N]/state --> {"controller_epoch":...,"leader":...,"version":...,"leader_epoch":...,"isr":[...]} (ephemeral node)
Consumer Id Registry:1/consumers/[group_id]/ids/[consumer_id] --> {"version":...,"subscription":{...:...},"pattern":...,"timestamp":...} (ephemeral node)
Consumer Offsets:1/consumers/[group_id]/offsets/[topic]/[partition_id] --> offset_counter_value ((persistent node)
Partition Owner registry:1/consumers/[group_id]/owners/[topic]/[partition_id] --> consumer_node_id (ephemeral node)
https://coreos.com/etcd/docs/latest/
https://coreos.com/etcd/docs/latest/api.html
https://coreos.com/etcd/docs/latest/libraries-and-tools.html
Installation Requirements:
Instructions:
客户端:client.go
etcdmain/main.go Main():123456789101112131415161718192021222324252627282930313233343536373839404142434445464748495051525354555657585960616263646566676869707172737475767778798081828384858687888990919293949596979899100101102103104105106107108109110111112113114115116117118119120121122123124125—> etcdmain/etcd.go startEtcdOrProxyV2(): —> etcdmain/config.go cfg := newConfig(): etcd初始化对象配置 —> etcdmain/config.go cfg.parse(Args[1:]): 解析etcd启动参数 —> etcdmain/etcd.go setupLogging(cfg) —> etcdmain/etcd.go which := identifyDataDirOrDie(cfg.Dir) 分析Dir参数,解析etcd启动方式,如果Dir参数为空,也会走下面2个分支 —> case dirMember: —> etcdmain/etcd.go startEtcd(&cfg.Config) —> embed/etcd.go e, err := embed.StartEtcd(cfg) 启动etcd服务 —> embed/config.go cfg.Validate() 验证config值 —> embed/etcd.go e.Peers := startPeerListeners(cfg) —> plns = make([]net.Listener, len(cfg.LPUrls)) —> for i, u := range cfg.LPUrls —> pkg/transport/listener.go tlscfg = cfg.PeerTLSInfo.ServerConfig() CA file config —> rafthttp/util.go plns[i] = rafthttp.NewListener(u, tlscfg) —> transport/timeout_listener.go transport.NewTimeoutListener(u.Host, u.Scheme, tlscfg, ConnReadTimeout, ConnWriteTimeout) —> pkg/transport/listener.go ln := newListener(u.Host, u.Scheme) —> unix_listener.go if (u.Scheme == “unix” | “unixs”) return NewUnixListener(u.Host) unix socket via unix://laddr —> dial.go else return net.Listen(“tcp”, u.Host) tcp socket —> transport/timeout_listener.go ln = &rwTimeoutListener{} —> pkg/transport/listener.go ln = wrapTLS(u.Host, u.Scheme, tlscfg, ln) —> tls.go tlscfg.NewListener(ln, tlscfg) 创建listener,该listener接受inner连接 tls:Transport Layer Security 传输层安全协议 —> embed/etcd.go e.sctxs := startClientListeners(cfg) —> if cfg.ClientAutoTLS && cfg.ClientTLSInfo.Empty() cfg.ClientTLSInfo = transport.SelfCert(path.Join(cfg.Dir, “fixtures/client"), cfg.LCurls) 配置tls信息 —> sctxs = make(map[string] *serveCtx) —> sctx.l = net.Listen(proto, cfg.LCurls) proto=“tcp|unix|unixs" 创建socket 进行listen —> sctx.l = transport.LimitListener(sctx.l, int(fdLimit - reservedInternalFDNum)) 设置listen limit上限值 —> pkg/transport/keepalive_listener.go sctx.l = transport.NewKeepAliveListener(sctx.l, “tcp”, cfg) 创建socket —> newTLSKeepaliveListener(sctx.l, cfg) —> e.Clients = append(e.Clients, e.sctxs.l) —> srvcfg := &etcdserver.ServerConfig{cfg} —> etcdserver/server.go e.Server = etcdserver.NewServer(srvcfg) —> store/store.go st := store.New(StoreClusterPrefix, StoreKeysPrefix) —> store/store.go s := newStore(namespaces ...) —> s := new(store) —> s.Root = newDir(s, “/“, s.CurrentIndex, Permanent) —> for namespace := range namespaces s.Root.Add(newDir(s, namespace, s.CurrentIndex, s.Root, Permanent)) —> s.Stats = newStats() —> s.WatcherHub = newWatchHub(1000) —> s.ttlKeyHeap = newTtlKeyHeap() —> s.readonlySet = types.NewUnsafeSet(append(namespaces, “/“) ...) —> s.clock = clockwork.NewRealClock() —> haveWAL := wal.Exist(cfg.WALDir()) —> ss := snap.New(cfg.SnapDir()) —> bepath := path.Join(cfg.SnapDir(), databaseFilename) —> mvcc/backend/backend.go be := backend.NewDefaultBackend(bepath) —> newBackend(bepath, defaultBatchInterval, defaultBatchLimit) —> db := bolt.Open(bepath, 0600, boltOpenOptions) —> b := &backend{} —> mvcc/backend/batch_tx.go b.batchTx = newBatchTx(b) —> tx := &batchTx{b} —> tx.Commit() —> go b.run() —> t := time.NewTimer(b.batchInterval) —> for —> select —> case <- t,C: —> case <- b.stopc: —> b.batchTx.CommitAndStop() —> b.batchTx.Commit() —> b.Reset(b.batchInterval) —> rafthttp/util.go prt := rafthttp.NewRoundTripper(cfg.PeerTLSInfo, cfg.peerDialTimeout()) —> pkg/transport/timeout_transport.go transport.NewTimoutTransport(cfg.PeerTLSInfo, cfg.peerDialTimeout()) —> tr := NewTransport(info, dialtimeoutd) —> tr.Dial =(&rwTimeoutDialer{}).Dial —> swith —> case !haveWAL && !cfg.NewCluster —> cfg.VerifyJoinExisting() —> cl = membership.NewClusterFromURLsMap(cfg.InitialClusterToken, cfg.InitialPeerURLsMap) —> existingCluster = GetClusterFromRemotePeers(getRemotePeerURLs(cl, cfg.Name), prt) —> membership.ValidateClusterAndAssignIDs(cl, existingCluster) —> isCompatibleWithCluster(cl, cl.MemberByName(cfg.Name).ID, prt) —> remotes = existingCluster.Members() —> cl.SetID(existingCluster.ID()) —> cl.SetStore(st) —> cl.SetBackend(be) —> cfg.Print() —> id, n, s, w = startNode(cfg, cl) —> case !haveWAL && cfg.NewCluster —> cfg.VerifyBootstrape() —> cl = membership.NewClusterFromURLsMap(cfg.InitialClusterToken, cfg.InitialPeerURLsMap) —> m := cl.MemberByName(cfg.Name) —> isMemberBootstrapped(cl, cfg.Name, prt, cfg.bootstrapTimeout()) —> if cfg.ShouldDiscover() —> str = discovery.JoinCluster(cfg.DiscoveryURL, cfg.DiscoveryProxy, m.ID, cfg.InitialPeerURLsMap.String()) —> urlsmap = types.NewURLsMap(str) —> checkDuplicateURL(urlsmap) —> cl = membership.NewClusterFromURLsMap(cfg.InitoalClusterToken, urlsmap) —> cl.SetStore(st) —> cl.SetBackend(be) —> cfg.PrintWithInitial() —> id, n, s, w = startNode(cfg, cl, cl.MemberIDs()) —> case haveWAL: —> fileutil.IsDirWriteable(cfg.MemberDir()) —> fileutil.IsDirWriteable(cfg.WALDir()) —> snapshot = ss.Load() —> st.Recovery(snapshot.Data) —> cfg.Print() —> if !cfg.ForceNewCluster —> id, cl, n, s, w = restartNode(cfg, snapshot) —> else —> id, cl, n, s, w = restartAsStandaloneNode(cfg, snapshot) —> cl.SetStore(st) —> cl.SetBackend(be) —> cl.Recover() —> sstats := &stats.ServerStats{} —> sstats.Initialize() —> lstats := stats.NewLeaderStats(id.String()) —> srv = &EtcdServer{} —> srv.applyV2 = &applierV2store{} —> srv.be = be —> srv.lessor = lease.NewLessor(srv.be) —> srv.kv = mvcc.New(src.be, srv.lessor, &srv.consistIndex) —> srv.consistIndex.setConsistentIndex(srv.kv.ConsistentIndex()) —> srv.authStore = auth.NewAuthStore(srv.be) —> h := cfg.AutoCompactionRetention —> srv.compactor = compactor.NewPeriodic(h, srv,kv, srv) —> tr := &rafthttp.Transport{} —> tr.Start() —> for m := range remotes tr.AddRemote(m.ID, m.PeerURLs) —> for m := range cl.Members() tr.AddPeer(m.ID, m.PeerURLs) —> srv.r.transport = tr —> etcdserver/server.go e.Server.Start() —> interrupt_unix.go osutil.RegisterInterruptHandler(e.Server.Stop) 向系统注册中断事件 —> case dirProxy: —> etcdmain/etcd.go startProxy(&cfg.Config)
1.源码下载:git clone https://github.com/apache/zookeeper.git1git checkout branch-3.4 (zookeeper版本选择3.4.8进行学习)
2.通过Eclipse新建一个Java project, 将project prosition 设置为source code download的位置,java project 创建成果之后,右键build.xml run as Ant build,会自动下载build project的jar包。
多个文件目录下都有build.xml文件,都可以尝试run as Ant build,下载build project所需要的jar包。
3.运行build.xml之后,jar包或许仍不完整,需要自己下载jar包,目录截图如下: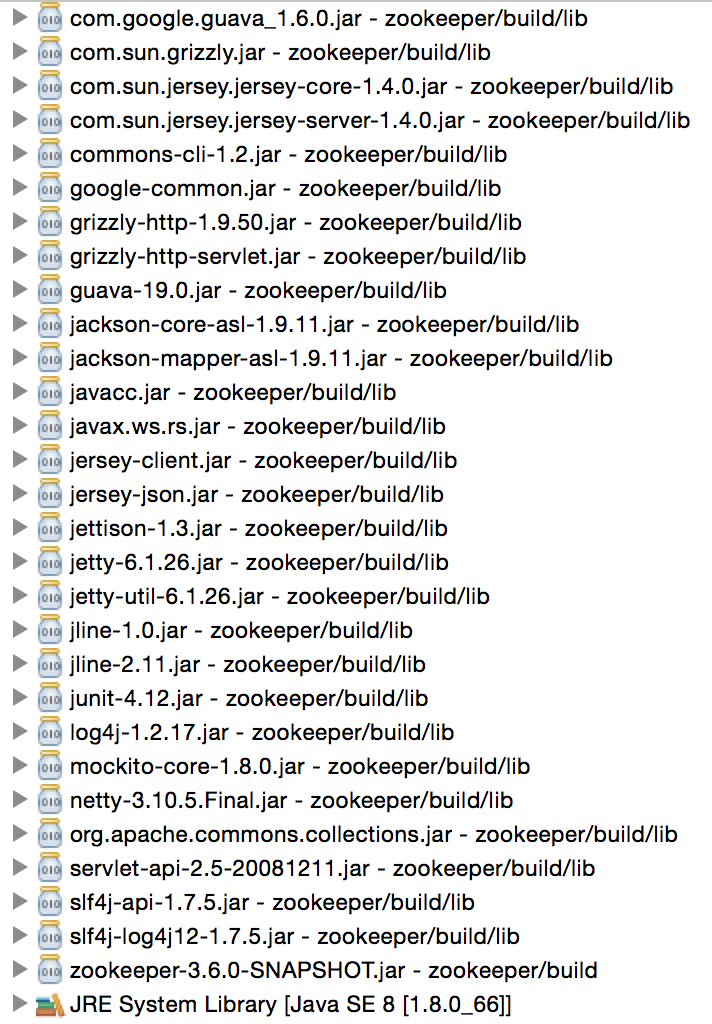
4.至此,zookeeper java工程的编译任务完成。
|
|
RestAPI源码入门:
RestAPI 入口main函数所在文件: org.apache.zookeeper.server.jersey.RestMain
ZooKeeper Source Code 解析:
1.zkServer 脚本启动命令:1234nohup "$JAVA" "-Dzookeeper.log.dir=${ZOO_LOG_DIR}" "-Dzookeeper.root.logger=${ZOO_LOG4J_PROP}" \-agentlib:jdwp=transport=dt_socket,server=y,suspend=y,address=7778 \ (此行是用作java remote debug使用的,是我后加的)-cp "$CLASSPATH" $JVMFLAGS $ZOOMAIN "$ZOOCFG" > "$_ZOO_DAEMON_OUT" 2>&1 < /dev/null & ZOOMAIN="-Dcom.sun.management.jmxremote -Dcom.sun.management.jmxremote.local.only=$JMXLOCALONLY org.apache.zookeeper.server.quorum.QuorumPeerMain"
2.zkCli 脚本启动命令:123"$JAVA" "-Dzookeeper.log.dir=${ZOO_LOG_DIR}" "-Dzookeeper.root.logger=${ZOO_LOG4J_PROP}" \ -cp "$CLASSPATH" $CLIENT_JVMFLAGS $JVMFLAGS \ org.apache.zookeeper.ZooKeeperMain "$@"
由上可知, ZooKeeper的server启动入口函数为 QuorumPeerMain ,而client的启动入口函数为 ZooKeeperMain。
main函数:123456789101112131415161718192021222324252627282930313233343536373839404142434445464748495051525354555657585960616263646566676869707172737475767778798081828384858687888990919293949596979899100101102103104105106107108109110111112113114115116117118119120121122123124125126127128129130131132133134135136137138139140141142143144145146147148149150151152153154155156157158159160161162163164165166167168169170171—> QuorumPeerMain main = new QuorumPeerMain()—> main.initializeAndRun(args) —> QuorumPeerConfig config = new QuorumPeerConfig() —> config.parse(args) —> parseProperties(cfg) —> DatadirCleanupManager purgeMgr = new DatadirCleanupManager(config) —> purgeMgr.start() —> timer = new Timer(“PurgeTask") —> TimerTask task = new PurgeTask(dataLogDir, snapDir) —> PurgeTxnLog.purge(dataLogDir, snapDir) —> timer.scheduleAtFixedRate(task) —> runFromConfig(config) —> ServerCnxnFactory cnxnFactory = ServerCnxnFactory.createFactory() NIOServerCnxnfactory —> cnxnFactory.configure —> thread = new ZooKeeperThread (Runnable) 参数Runnable是一个线程,传入的是cnxnFactory —> ServerSocketChannel.open() —> quorumPeer = new QuorumPeer() 是一个线程 —> quorumPeer.setZKDatabase (new ZKDatabase(quorumPeer.getTxnFactory()) ) —> new ZKDatabase() —> dataTree = new DataTree() —> quorumPeer.start() —> loadDataBase() —> zkDb.loadDataBase() —> zxid = snapLog.restore(dataTree, listener) —> processTransaction (hdr, dt, txnLog.itor) —> switch (hdr) —> OpCode.createSession —> dt.processTxn (itor.getTxn) —> switch (header.getType()) —> OpCode.create —> OpCode.delete —> OpCode.setData —> OpCode.setACL —> OpCode.closeSession —> OpCode.error —> OpCode.check —> OpCode.multi —> OpCode.closeSession —> dt.processTxn (itor.getTxn) —> currentEpoch = readLongFromFile(“currentEpoch") —> acceptedEpoch = readLongFromFile(“acceptEpoch") —> cnxnFactory.start() —> thread.start() —> startLeaderElection() —> super.start()NIOServerCnxnfactory.run() —> while (! ServerSockChannel.socket().isClosed()) —> selector.select(1000) —> selectedList = selector.selectedKeys() —> for (SelectedKey k : selectedList) —> if ( k.readyOps() & SelectionKey.OP_ACCEPT != 0) —> socketChannel = ((ServerSocketChannel) key.channel()).accept() —> NIOServerCnxn cnxn = createConnection(socketChannel, k) —> else if (k.readyOps() & (SelectionKey.OP_READ | SelectionKey.OP_WRITE) != 0) —> NIOServerCnxn cnxn = (NIOServerCnxn) k.attachment() —> cnxn.doIO(k) —> if (k.isReadable()) —> socketChannel.read (incomingBuffer) —> zkServer.processPacket (incomingBuffer) —> OpCode.auth 解析incomingBuffer,判断请求类型 —> OpCode.sasl —> req = new Request (incomingBuffer, ServerCnxn) —> processRequest(req) —> submittedRequest.add(req) —> if (k.isWritable()) —> if (outgoingBuffer.size() > 0) —> sockChannel.write(outgoingBuffer) —> selector.clear()quorumPeer.run() —> jmxQuorumBean = new QuorumBean(this) —> MBeanRegistry.getInstance().register(jmxQuorumBean) —> while (running) —> switch (peerState) —> case LOOKING: —> if (readOnly) —> roZk = new ReadOnlyZooKeeperServer (logFactory, this, new ZooKeeperServer.BasicDataTreeBuilder(), this.zkDb) —> roZkMgr = new Thread() —> roZkMgr.start() —> roZk.startup() —> registerJMX() —> startSessionTracker() —> setupRequestProcessors() —> state = RUNNING —> setBCVote —> setCurrentVote —> case OBSERVING: —> setObserver (makeObserver (logFactory) ) —> new ZooKeeperServer.BasicDataTreeBuilder() —> new ObserverZooKeeperServer(logFactory, zkDatabase) —> new Observer() —> observer.observeLeader() —> zk.registerJMX —> addr = findLeader() —> connectToLeader (addr) socket连接leader —> syncWithLeader() —> synchronized (zk) —> zk.getZKDatabase.deserializeSnapshot(leaderIs) —> while (self.isRunning()) —> readPacket(qp) —> processPacket(qp) —> switch (qp.getType()) —> case Leader.PING —> case Leader.PROPOSAL —> case Leader.COMMIT —> …... —> case FOLLOWING: —> setFollower( makeFollower(logFactory) ) —> follower.followLeader() —> connectToLeader() —> syncWithLeader() —> while (self.isRunning()) —> readPacket(qp) —> processPacket(qp) —> switch (qp.getType()) —> case Leader.PING —> case Leader.PROPOSAL —> case Leader.COMMIT —> …... —> case LEADING: —> setLeader ( makeLeader(logFactory) ) —> leader.lead() —> zk.registerJMX() —> cnxAccepter = new LearnerAcceptor() —> cnxAccepter.run() —> LearnerHandler.run() —> zk.setZxid(ZxidUtils.makeZxid(epoch)) —> startZkServer() —> zk.startup () —> CommitProcessor.run() 处理已完成的客户端请求 —> PrepRequestProcessor.run() 处理未完成客户端请求 —> while (true) —> request = submittedRequests.take() —> pRequest (request) —> switch (request.type) —> case OpCode.create: pRequest2Txn(处理所有的请求) —> case OpCode.delete: pRequest2Txn —> case OpCode.setData: pRequest2Txn —> case OpCode.setACL: pRequest2Txn —> case OpCode.check: pRequest2Txn —> case OpCode.multi: pRequest2Txn —> …... —> setLeader(null)QuorumPeer : public Follower follower; Follower extends Leader public Leader leader; public Observer observer; Obsearver extends Learnerclass Leader { final LeaderZooKeeperServer zk; final QuorumPeer self; private boolean quorumFormed = false; // the follower acceptor thread LearnerCnxAcceptor cnxAcceptor; // list of all the followers private final HashSet<LearnerHandler> learners = new HashSet<LearnerHandler>();}class Follower extends Learner{ private long lastQueued; // This is the same object as this.zk, but we cache the downcast op final FollowerZooKeeperServer fzk;}class Learner { QuorumPeer self; LearnerZooKeeperServer zk; protected BufferedOutputStream bufferedOutput; protected Socket sock; protected InputArchive leaderIs; protected OutputArchive leaderOs;}
=======================================================================
ZooKeeperMain解析源码:
main函数:123456789101112131415161718192021—> main = new ZooKeeperMain —> parseOptions (-server, -timeout, -readonly) —> connectToZk —> zk = new ZooKeeper —> new ConnectStringParser (属性:chrootPath, serverAddress) —> new StaticHostProvider (属性:serverAddress) —> getClientCnxnSocket (返回 ClientCnxnSocket的子类ClientCnxnSocketNIO对象 (属性:selector, sockKey) ) —> new ClientCnxn (参数:chrootPath, hostProvider, zookeeper, watchManager, clientCnxnSocket, 属性:authInfo, pendingQueue, outgoingQueue, zookeeper, clientWatchManager) —> SendThread (参数:ClientCnxnSocketNIO对象,属性:clientCnxnSocket, lastPingSentNs, isFirstConnect) —> EventThread (属性: waitingEvents, sessionState) —> ClientCnxn.start()—> main.run() —> processCmd (cl) —> processZKCmd (co) —> cmd equals create/delete/rmr/set/aget/get/ls/ls2/getAcl/setAcl/stat/listquota/setquota/delquota —> zk. create/delete/rmr/set/aget/get/ls/ls2/getAcl/setAcl/stat/listquota/setquota/delquota —> cnxn. submitRequest (request, response) —> queuePacket (request, response) —> synchronized (outgoingQueue) —> outgoingQueue.add ( new Packet(request, response) ) —> sendThread.getClientCnxnScoket().wakeupCnxn()
==============================================================================================================================
SendThred run函数:
属性: state: socket连接状态,isFirstConnect: socket连接是否为第一次初始化连接,zookeeerSaslClient: SASL用户认证机制123456789101112131415161718192021222324252627282930313233343536373839404142434445464748495051525354555657585960616263646566676869707172737475767778798081828384858687888990919293949596979899run —> while (state.isAlive) |—> if (! clientCnxnSocket.isConnected) | —> startConnect | —> state = CONNECTING | —> zookeeerSaslClient 认证 | —> ClientCnxnSocketNIO.connect | —> SocketChannel.register(selector, OP_CONNECT) | —> sock.connect(addr) | if (immediateConnect) | —> sendThread.primeConnection | —> new ConnectRequest(lastZxid) | —> synchronized (outgoingQueue) | if (! disabledAutoWatchReset) | —> 将zookeeper 的属性 dataWatches, existWatchs, childWatchs 组装成 SetWatchs (递增Zxid) | —> new RequestHeader (Xid=-8, OpCode.setWatches) | —> new Packet, 将requestHeader和setWatchs 一起组装成Packet | —> outgoingQueue.addFirst (packet) | for (id : authInfo) | —> outgoingQueue.addFirst (new Packet(new RequestHeader(Xid=-4, OpCode.auth), new AuthPacket(id.schema, id.data))) | outgoingQueue.addFirst (new Packet(ConnectRequest)) | clientCnxnSocket.enableReadWriteOnly() |—> if (state.isConnected) | —> if (zookeeperSaslClient != null) | —> if (zookeeperSaslClient.getSaslState == ZookeeperSaslClient.SaslState.INITIAL) | —> zookeeperSaslClient.initialize | —> if (zookeeperSaslClient.getKeeperState == KeeperState.AuthFailed) | —> state = States.AUTH_FAILED | —> sendAuthEvent = true | —> else if (zookeeperSaslClient.getKeeperState == KeeperState.SaslAuthenticated) | —> sendAuthEvent = true | —> if (sendAuthEvent == true) | —> eventThread.queueEvent (new WatchedEvent(Watcher.Event.EventType.None, zookeeperSaslClient.getKeeperState) ) |—> if (state.isConnected) | —> if (clientCnxnSocket.getIdleSend > MAX_SEND_PING_INTERVAL) | —> sendPing | —> queuePacket (new RequestHeader (Xid=-2, OpCode.ping) ) | —> synchronized (outgoingQueue) | —> new Packet (RequestHeader) | —> if (RequestHeader != OpCode.closeSession) | —> outgoingQueue.add(packet) | —> sendThread.getClientCnxnSocket().wakeupCnxn() |—> if (state == States.CONNECTEDREADONLY) | —> pingRwServer() | —> new Socket | —> new BufferedReader (new InputStreamReader(socket.getInputStream() ) ) | —> BufferedReader.readLine() |—> clientCnxnSocket.doTransport (pendingQueue, outgoingQueue) | —> synchronize (clientCnxnSocket) | —> selected = selector.selectedKeys() | —> for (SelectionKey key : selected) | —> if ((key.readyOps() & SelectionKey.OP_CONNECT) != 0) | —> if ((SocketChannel)key.channel().finishConnect() ) | —> sendThread.primeConnection | —> else if ((key.readyOps() & (SelectionKey.OP_READ | SelectionKey.OP_WRITE)) != 0) | —> doIO (pendingQueue, outgoingQueue) | —> socketChannel = socketKey.channel() | —> if (socketKey.isReadable()) | —> socketChannel.read(incomingBuffer) | —> if (! initialized) | —> readConnectResult() | —> ConnectResponse response = new ConnectResponse() | —> response.deserialize (BinaryInputArchive.getArchive(new ByteBufferInputStream(incomingBuffer)) , “connect") | —> sendThread.onConnectd(response.getTimeout, response.getSessionId, response.getPasswd) | —> eventThread.queueEvent(new WatchedEvent(Watcher.Event.EventType.None, eventState) ) | —> enableRead() | —> else | —> sendThread.readResponse(incomingBuffer) | —> ReplyHeader replyHeader = new ReplyHeader() | —> replyHeader.deserialize (BinaryInputArchive.getArchive(new ByteBufferInputStream(incomingBuffer)), “header") | —> if (replyHeader.getXid == -2) pings | —> debug | —> if (replyHeader.getXid == -4) AuthPacket | —> if (replyHeader.getErr() == KeeperException.Code.AUTHFAILED) | —> eventThread.queueEvent (new WatchedEvent(Watcher.Event.EventType.None, Watcher.Event.KeeperState.AuthFailed) ) | —> if (replyHeader.getXid == -1) notification | —> WatcherEvent event = new WatcherEvent() | —> event.deserialize(BinaryInputArchive.getArchive(new ByteBufferInputStream(incomingBuffer)), “response") | —> event.setPath (chrootPath) | —> WatchedEvent we = new WatchedEvent(event) | —> eventThread.queueEvent (we) | —> synchronized (pendingQueue) | —> packet = pendingQueue.remove() | —> packet.replyHeader.setXid/setErr/setZxid | —> finishPacket (packet) | —> eventThread.queuePacket(packet) | —> waitingEvents.add (packet) | —> if (socketKey.isWritable()) | —> Packet packet = findSendablePacket(outgoingQueue, cnxn.sendThread.clientTunneledAuthenticationInProgress) | —> packet.createBB byteBuffer | —> socketChannel.write(packet.bb) | —> outgoingQueue.removeFirstOccurrence(packet) | —> if (packet.hasRemaining) | —> synchronized (pendingQueue) | —> pendingQueue.add(packet) | —> if (sendThread.getZkState().isConnected) | —> synchronized (outgoingQueue) | —> if (findSendablePacket(outgoingQueue, cnxn.sendThread.clientTunneledAuthenticationInProgress()) != null ) | —> enableWrite()
==============================================================================================================================
EventThred run函数:
属性: waitingEvents1234567891011121314151617181920212223242526272829303132333435363738394041424344run —> isRunning = true —> while (true) —> event = waitingEvents.take() —> if (event == eventOfDeath) —> wasKilled = true —> else —> processEvent(event) —> if (event instanceof WatcherSetEventPair) —> for (Watcher watcher : ((WatcherSetEventPair)event).watchers ) —> watcher.process( ((WatcherSetEventPair)event).event ) —> else —> Packet p = (Packet) event —> if (p.response instanceof ExistsResponse || p.response instanceof SetDataResponse || p.response instanceof SetACLResponse) —> StatCallback cb = (StatCallback) p.cb —> cb.processResult ( clientPath, ((ExistsResponse/SetDataResponse/SetACLResponse) p.response).getStat ) —> decOutstanding () —> else if (p.response instanceof GetDataResponse) —> DataCallback cb = (DataCallback) p.cb —> GetDataResponse response = (GetDataResponse) p.response —> cb.processResult (clientPath, response.getData(), response.getStat()) —> else if (p.response instanceof GetACLResponse) —> ACLCallback cb = (ACLCallback) p.cb —> GetACLResponse response = (GetACLResponse) p.response —> cb.processResult (clientPath, response.getAcl(), response.getStat()) —> else if (p.response instanceof GetChildrenResponse) —> ChildrenCallback cb = (ChildrenCallback) p.cb —> GetChildrenResponse response = (GetChildrenResponse) p.response —> cb.processResult (clientPath, response.getChildren()) —> else if (p.response instanceof GetChildren2Response) —> Children2Callback cb = (Children2Callback) p.cb —> GetChildren2Response response = (GetChildren2Response) p.response —> cb.processResult (clientPath, response.getChildren()) —> else if (p.response instanceof CreateResponse) —> StringCallback cb = (StringCallback) p.cb —> CreateResponse response = (CreateResponse) p.response —> cb.processResult (clientPath, response.getPath()) —> else if (p.response instanceof MultiResponse) —> MultiCallback cb = (MultiCallback) p.cb —> MultiResponse response = (MultiResponse) p.response —> cb.processResult (clientPath, response.getResultList()) —> else if (p.cb instanceof VoidCallback) —> VoidCallback cb = (VoidCallback) p.cb —> cb.processResult (clientPath)
ClinetCnxn是核心函数:123456789101112131415161718192021222324252627282930313233343536373839404142434445464748495051525354555657585960616263646566676869707172737475767778798081828384858687888990919293949596979899100101102103104105106107108109110111112113114115116117118119120121122123124125126127128129130131132133134135136137138139140141142143144145146147148149150151152153154155156157158159160161162163164165166167168169170171172173174175176177178179180181182183184185186187188189190191192193194195196197198199200201202203204205206207208209210211212213214215216217218219220221222223224225226227228229230231232233234235236237238239240241242243244245246247248249250251252253254255256257258259260261262263264265266267268269270271272273274275276277278279280281282283284285286287288289290291292293294295296297298299300301302303304305306307308309310311312313314 public ClientCnxn(String chrootPath, HostProvider hostProvider, intsessionTimeout, ZooKeeper zooKeeper, ClientWatchManager watcher, ClientCnxnSocket clientCnxnSocket, long sessionId, byte[] sessionPasswd, boolean canBeReadOnly) { this.zooKeeper = zooKeeper; this.watcher = watcher; this.hostProvider = hostProvider; this.chrootPath = chrootPath; sendThread = new SendThread(clientCnxnSocket); eventThread = new EventThread(); } public enum States { CONNECTING, ASSOCIATING, CONNECTED, CONNECTEDREADONLY, CLOSED, AUTH_FAILED, NOT_CONNECTED; public boolean isAlive() { return this != CLOSED && this != AUTH_FAILED; } public boolean isConnected() { return this == CONNECTED || this == CONNECTEDREADONLY; } } Packet(RequestHeader requestHeader, ReplyHeader replyHeader, Record request, Record response, WatchRegistration watchRegistration, boolean readOnly) { this.requestHeader = requestHeader; this.replyHeader = replyHeader; this.request = request; this.response = response; this.readOnly = readOnly; this.watchRegistration = watchRegistration; } public DataTree() { /* Rather than fight it, let root have an alias */ nodes.put("", root); nodes.put(rootZookeeper, root); /** add the proc node and quota node */ root.addChild(procChildZookeeper); nodes.put(procZookeeper, procDataNode); procDataNode.addChild(quotaChildZookeeper); nodes.put(quotaZookeeper, quotaDataNode); } protected void pRequest2Txn(int type, long zxid, Request request, Record record, boolean deserialize) throws KeeperException, IOException, RequestProcessorException { request.hdr = new TxnHeader(request.sessionId, request.cxid, zxid, zks.getTime(), type); switch (type) { case OpCode.create: zks.sessionTracker.checkSession(request.sessionId, request.getOwner()); CreateRequest createRequest = (CreateRequest)record; if(deserialize) ByteBufferInputStream.byteBuffer2Record(request.request, createRequest); String path = createRequest.getPath(); int lastSlash = path.lastIndexOf('/'); if (lastSlash == -1 || path.indexOf('\0') != -1 || failCreate) { LOG.info("Invalid path " + path + " with session 0x" + Long.toHexString(request.sessionId)); throw new KeeperException.BadArgumentsException(path); } List<ACL> listACL = removeDuplicates(createRequest.getAcl()); if (!fixupACL(request.authInfo, listACL)) { throw new KeeperException.InvalidACLException(path); } String parentPath = path.substring(0, lastSlash); ChangeRecord parentRecord = getRecordForPath(parentPath); checkACL(zks, parentRecord.acl, ZooDefs.Perms.CREATE, request.authInfo); int parentCVersion = parentRecord.stat.getCversion(); CreateMode createMode = CreateMode.fromFlag(createRequest.getFlags()); if (createMode.isSequential()) { path = path + String.format(Locale.ENGLISH, "%010d", parentCVersion); } validatePath(path, request.sessionId); try { if (getRecordForPath(path) != null) { throw new KeeperException.NodeExistsException(path); } } catch (KeeperException.NoNodeException e) { // ignore this one } boolean ephemeralParent = parentRecord.stat.getEphemeralOwner() != 0; if (ephemeralParent) { throw new KeeperException.NoChildrenForEphemeralsException(path); } int newCversion = parentRecord.stat.getCversion()+1; request.txn = new CreateTxn(path, createRequest.getData(), listACL, createMode.isEphemeral(), newCversion); StatPersisted s = new StatPersisted(); if (createMode.isEphemeral()) { s.setEphemeralOwner(request.sessionId); } parentRecord = parentRecord.duplicate(request.hdr.getZxid()); parentRecord.childCount++; parentRecord.stat.setCversion(newCversion); addChangeRecord(parentRecord); addChangeRecord(new ChangeRecord(request.hdr.getZxid(), path, s, 0, listACL)); break; case OpCode.delete: zks.sessionTracker.checkSession(request.sessionId, request.getOwner()); DeleteRequest deleteRequest = (DeleteRequest)record; if(deserialize) ByteBufferInputStream.byteBuffer2Record(request.request, deleteRequest); path = deleteRequest.getPath(); lastSlash = path.lastIndexOf('/'); if (lastSlash == -1 || path.indexOf('\0') != -1 || zks.getZKDatabase().isSpecialPath(path)) { throw new KeeperException.BadArgumentsException(path); } parentPath = path.substring(0, lastSlash); parentRecord = getRecordForPath(parentPath); ChangeRecord nodeRecord = getRecordForPath(path); checkACL(zks, parentRecord.acl, ZooDefs.Perms.DELETE, request.authInfo); int version = deleteRequest.getVersion(); if (version != -1 && nodeRecord.stat.getVersion() != version) { throw new KeeperException.BadVersionException(path); } if (nodeRecord.childCount > 0) { throw new KeeperException.NotEmptyException(path); } request.txn = new DeleteTxn(path); parentRecord = parentRecord.duplicate(request.hdr.getZxid()); parentRecord.childCount--; addChangeRecord(parentRecord); addChangeRecord(new ChangeRecord(request.hdr.getZxid(), path, null, -1, null)); break; case OpCode.setData: zks.sessionTracker.checkSession(request.sessionId, request.getOwner()); SetDataRequest setDataRequest = (SetDataRequest)record; if(deserialize) ByteBufferInputStream.byteBuffer2Record(request.request, setDataRequest); path = setDataRequest.getPath(); validatePath(path, request.sessionId); nodeRecord = getRecordForPath(path); checkACL(zks, nodeRecord.acl, ZooDefs.Perms.WRITE, request.authInfo); version = setDataRequest.getVersion(); int currentVersion = nodeRecord.stat.getVersion(); if (version != -1 && version != currentVersion) { throw new KeeperException.BadVersionException(path); } version = currentVersion + 1; request.txn = new SetDataTxn(path, setDataRequest.getData(), version); nodeRecord = nodeRecord.duplicate(request.hdr.getZxid()); nodeRecord.stat.setVersion(version); addChangeRecord(nodeRecord); break; case OpCode.setACL: zks.sessionTracker.checkSession(request.sessionId, request.getOwner()); SetACLRequest setAclRequest = (SetACLRequest)record; if(deserialize) ByteBufferInputStream.byteBuffer2Record(request.request, setAclRequest); path = setAclRequest.getPath(); validatePath(path, request.sessionId); listACL = removeDuplicates(setAclRequest.getAcl()); if (!fixupACL(request.authInfo, listACL)) { throw new KeeperException.InvalidACLException(path); } nodeRecord = getRecordForPath(path); checkACL(zks, nodeRecord.acl, ZooDefs.Perms.ADMIN, request.authInfo); version = setAclRequest.getVersion(); currentVersion = nodeRecord.stat.getAversion(); if (version != -1 && version != currentVersion) { throw new KeeperException.BadVersionException(path); } version = currentVersion + 1; request.txn = new SetACLTxn(path, listACL, version); nodeRecord = nodeRecord.duplicate(request.hdr.getZxid()); nodeRecord.stat.setAversion(version); addChangeRecord(nodeRecord); break; case OpCode.createSession: request.request.rewind(); int to = request.request.getInt(); request.txn = new CreateSessionTxn(to); request.request.rewind(); zks.sessionTracker.addSession(request.sessionId, to); zks.setOwner(request.sessionId, request.getOwner()); break; case OpCode.closeSession: // We don't want to do this check since the session expiration thread // queues up this operation without being the session owner. // this request is the last of the session so it should be ok //zks.sessionTracker.checkSession(request.sessionId, request.getOwner()); HashSet<String> es = zks.getZKDatabase() .getEphemerals(request.sessionId); synchronized (zks.outstandingChanges) { for (ChangeRecord c : zks.outstandingChanges) { if (c.stat == null) { // Doing a delete es.remove(c.path); } else if (c.stat.getEphemeralOwner() == request.sessionId) { es.add(c.path); } } for (String path2Delete : es) { addChangeRecord(new ChangeRecord(request.hdr.getZxid(), path2Delete, null, 0, null)); } zks.sessionTracker.setSessionClosing(request.sessionId); } LOG.info("Processed session termination for sessionid: 0x" + Long.toHexString(request.sessionId)); break; case OpCode.check: zks.sessionTracker.checkSession(request.sessionId, request.getOwner()); CheckVersionRequest checkVersionRequest = (CheckVersionRequest)record; if(deserialize) ByteBufferInputStream.byteBuffer2Record(request.request, checkVersionRequest); path = checkVersionRequest.getPath(); validatePath(path, request.sessionId); nodeRecord = getRecordForPath(path); checkACL(zks, nodeRecord.acl, ZooDefs.Perms.READ, request.authInfo); version = checkVersionRequest.getVersion(); currentVersion = nodeRecord.stat.getVersion(); if (version != -1 && version != currentVersion) { throw new KeeperException.BadVersionException(path); } version = currentVersion + 1; request.txn = new CheckVersionTxn(path, version); break; } } protected void processPacket(QuorumPacket qp) throws IOException{ switch (qp.getType()) { case Leader.PING: ping(qp); break; case Leader.PROPOSAL: LOG.warn("Ignoring proposal"); break; case Leader.COMMIT: LOG.warn("Ignoring commit"); break; case Leader.UPTODATE: LOG.error("Received an UPTODATE message after Observer started"); break; case Leader.REVALIDATE: revalidate(qp); break; case Leader.SYNC: ((ObserverZooKeeperServer)zk).sync(); break; case Leader.INFORM: TxnHeader hdr = new TxnHeader(); Record txn = SerializeUtils.deserializeTxn(qp.getData(), hdr); Request request = new Request (null, hdr.getClientId(), hdr.getCxid(), hdr.getType(), null, null); request.txn = txn; request.hdr = hdr; ObserverZooKeeperServer obs = (ObserverZooKeeperServer)zk; obs.commitRequest(request); break; } }switch (packetType) { case DIFF: return "DIFF"; case TRUNC: return "TRUNC"; case SNAP: return "SNAP"; case OBSERVERINFO: return "OBSERVERINFO"; case NEWLEADER: return "NEWLEADER"; case FOLLOWERINFO: return "FOLLOWERINFO"; case UPTODATE: return "UPTODATE"; case LEADERINFO: return "LEADERINFO"; case ACKEPOCH: return "ACKEPOCH"; case REQUEST: return "REQUEST"; case PROPOSAL: return "PROPOSAL"; case ACK: return "ACK"; case COMMIT: return "COMMIT"; case PING: return "PING"; case REVALIDATE: return "REVALIDATE"; case SYNC: return "SYNC"; case INFORM: return "INFORM"; default: return "UNKNOWN"; } }
ZooKeeper 服务: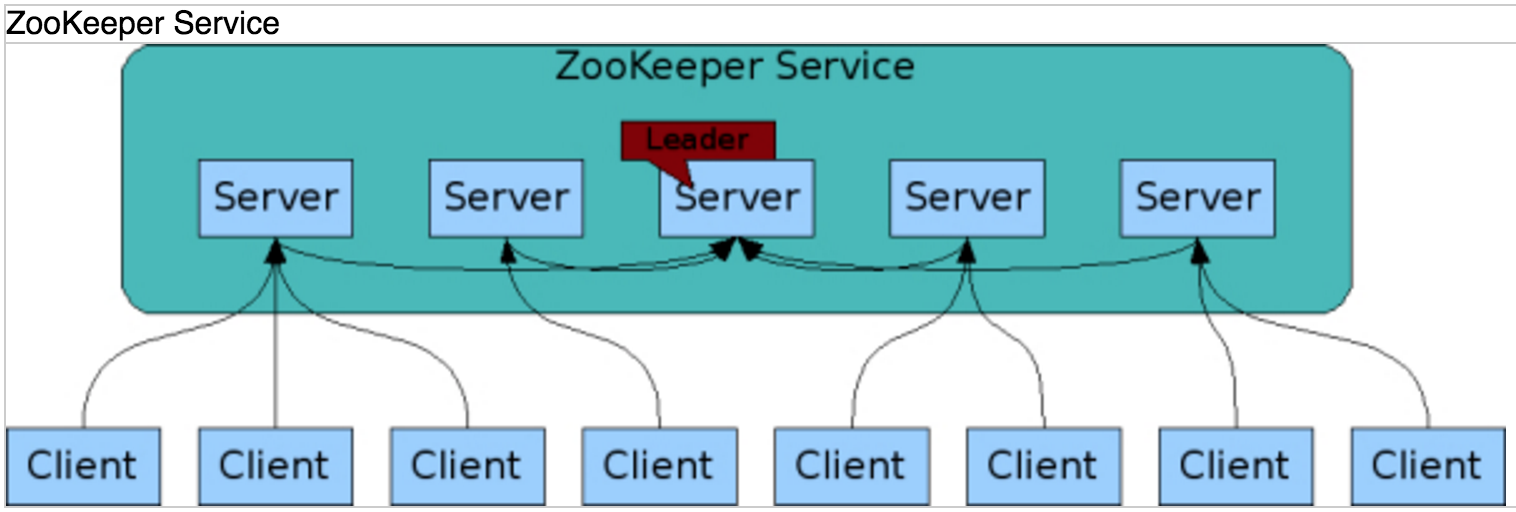
ZooKeeper 名字空间: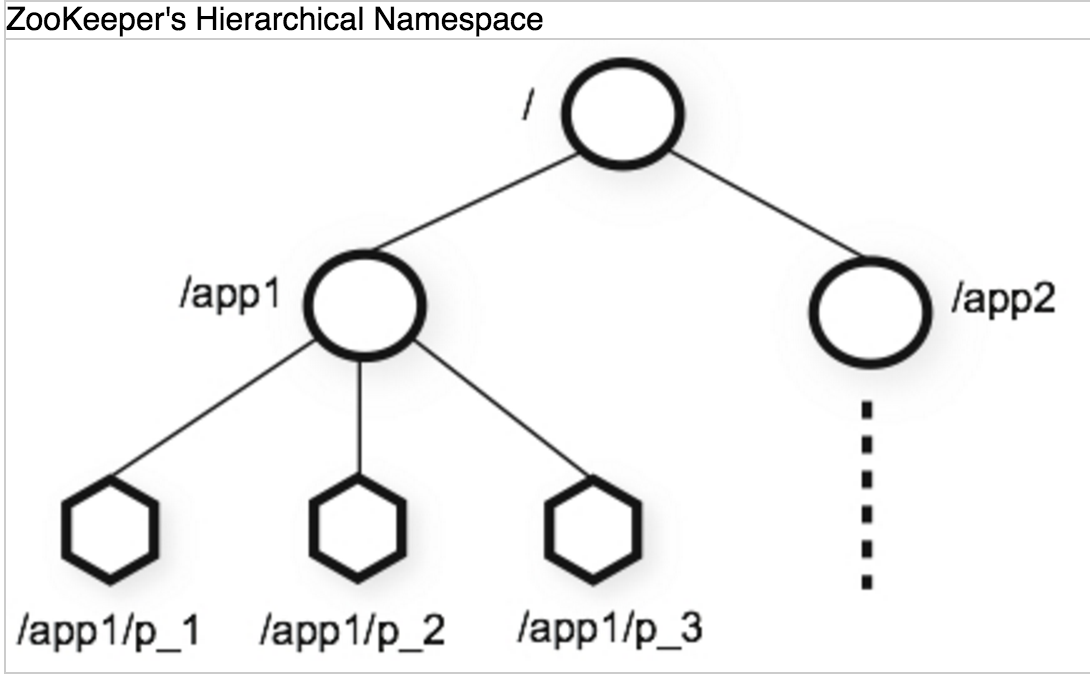
《ZooKeeper分布式过程协同技术详解》
wiki: https://en.wikipedia.org/wiki/Paxos_(computer_science)
ZooKeeper API:
1.create /path data
2.delete /path
3.exists /path
4.setData /path data
5.getData /path
6.getChildren /path
ZooKeeper服务器的两种工作模式: 独立模式(standalone)和仲裁模式(quorum)
独立模式(standalone): 单独的ZooKeeper服务器。
仲裁模式(quorum): ZooKeeper集合(ZooKeeper ensemble)。 仲裁模式中,为减少ZooKeeper Server数据同步的延迟,法定人数 的概念被使用,法定人数的大小设置非常重要。
仲裁模式试验:
configure 文件:
z1.cfg12345678tickTime=2000initLimit=10syncLimit=5dataDir=/root/zookeeper-3.4.8/conf/z1/dataclientPort=2181server.1=127.0.0.1:2222:2223server.2=127.0.0.1:3333:3334server.3=127.0.0.1:4444:4445
z2.cfg12345678tickTime=2000initLimit=10syncLimit=5dataDir=/root/zookeeper-3.4.8/conf/z2/dataclientPort=2182server.1=127.0.0.1:2222:2223server.2=127.0.0.1:3333:3334server.3=127.0.0.1:4444:4445
z3.cfg12345678tickTime=2000initLimit=10syncLimit=5dataDir=/root/zookeeper-3.4.8/conf/z3/dataclientPort=2183server.1=127.0.0.1:2222:2223server.2=127.0.0.1:3333:3334server.3=127.0.0.1:4444:4445
启动3个节点命令:123/root/zookeeper-3.4.8/bin/zkServer.sh start z1/z1.cfg/root/zookeeper-3.4.8/bin/zkServer.sh start z2/z2.cfg/root/zookeeper-3.4.8/bin/zkServer.sh start z3/z3.cfg
连接集群:1/bin/zkCli.sh -server 127.0.0.1:2181,127.0.0.1:2182,127.0.0.1:2183
创建 ephemeral 节点:1create -e /master "master.example.com"
创建 sequential 节点:1create -s /master/task- “cmd"
WatchedEvent 数据结构包含以下信息:12345678ZooKeeper会话状态(KeeperState):Disconnected, SyncConnected, AuthFailed, ConnectedReadOnly, SaslAuthenticated, Expired.事件类型(EventType):NodeCreated, NodeDeleted, NodeDataChanged, NodeChildrenChanged, None.如果事件类型不是None时,返回一个znode路径.Watch监视点设置:NodeCreated:通过exists调用设置监视点。NodeDeleted:通过exists或getData调用设置监视点。NodeDataChanged:通过exists或getData调用设置监视点。NodeChildrenChanged:通过getChildren调用设置监视点。
Spark 这一大数据分析框架,包含了:
参考: http://spark.apache.org/docs/latest/streaming-programming-guide.html
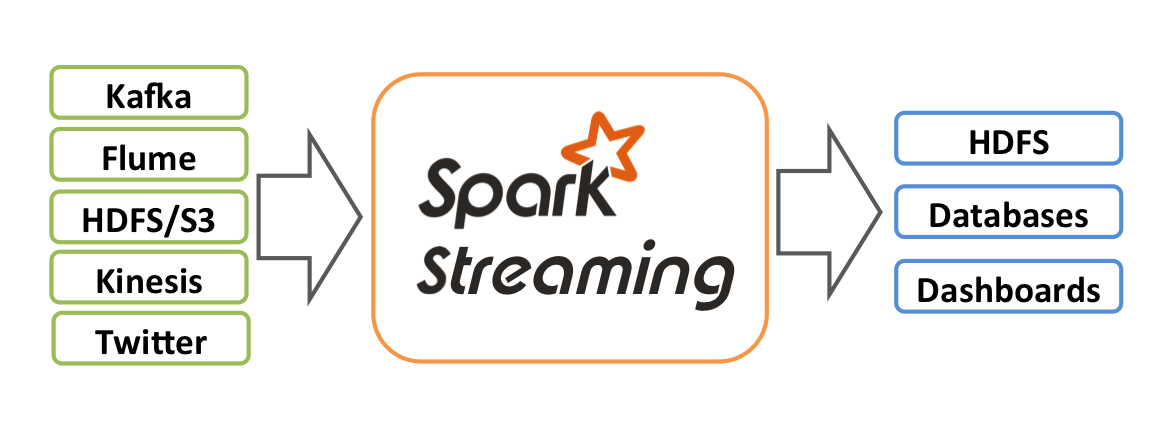

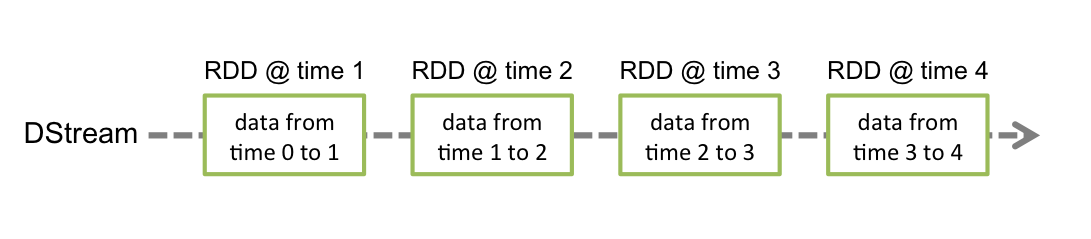
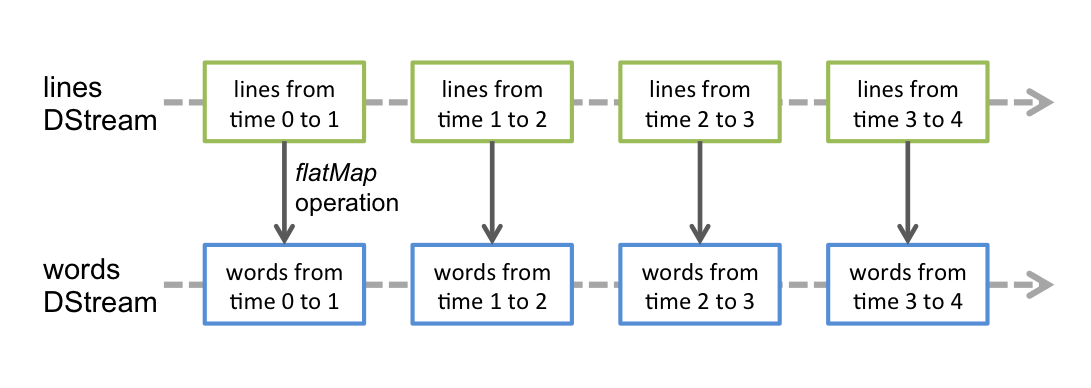
StreamingContext:1234567import org.apache.spark._import org.apache.spark.streaming._import org.apache.spark.streaming.StreamingContext._ // not necessary since Spark 1.3// Create a local StreamingContext with two working thread and batch interval of 1 second.// The master requires 2 cores to prevent from a starvation scenario.val conf = new SparkConf().setMaster("local[2]").setAppName("NetworkWordCount")val ssc = new StreamingContext(conf, Seconds(1))
socket:123456789101112// Create a DStream that will connect to hostname:port, like localhost:9999val lines = ssc.socketTextStream("localhost", 9999)// Split each line into wordsval words = lines.flatMap(_.split(" "))import org.apache.spark.streaming.StreamingContext._ // not necessary since Spark 1.3// Count each word in each batchval pairs = words.map(word => (word, 1))val wordCounts = pairs.reduceByKey(_ + _)// Print the first ten elements of each RDD generated in this DStream to the consolewordCounts.print()ssc.start() // Start the computationssc.awaitTermination() // Wait for the computation to terminate
往9999端口里面输入:12$ nc -lk 9999$ ./bin/run-example streaming.NetworkWordCount localhost 9999
参考: http://spark.apache.org/docs/latest/graphx-programming-guide.html

|
|
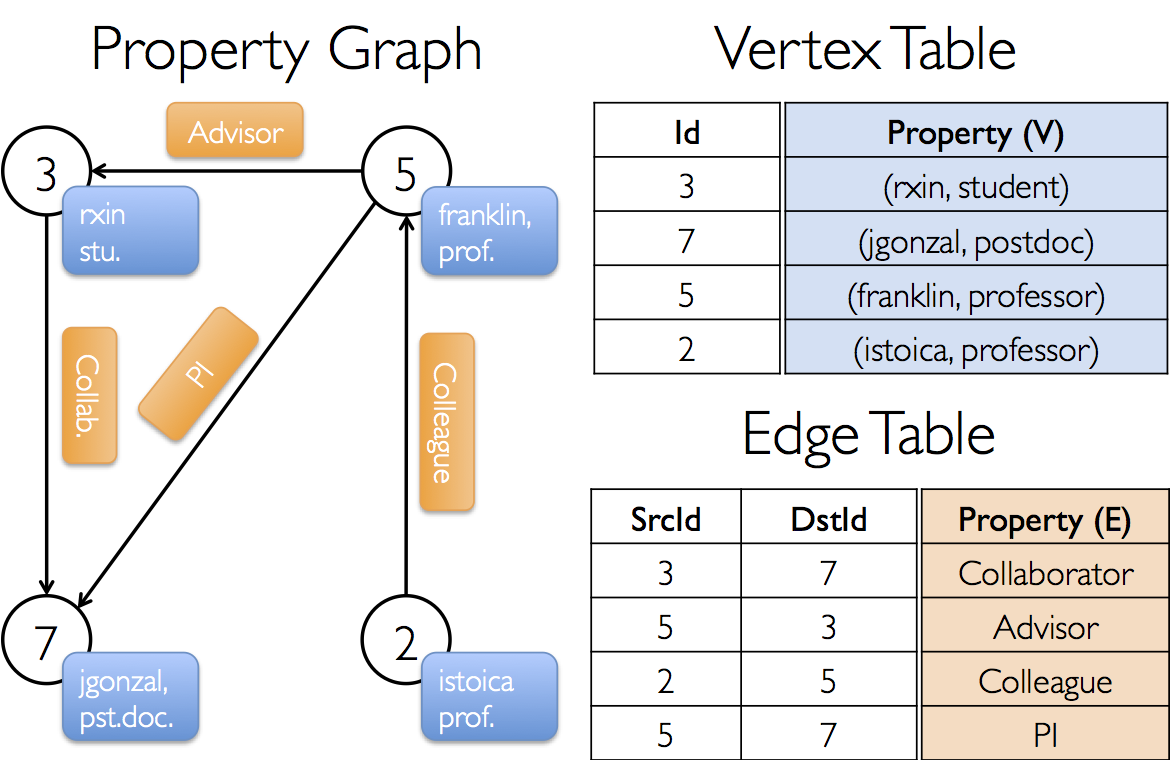
构建graph的代码:1234567891011121314151617181920212223242526272829val userGraph: Graph[(String, String), String]// Assume the SparkContext has already been constructedval sc: SparkContext// Create an RDD for the verticesval users: RDD[(VertexId, (String, String))] = sc.parallelize(Array((3L, ("rxin", "student")), (7L, ("jgonzal", "postdoc")), (5L, ("franklin", "prof")), (2L, ("istoica", "prof"))))// Create an RDD for edgesval relationships: RDD[Edge[String]] = sc.parallelize(Array(Edge(3L, 7L, "collab"), Edge(5L, 3L, "advisor"), Edge(2L, 5L, "colleague"), Edge(5L, 7L, "pi")))// Define a default user in case there are relationship with missing userval defaultUser = ("John Doe", "Missing")// Build the initial Graphval graph = Graph(users, relationships, defaultUser)val graph: Graph[(String, String), String] // Constructed from above// Count all users which are postdocsgraph.vertices.filter { case (id, (name, pos)) => pos == "postdoc" }.count// Count all the edges where src > dstgraph.edges.filter(e => e.srcId > e.dstId).countgraph.edges.filter { case Edge(src, dst, prop) => src > dst }.countval graph: Graph[(String, String), String] // Constructed from above// Use the triplets view to create an RDD of facts.val facts: RDD[String] = graph.triplets.map(triplet => triplet.srcAttr._1 + " is the " + triplet.attr + " of " + triplet.dstAttr._1)facts.collect.foreach(println(_))
Graph Operators:123val graph: Graph[(String, String), String]// Use the implicit GraphOps.inDegrees operatorval inDegrees: VertexRDD[Int] = graph.inDegrees
Shortest Path:12345678910111213141516171819202122import org.apache.spark.graphx.{Graph, VertexId}import org.apache.spark.graphx.util.GraphGenerators// A graph with edge attributes containing distancesval graph: Graph[Long, Double] = GraphGenerators.logNormalGraph(sc, numVertices = 100).mapEdges(e => e.attr.toDouble)val sourceId: VertexId = 42 // The ultimate source// Initialize the graph such that all vertices except the root have distance infinity.val initialGraph = graph.mapVertices((id, _) => if (id == sourceId) 0.0 else Double.PositiveInfinity)val sssp = initialGraph.pregel(Double.PositiveInfinity)( (id, dist, newDist) => math.min(dist, newDist), // Vertex Program triplet => { // Send Message if (triplet.srcAttr + triplet.attr < triplet.dstAttr) { Iterator((triplet.dstId, triplet.srcAttr + triplet.attr)) } else { Iterator.empty } }, (a, b) => math.min(a, b) // Merge Message)println(sssp.vertices.collect.mkString("\n"))
参考: http://spark.apache.org/docs/latest/sql-programming-guide.html
|
|
Running the Thrift JDBC/ODBC server:123456./sbin/start-thriftserver.shexport HIVE_SERVER2_THRIFT_PORT=<listening-port>export HIVE_SERVER2_THRIFT_BIND_HOST=<listening-host>./sbin/start-thriftserver.sh \ --master <master-uri> \ ...
Running the Spark SQL CLI:1./bin/spark-sql